RGB-Matrix-P3-64x64 GIF
Tutorial on setting up the RGB Matrix P3 64X64 Panel with the Raspberry Pi Pico
Introduction
I wanted a panel to display GIFs for decoration purpose and came accross these RGB Matrix panels from Waveshare.
The RGB Matrix panel is great for DIY Project with many great features:
- 4096 individual RGB LEDs, full-color display, adjustable brightness.
- 64 × 64 pixels, 3mm pitch, allows displaying text, colorful images, or animation.
- 192 × 192mm dimensions, moderate size, suitable for DIY desktop display or wall mount display.
- Onboard two HUB75 headers, one for controller data input, one for output, and chain support.
- Comes with online open-source development resources and tutorials, for use with Raspberry Pi, Arduino, and so on.
Required Hardware
- Waveshare RGB Matrix P3 64×64 (HUB75)
- Raspberry Pi Pico or Pico W
- 5V Power supply (3A recommended)
- Level shifter (optional but recommended for long-term use)
- Jumper wires
- USB cable for programming
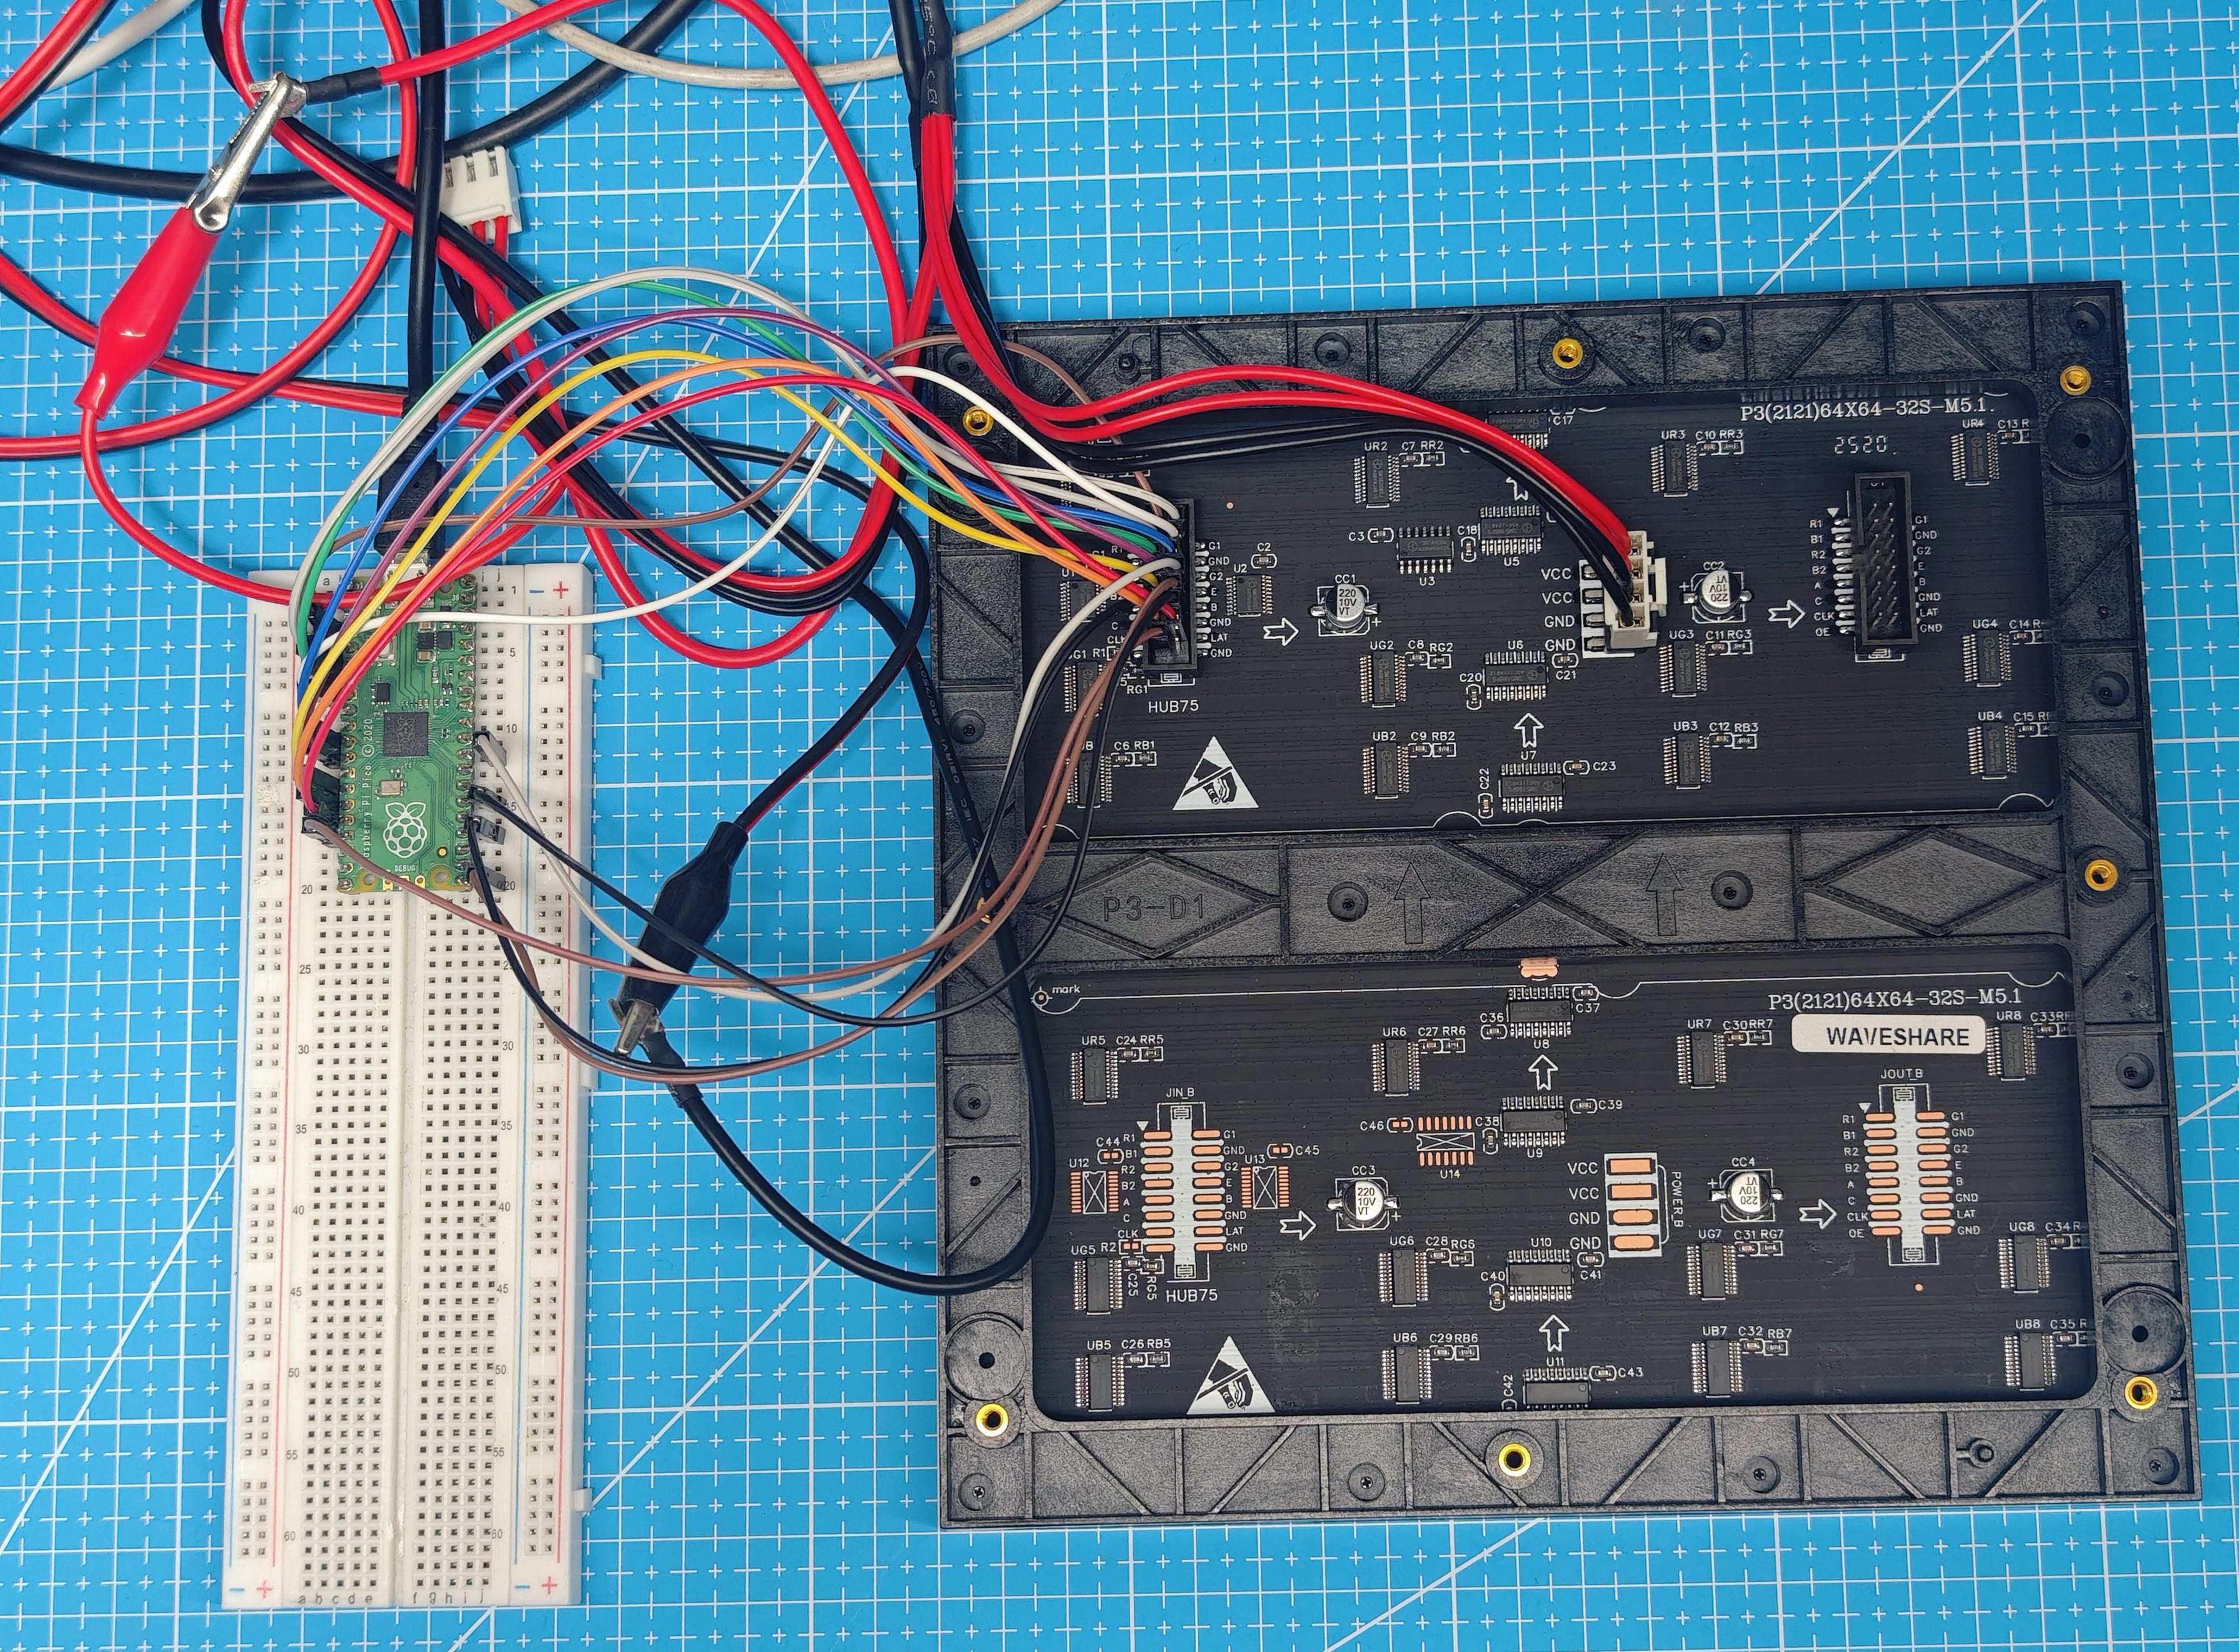
Schematic
Make all the necessary connections as indicated in the following Figure.
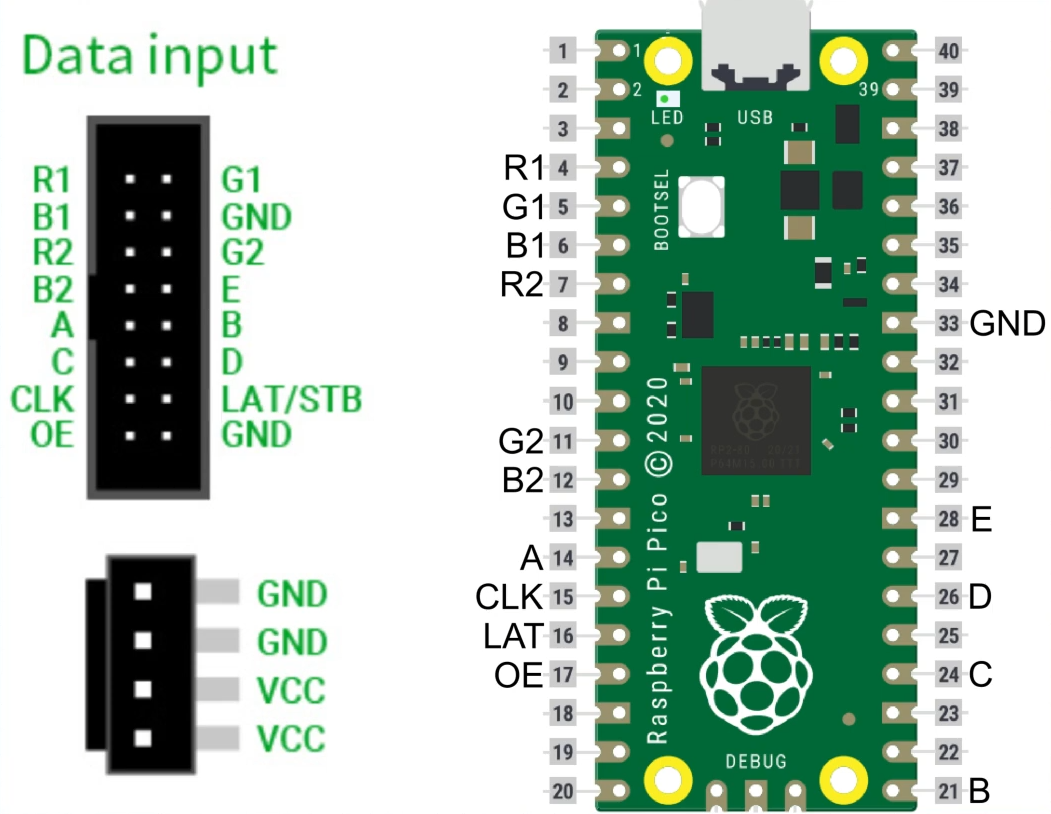
The panel will need to be powered by a 5V external supply
Setup
Download the demo code.
Flash Pico
In the project file flash the Pico with the CircuitPython uf2 file provided.
Libraries and Code
Copy everything in the folder 2-Code and paste it in the CIRCUIPY which will show as a mass storage device and replace everything when prompted
Multiple Images Display
###############################################
# 64×64 WAVESHARE RGB PANEL ANIMATION PLAYER  #
# NO BUTTON VERSION                           #
###############################################

import time
import os
import board
import displayio
import framebufferio
import rgbmatrix


displayio.release_displays()


bit_depth_value = 2
unit_width = 64
unit_height = 64

matrix = rgbmatrix.RGBMatrix(
    width = unit_width,
    height = unit_height,
    bit_depth = bit_depth_value,
    rgb_pins = [board.GP2, board.GP3, board.GP4, board.GP5, board.GP8, board.GP9],
    addr_pins = [board.GP10, board.GP16, board.GP18, board.GP20, board.GP22],
    clock_pin = board.GP11,
    latch_pin = board.GP12,
    output_enable_pin = board.GP13,
    tile = 1,
    serpentine = True,
    doublebuffer = True,
)

DISPLAY = framebufferio.FramebufferDisplay(matrix, auto_refresh=True)


SPRITESHEET_FOLDER = "/bmps"
DEFAULT_FRAME_DURATION = 0.1    # seconds
AUTO_ADVANCE_LOOPS = 3          # how many loops per animation before switching

FRAME_DURATION_OVERRIDES = {
    "1.bmp": 0.15,
    "2.bmp": 0.05,
    "3.bmp": 0.03,
}


file_list = sorted(
    f for f in os.listdir(SPRITESHEET_FOLDER)
    if f.endswith(".bmp") and not f.startswith(".")
)

if not file_list:
    raise RuntimeError("No BMP files found in /bmps")

current_image = None
current_frame = 0
current_loop = 0
frame_count = 0
frame_duration = DEFAULT_FRAME_DURATION


sprite_group = displayio.Group()


def load_image():
    global current_frame, current_loop, frame_count, frame_duration

    while len(sprite_group):
        sprite_group.pop()

    filename = SPRITESHEET_FOLDER + "/" + file_list[current_image]
    bitmap = displayio.OnDiskBitmap(open(filename, "rb"))

    FRAME_HEIGHT = 64  # required per-frame height for 64×64

    sprite = displayio.TileGrid(
        bitmap,
        pixel_shader=getattr(bitmap, "pixel_shader", displayio.ColorConverter()),
        width=1,
        height=1,
        tile_width=bitmap.width,
        tile_height=FRAME_HEIGHT,
    )

    sprite_group.append(sprite)
    DISPLAY.show(sprite_group)

    current_frame = 0
    current_loop = 0
    frame_count = bitmap.height // FRAME_HEIGHT

    frame_duration = FRAME_DURATION_OVERRIDES.get(
        file_list[current_image], DEFAULT_FRAME_DURATION
    )


def advance_image():
    global current_image

    if current_image is None:
        current_image = 0
    else:
        current_image += 1

    if current_image >= len(file_list):
        current_image = 0

    load_image()


def advance_frame():
    global current_frame, current_loop

    current_frame += 1

    if current_frame >= frame_count:
        current_frame = 0
        current_loop += 1

    sprite_group[0][0] = current_frame


advance_image()


while True:

    # Auto-switch to next file after loops
    if current_loop >= AUTO_ADVANCE_LOOPS:
        advance_image()

    advance_frame()
    time.sleep(frame_duration)
Below are the important parts of the animation code and what each part does.
This keeps things simple so you can quickly understand or modify the project.
1. Reset the Display
displayio.release_displays()
This clears any previous display so the RGB panel can start correctly.
2. Matrix Setup
matrix = rgbmatrix.RGBMatrix(
    width=64,
    height=64,
    bit_depth=2,
    rgb_pins=[board.GP2, board.GP3, board.GP4, board.GP5, board.GP8, board.GP9],
    addr_pins=[board.GP10, board.GP16, board.GP18, board.GP20, board.GP22],
    clock_pin=board.GP11,
    latch_pin=board.GP12,
    output_enable_pin=board.GP13,
    serpentine=True,
    doublebuffer=True,
)
This creates the 64×64 HUB75 RGB matrix display.
What to change:
bit_depth= brightness6= very bright3= normal2= dim1= very dim
3. Animation Speed Settings
DEFAULT_FRAME_DURATION = 0.1
AUTO_ADVANCE_LOOPS = 4
DEFAULT_FRAME_DURATION→ how fast frames switchAUTO_ADVANCE_LOOPS→ how many times an animation repeats before switching to the next file
4. Load All BMP Animations
file_list = sorted(
    f for f in os.listdir("/bmps")
    if f.endswith(".bmp")
)
This gets all .bmp animations inside the /bmps folder.
5. Load a BMP as an Animation
bitmap = displayio.OnDiskBitmap(open(filename, "rb"))

sprite = displayio.TileGrid(
    bitmap,
    tile_width=bitmap.width,
    tile_height=64,
)
Each BMP is loaded and split into 64-pixel-high frames.
Important:
Your BMP height must be:
64 × number_of_frames
Example:
- 64×256 → 4 frames
- 64×128 → 2 frames
6. Show the Animation
sprite_group = displayio.Group()
sprite_group.append(sprite)
DISPLAY.show(sprite_group)
This displays the animation frames on the matrix.
7. Play Frames in a Loop
sprite[0] = current_frame
current_frame = (current_frame + 1) % frame_count
Shows the next frame. When it reaches the end, it loops back to frame 0.
8. Switch to the Next BMP
if current_loop >= AUTO_ADVANCE_LOOPS:
    advance_image()
After the animation finishes a few loops, the next BMP is loaded.
What You Should Edit
| Part | What It Does | Change It If… |
|---|---|---|
bit_depth_value | Panel brightness | Display too bright/dim |
DEFAULT_FRAME_DURATION | Frame speed | Animation too fast/slow |
AUTO_ADVANCE_LOOPS | How long each file plays | Want more/less time |
/bmps/*.bmp | Animations to show | Add/remove effects |
| BMP height | Number of frames | You add more frames |
BMP Requirements
Your BMP must follow these rules:
- Width = 64 px
- Height = 64 × N
- Format = RGB565 (16-bit)
Example:
64 × 256  → 4 frames
64 × 320  → 5 frames
Smooth_Loop Animation
In this code we can select one bmp that we can loop smoothly forever by changing FILENAME = “2.bmp”
###############################################
# 64×64 WAVESHARE RGB PANEL ANIMATION PLAYER  #
# LOOP A SELECTED BMP SMOOTHLY                #
###############################################

import time
import os
import board
import displayio
import framebufferio
import rgbmatrix

displayio.release_displays()

matrix = rgbmatrix.RGBMatrix(
    width = 64,
    height = 64,
    bit_depth = 2,
    rgb_pins = [board.GP2, board.GP3, board.GP4, board.GP5, board.GP8, board.GP9],
    addr_pins = [board.GP10, board.GP16, board.GP18, board.GP20, board.GP22],
    clock_pin = board.GP11,
    latch_pin = board.GP12,
    output_enable_pin = board.GP13,
    tile = 1,
    serpentine = True,
    doublebuffer = True,
)

DISPLAY = framebufferio.FramebufferDisplay(matrix, auto_refresh=True)

# ------------------------------------------------
# Select which BMP file to loop
# ------------------------------------------------
SPRITESHEET_FOLDER = "/bmps"
FILENAME = "2.bmp"     # ← change this to any BMP you want

filename = SPRITESHEET_FOLDER + "/" + FILENAME
bitmap = displayio.OnDiskBitmap(open(filename, "rb"))

FRAME_HEIGHT = 64
frame_count = bitmap.height // FRAME_HEIGHT
frame_duration = 0.1

# ------------------------------------------------
# Display group / TileGrid
# ------------------------------------------------
sprite_group = displayio.Group()

sprite = displayio.TileGrid(
    bitmap,
    pixel_shader=getattr(bitmap, "pixel_shader", displayio.ColorConverter()),
    width=1,
    height=1,
    tile_width=bitmap.width,
    tile_height=FRAME_HEIGHT,
)

sprite_group.append(sprite)
DISPLAY.show(sprite_group)

current_frame = 0

# ------------------------------------------------
# MAIN LOOP
# ------------------------------------------------
while True:
    sprite[0] = current_frame
    current_frame += 1

    if current_frame >= frame_count:
        current_frame = 0

    time.sleep(frame_duration)
How to Convert GIF → BMP
Step 1 — Download a GIF
Download any GIF you want to use.
The examples in this tutorial were downloaded from Giphy.
Step 2 — Convert GIF Into a Sprite Sheet
We will use Piskel to prepare the 64×64 animation frames.
👉 Open: https://www.piskelapp.com/p/create/sprite/
Instructions:
- Click Import → Browse images and select your GIF
- Piskel will load all frames automatically
- Resize each frame to 64×64
- Menu → Edit → Resize
- Set Width = 64, Height = 64
- Export the animation as a vertical spritesheet
IMPORTANT:
Set columns = 1 (this makes one frame per row → vertical layout)
→ Export → PNG Sprite Sheet
→ Columns: 1
→ Frame size: 64×64
Download the PNG.
Step 3 — Convert PNG Sprite Sheet to BMP
Go to: https://cloudconvert.com/png-to-bmp
Upload your exported PNG.
⚠️ Make sure format = BMP (24-bit or 16-bit allowed)
CircuitPython converts it internally.
Download the BMP file.
Step 4 — Rename and Upload to the Pico
Rename the BMP file to something simple:
1.bmpfire.bmpwave.bmp
Copy the BMP into your CIRCUITPY/bmps/ folder.
Conclusion
This RGB matrix panel is an awesome little display for DIY projects — from animated signs to desktop art or even full GIF loops. Once you get the hang of converting GIFs into 64×64 sprite sheets, you can load almost anything onto it.
If you decide to build this yourself and run into any problems, feel free to leave a comment on the video. I always try to help out wherever I can. Happy building!