🐨 Tutorial 3 - RGB LED
Introduction
RGB LEDs can produce any color in the spectrum by mixing red, green, and blue lights, and are commonly used in a variety of projects such as mood lighting, visual effects, and indicators.
In this tutorial, we will use PWM (Pulse Width Modulation) to control the intensity of the red, green, and blue components of the LED, and create different colors by mixing these components in various proportions. We will also introduce the concept of mapping, which allows us to convert a range of values to another range, and use it to map a color value between 0 and 255 to a duty cycle value between 0 and 65535 that is suitable for PWM control.
By the end of this tutorial, you will have a basic understanding of how to use PWM and mapping to control RGB LEDs with a Raspberry Pi Pico, and will be able to apply this knowledge to create your own colorful projects!
Components Needed
| Component | Quantity |
|---|---|
| Raspberry Pi Pico W | 1 |
| Micro USB Cable | 1 |
| Breadboard | 1 |
| Wires | Several |
| Resistor | 2 - 220Ω , 1 - 330Ω |
| RGB LED | 1 |
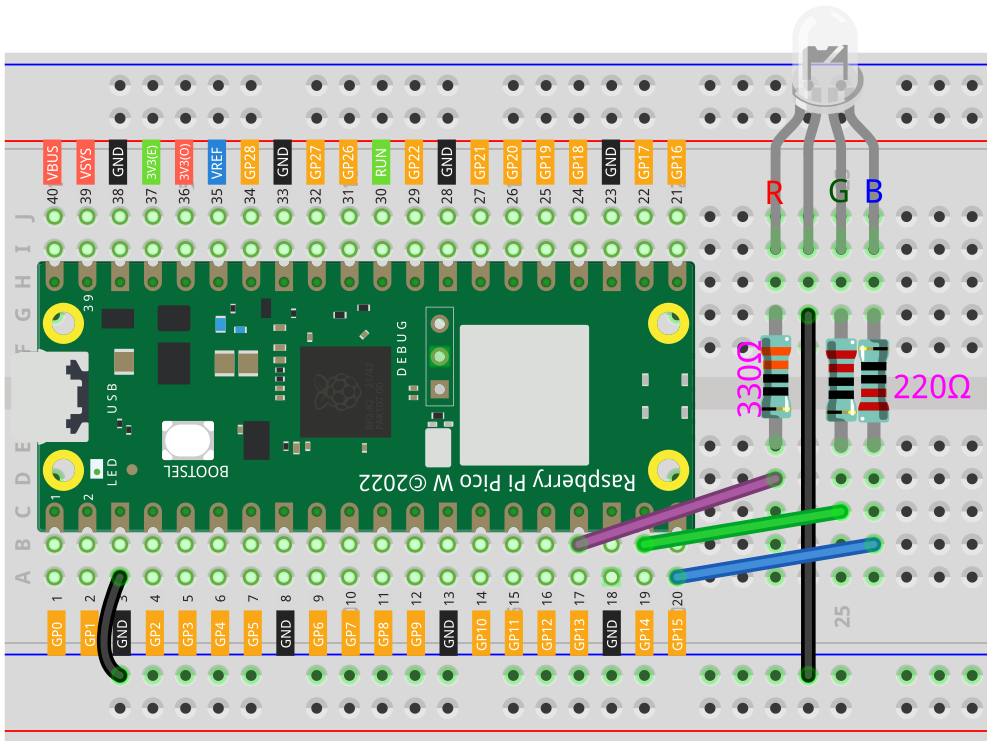
Fritzing Diagram
Example 1
from machine import Pin
from utime import sleep

led_red = Pin(13, Pin.OUT)
led_green = Pin(14, Pin.OUT)
led_blue = Pin(15, Pin.OUT)


while True:
    led_red.value(1)
    sleep(1)
    led_red.value(0)
    led_green.value(1)
    sleep(1)
    led_green.value(0)
    led_blue.value(1)
    sleep(1)
    led_blue.value(0)
In this example, we are controlling a single RGB LED connected to a microcontroller. An RGB LED is a special type of LED that can produce red, green, and blue light. It has four legs - one for each color and a common ground or common power depending on the type of RGB LED (common cathode or common anode).
Code explanation
from machine import Pin
from utime import sleep
This line imports the Pin class from the machine module, and the sleep function from the utime module. The Pin class allows us to interact with the GPIO pins, and the sleep function is used to create delays.
led_red = Pin(13, Pin.OUT)
led_green = Pin(14, Pin.OUT)
led_blue = Pin(15, Pin.OUT)
These lines create Pin objects for each color of the RGB LED. The numbers 13, 14, and 15 are the GPIO numbers that the red, green, and blue legs of the RGB LED are connected to, respectively. The Pin.OUT argument sets these pins as output pins, which means we can send signals out through them to control the RGB LED.
while True:
    led_red.value(1)
    sleep(1)
    led_red.value(0)
    led_green.value(1)
    sleep(1)
    led_green.value(0)
    led_blue.value(1)
    sleep(1)
    led_blue.value(0)
This is an infinite loop that continuously cycles through turning on each color of the RGB LED for one second before turning it off.
The value method is used to set the state of each pin. A value of 1 turns the LED on (sets the pin high), and a value of 0 turns the LED off (sets the pin low).
The sleep function is used to create a delay of one second between each action. This means that when a color is turned on, it stays on for one second before it is turned off.
So, in each cycle of the loop, the red color is turned on and stays on for one second, then it’s turned off. The same happens for the green and blue colors in sequence. This results in the RGB LED changing color from red to green to blue in a continuous loop.
Example 2
from machine import Pin, PWM

pins = [13, 14, 15]
colors = ['red', 'green', 'blue']
pwms = [PWM(Pin(pin)) for pin in pins]
for pwm in pwms:
    pwm.freq(1000)

def map_color(color):
    return int(color * 65535 / 255)

def set_color(red, green, blue):
    pwms[0].duty_u16(map_color(red))
    pwms[1].duty_u16(map_color(green))
    pwms[2].duty_u16(map_color(blue))

set_color(255, 128, 0)
Code explanation
from machine import Pin, PWM
This line imports the Pin and PWM classes from the machine module. These classes allow us to interact with the pins and generate PWM signals, respectively.
pins = [13, 14, 15]
colors = ['red', 'green', 'blue']
pwms = [PWM(Pin(pin)) for pin in pins]
for pwm in pwms:
    pwm.freq(1000)
These lines define three variables: pins, which is a list of the pin numbers we will use to control the RGB LED; colors, which is a list of the corresponding color names; and pwms, which is a list of PWM objects that we will use to generate signals on the corresponding pins.
The PWM objects are created using list comprehension, which allows us to create a list of objects in a single line of code. We iterate over the pins list, creating a Pin object for each pin number and passing it as an argument to the PWM constructor. The resulting PWM object is added to the pwms list.
We then loop over each PWM object in the pwms list and set its frequency to 1000Hz using the freq() method. This sets the frequency of the PWM signal that will be generated on each pin.
def map_color(color):
    return int(color * 65535 / 255)

def set_color(red, green, blue):
    pwms[0].duty_u16(map_color(red))
    pwms[1].duty_u16(map_color(green))
    pwms[2].duty_u16(map_color(blue))
These lines define two functions: map_color() and set_color().
The map_color() function takes a single argument color, which is an integer in the range of 0-255 representing the intensity of a particular color (red, green, or blue). The function then performs a mathematical operation to map this input value to a 16-bit PWM duty cycle value in the range of 0-65535.
The set_color() function takes three arguments: red, green, and blue, which are the intensities of the corresponding color components. The function calls the map_color() function to map each color value to a PWM duty cycle value, and then sets the duty cycle of the corresponding PWM object using the duty_u16() method.
set_color(255, 128, 0)
This line calls the set_color() function with three arguments: 255 for full intensity red, 128 for half intensity green, and 0 for no blue. This sets the RGB LED to a yellow color.