🦊 Tutorial 1 - Hello LED
YouTube Video
Introduction
Turning an LED on and off is often referred to as the “Hello World” program of hardware programming. This is because it is a simple, fundamental task that can be used to demonstrate basic programming concepts and test that the hardware is working correctly.
In the same way that the “Hello World” program is used in software programming to demonstrate the basic syntax of a programming language, turning an LED on and off is used in hardware programming to demonstrate how to control hardware using a microcontroller board like the Raspberry Pi Pico.
By writing a program that turns an LED on and off, developers can learn how to set up and control a digital output pin, and how to use timing functions like sleep to create a specific pattern of on and off cycles. This foundational knowledge can then be applied to more complex projects, such as controlling motors or sensors, building robots, or creating interactive installations.
In short, the LED blinking program is a simple, but powerful introduction to the world of hardware programming and can serve as a starting point for learning more about microcontrollers and embedded systems.
We will expand on the first example and create the classical “Knight Rider” LEDs.
Example 1 - Turning LED On / Off
Components Needed
| Component | Quantity |
|---|---|
| Raspberry Pi Pico W | 1 |
| Micro USB Cable | 1 |
| Breadboard | 1 |
| Wires | Several |
| Resistor | 1 (220Ω) |
| LED | 1 |
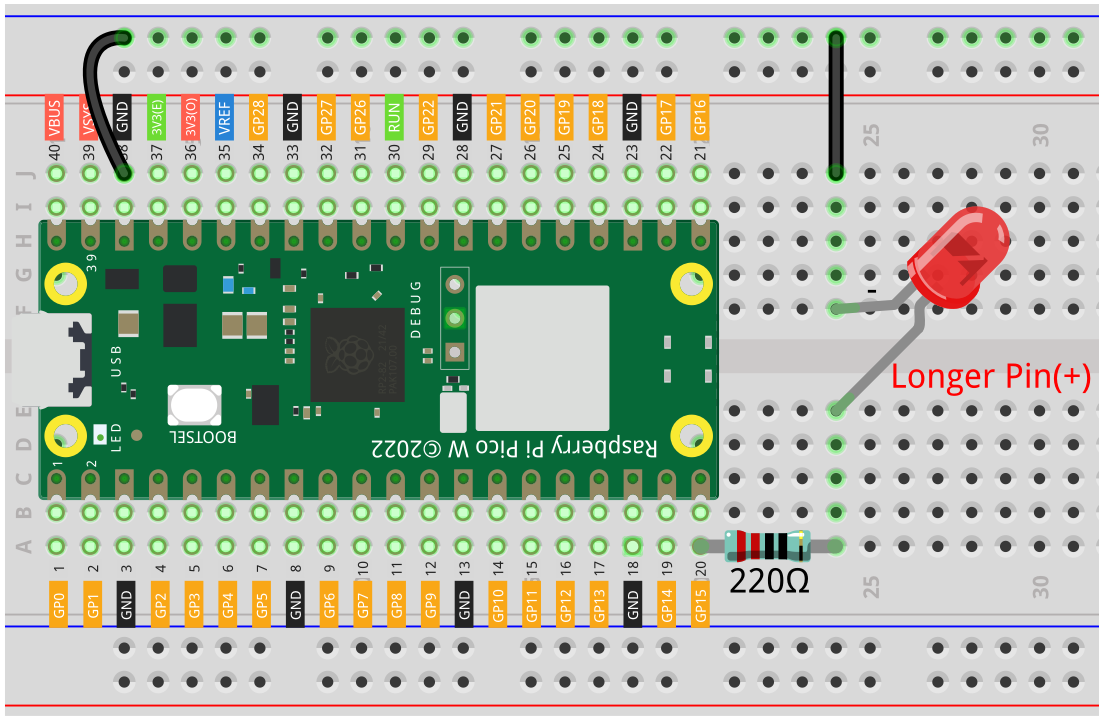
Fritzing Diagram
Code
from machine import Pin
import utime

led = Pin(15, Pin.OUT)
while True:
    led.value(1)
    utime.sleep(2)
    led.value(0)
    utime.sleep(2)
Code Explanation
from machine import Pin
import utime
These lines import two MicroPython modules, Pin from the machine module and utime. The Pin class is used to represent a pin on the Raspberry Pi Pico and utime provides functions for working with time.
led = Pin(15, Pin.OUT)
This line sets up a Pin object for pin 15 on the Raspberry Pi Pico, and sets it to be an output pin (i.e., one that can be used to control a device like an LED). The Pin constructor takes two arguments: the pin number, and the mode (in this case, Pin.OUT).
while True:
    led.value(1)
    utime.sleep(2)
    led.value(0)
    utime.sleep(2)yt
This is the main loop of the program, which will run indefinitely (since True is always true). The loop consists of two steps:
- Turn the LED on by setting the value of the
ledpin to 1 (which will typically result in the LED being illuminated). - Wait for 2 seconds using the
utime.sleepfunction. - Turn the LED off by setting the value of the
ledpin to 0 (which will typically result in the LED being turned off). - Wait for another 2 seconds using the
utime.sleepfunction.
This loop will repeat indefinitely, resulting in the LED blinking on and off every 2 seconds.
Example 2 - Knight Rider LED
Components Needed
| Component | Quantity |
|---|---|
| Raspberry Pi Pico W | 1 |
| Micro USB Cable | 1 |
| Breadboard | 1 |
| Wires | Several |
| Resistor | 8 (220Ω) |
| LED | 8 |