Wi-Fi Multiplug
YouTube Video
Introduction
In this tutorial, I will be guiding you through the process of creating a smart multi-plug using the Raspberry Pi Pico W, an 8-channel relay board, and a custom-designed PCB. This smart multi-plug can control different electronic devices individually through a simple web interface.
Disclaimer: This tutorial involves the use of live alternating current and is for educational purposes only. If you want to recreate this project, please seek the guidance of a professional.
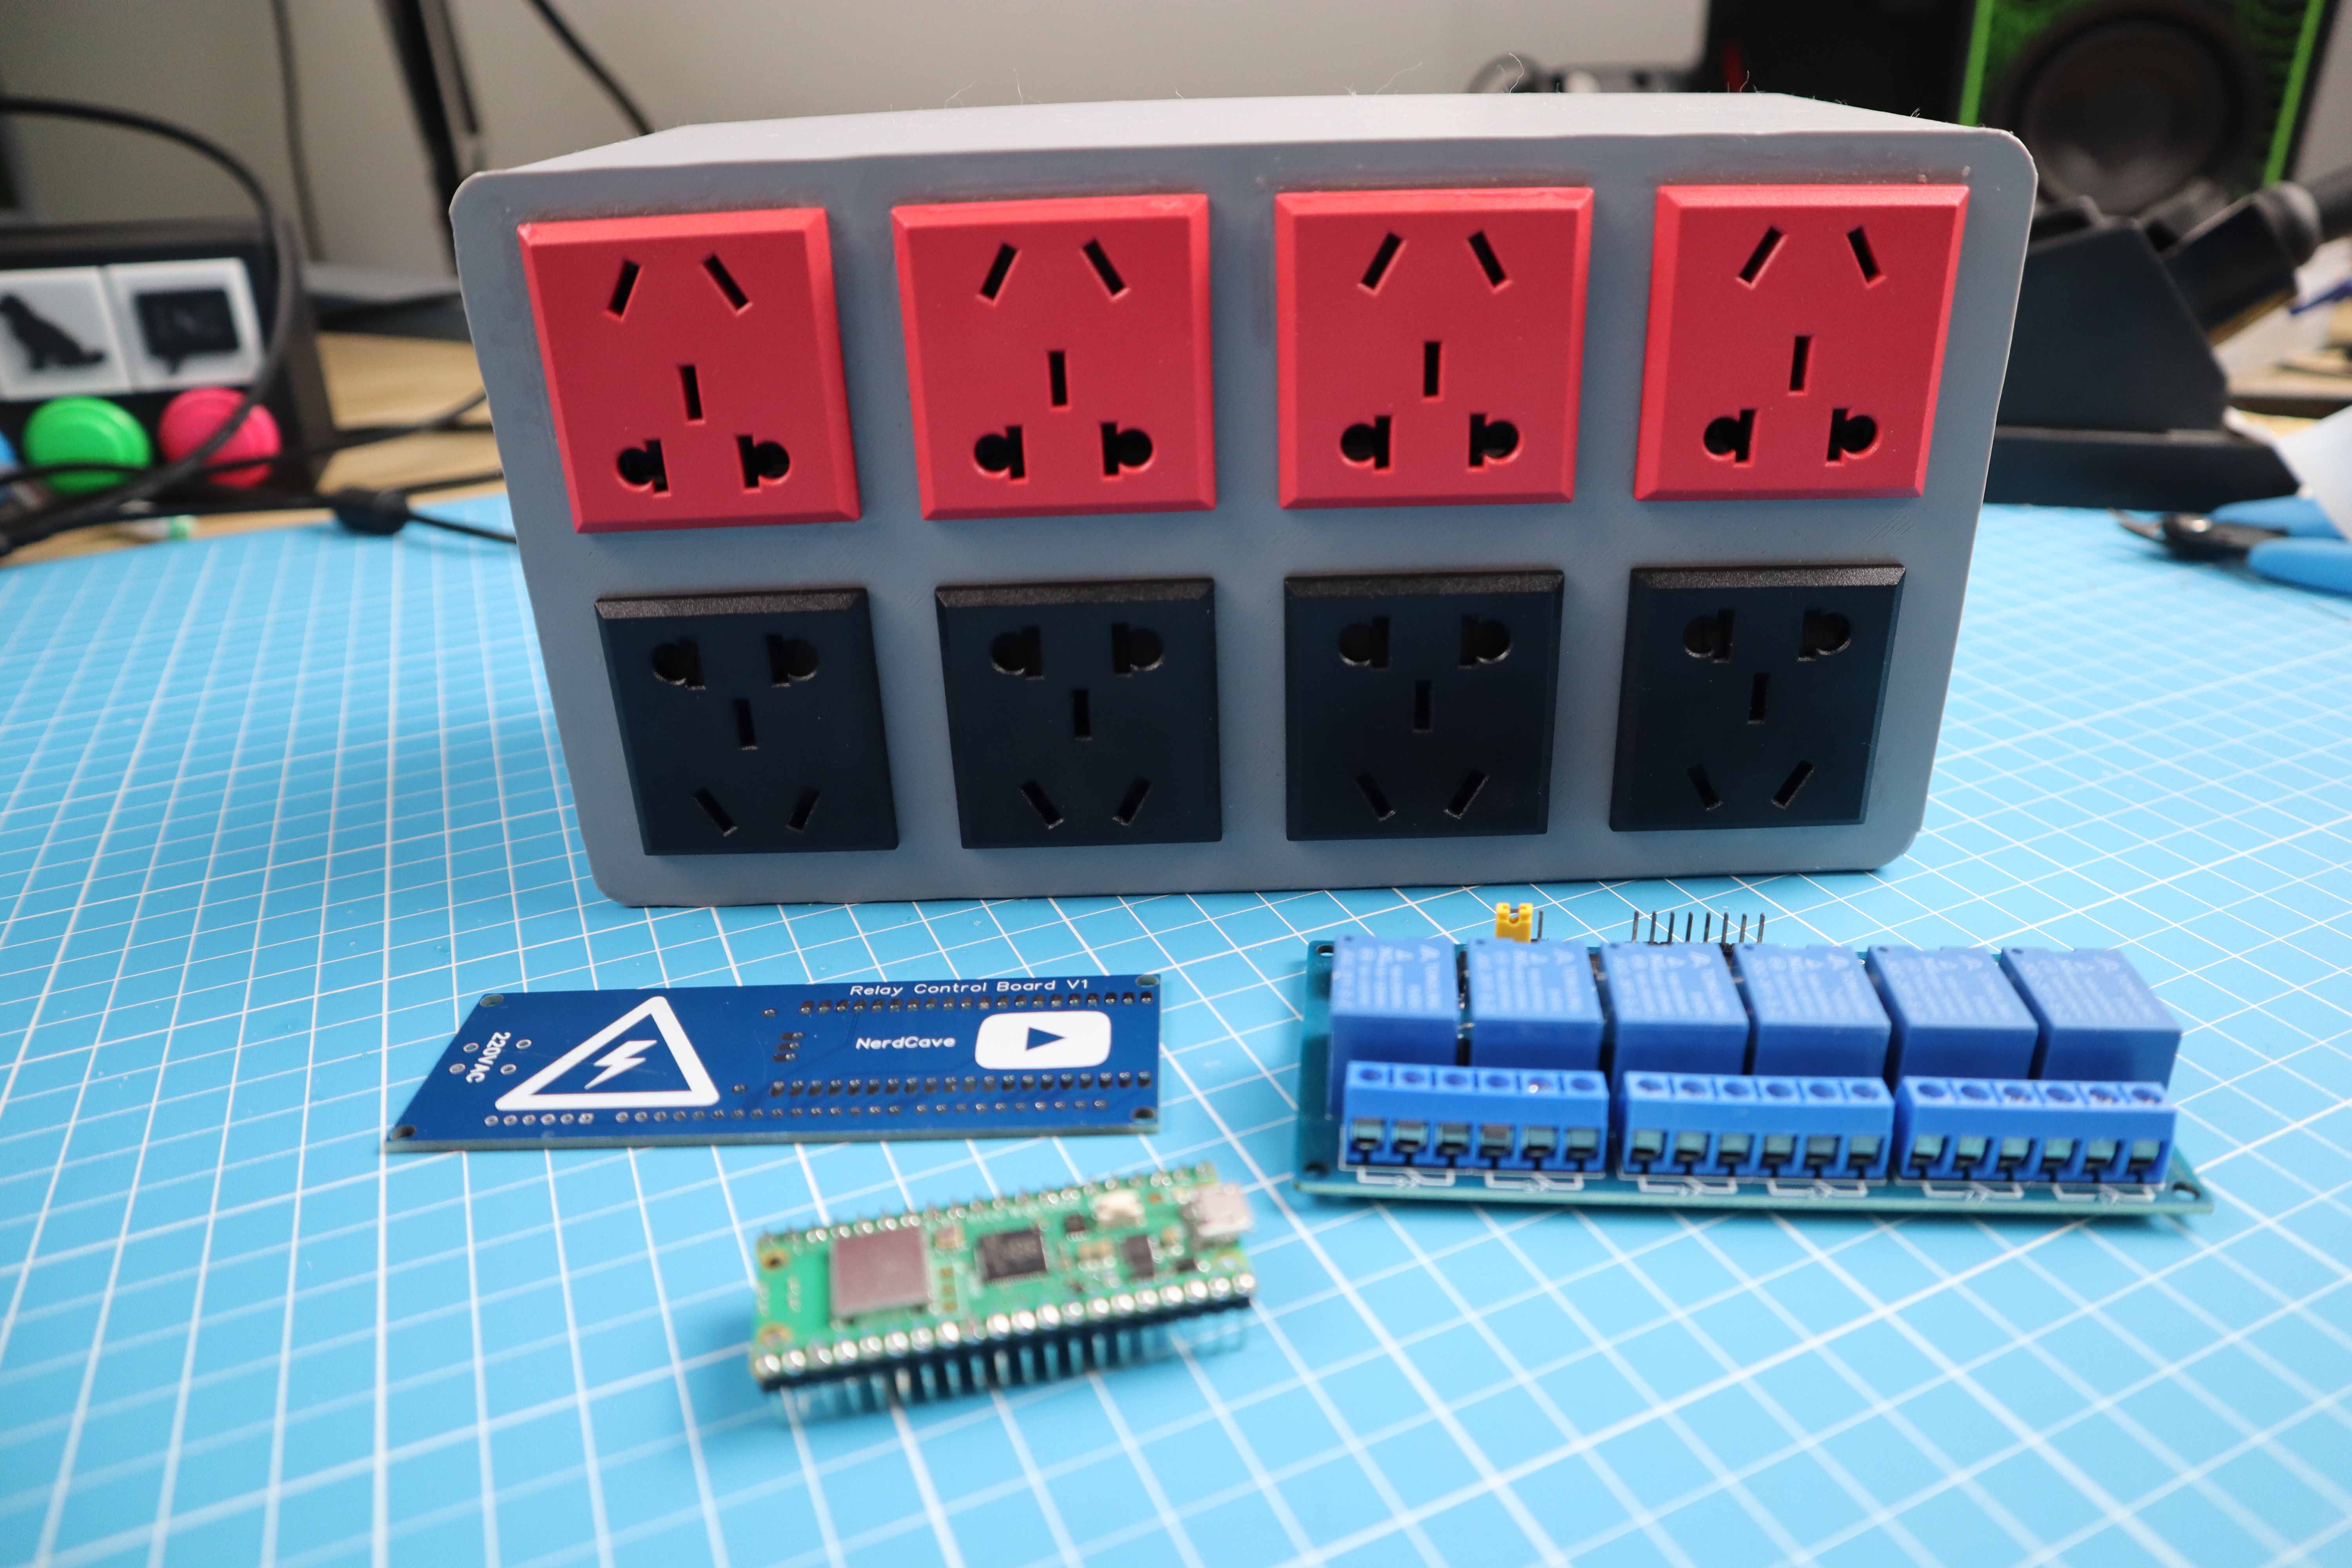
Multi Plug
Project Sponsors
Special thanks to JLCPCB who sponsored this project by providing the PCB. If you need any PCB for your projects, consider heading over to the JLCPCB website.
Components + Tools Breakdown
| Component | Quantity | Quantity | |
|---|---|---|---|
| Raspberry Pi Pico W | 1 | 1 | |
| Custom PCB (JLCPCB) | 1 | 1 | |
| Wires (Jumper Wires F-M) | Few | Few | |
| Wire 22 AWG Single Core -Red Black Yellow | +- 1.5 Meter | ||
| 8-channel relay module board | 1 | 5 | |
| 3D printed parts | 2 Parts | Few printed parts | |
| Power sockets | 8 | ||
| C14 Power entry module | 1 | ||
| Miscellaneous (glue etc.) | Explained in steps |
| Tools / Equipment | |
|---|---|
| Soldering Iron + Solder | |
| Computer + Thonny IDE | |
| Screw driver |
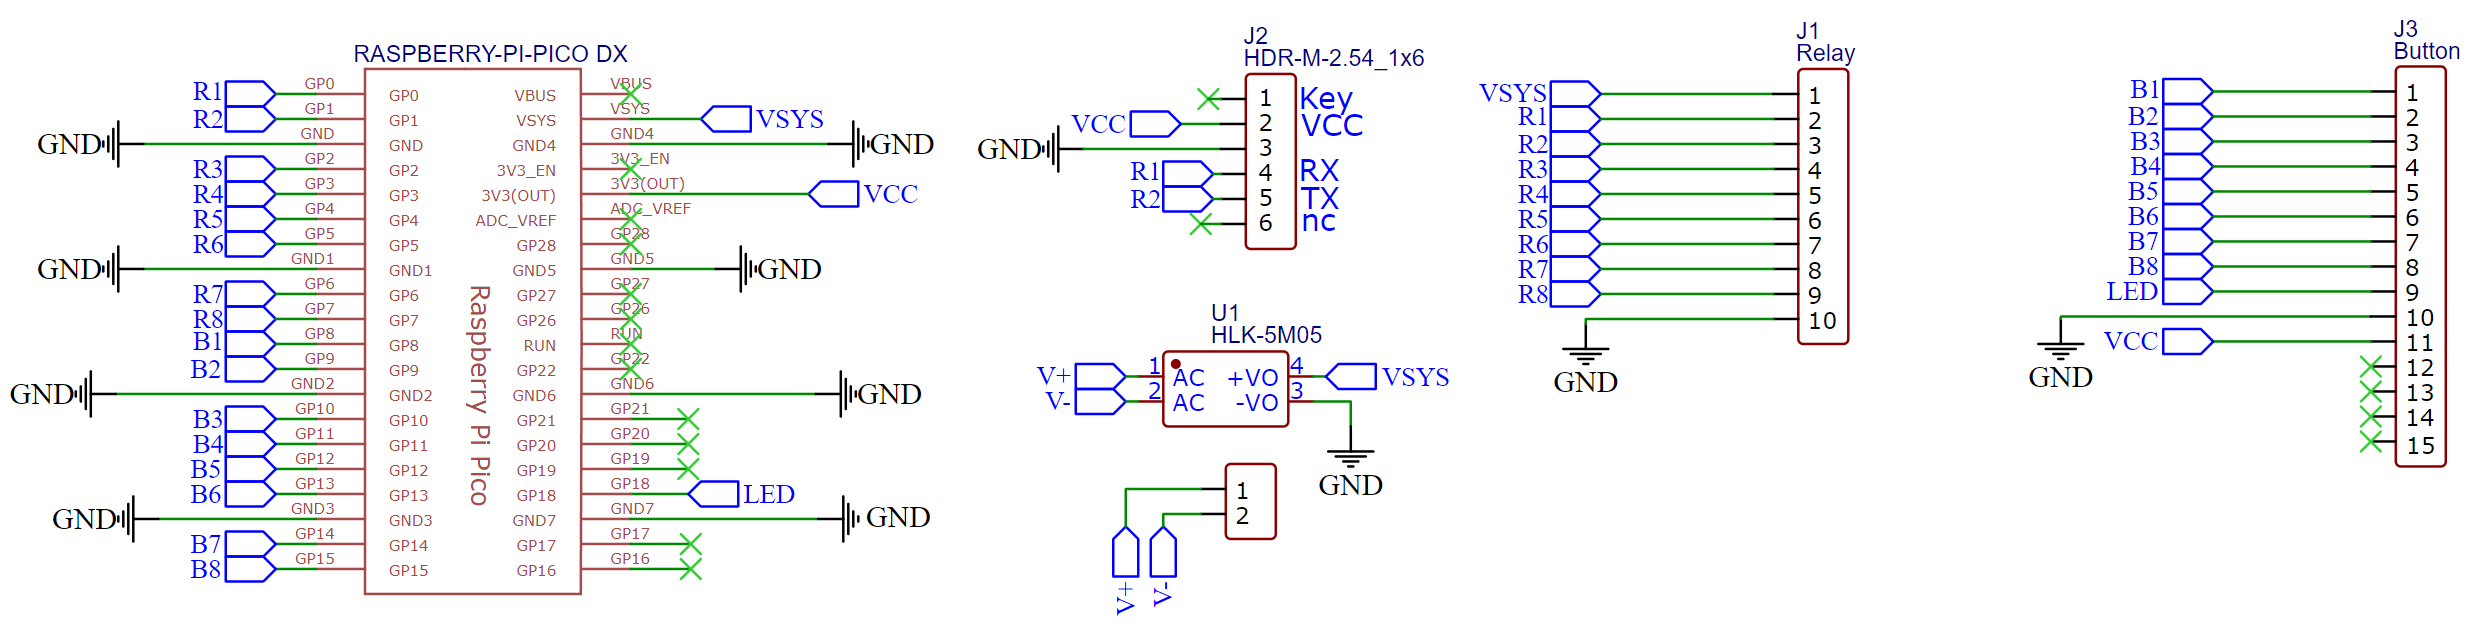
Schematic Diagram
The schematic diagram is shown below. The design is straightforward as each button was connected to a GPIO pin to the Raspberry Pi Pico W,
Breadboard Testing
Before we start building the project, it is recommended to assemble everything on a breadboard first to test all the components.
Designing the PCB
After testing, use EasyEDA to create the PCB. This board will make the project a lot easier to be used with the relay board. After double-checking the PCB board, place the order through JLCPCB.

PCB ( JLCPCB )
The PCB was ordered through JLCPCB. They offer great PCBs at a low cost and have promotions and coupons available throughout the year. You can sign up using here, or using the following link:
https://jlcpcb.com/?from=Nerd that will support me as a creator to keep making content that is assessable and open source at no charge to you.
Ordering the PCB is very simple:
Download the Gerber file here or using the link: https://github.com/Guitarman9119/Raspberry-Pi-Pico-/tree/main/Wi-Fi%20Multi%20Plug
Sign up through https://jlcpcb.com/?from=Nerd
Click on Add Gerber file

leave all the settings as default given. You might want change the PCB color which you can do here:
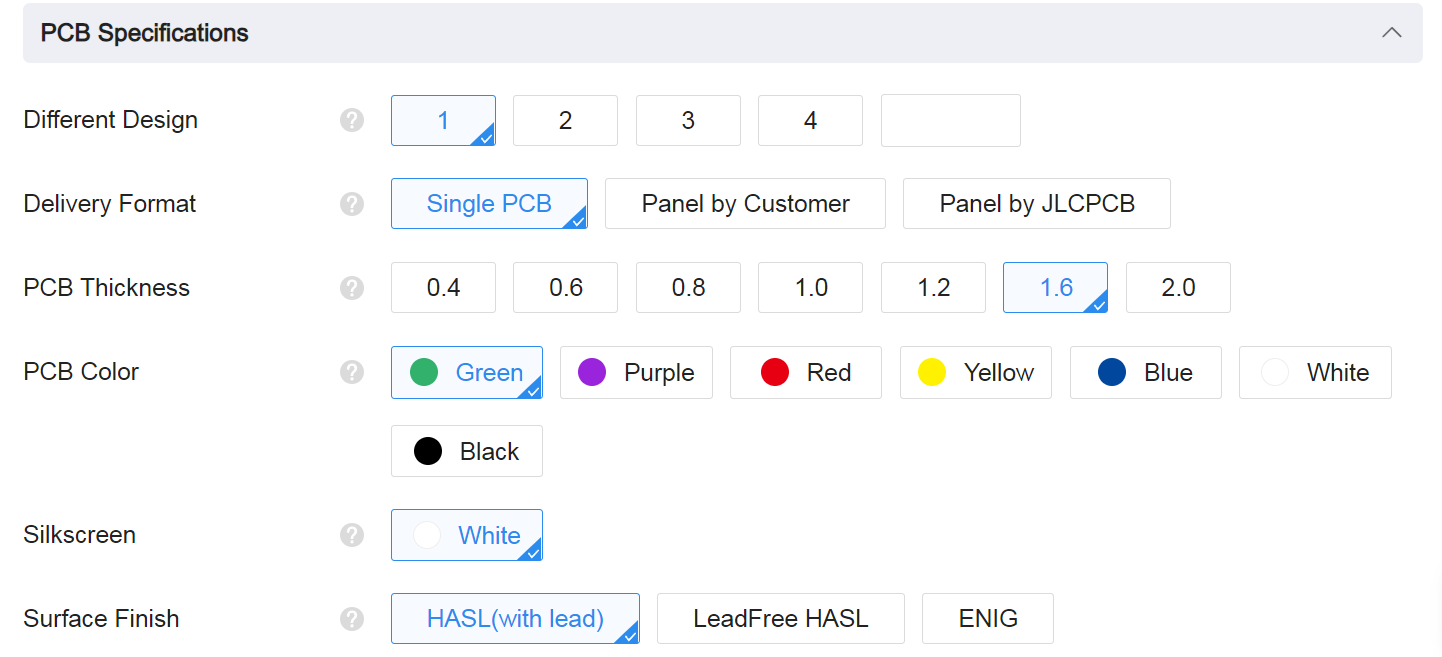
Enter you shipping details, save to cart
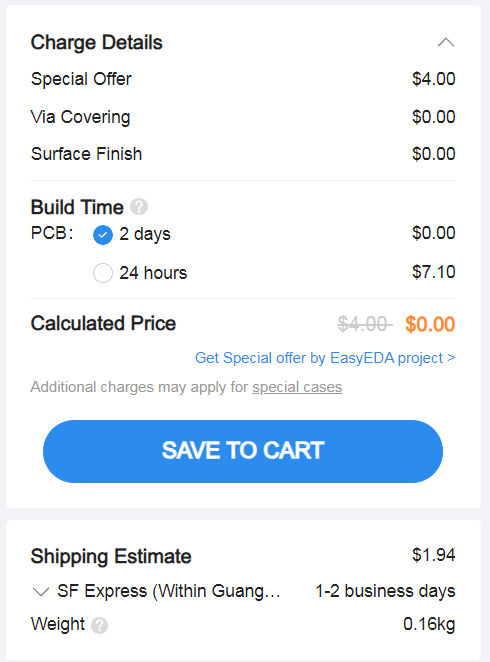
Then after a few days depending on your location you will receive your great quality PCB.

Enclosure Design
Using the dimensions of the relay board and your PCB, design a case to hold everything. For this project, we used Fusion360 which is free to use with a hobby license.
Printing the Case
Print out the case and use 100 percent infill to give it enough strength. Connect the relay board and PCB and connect the cables according to the provided diagram.
The first version of the case is available here:
https://github.com/Guitarman9119/Raspberry-Pi-Pico-/tree/main/Wi-Fi%20Multi%20Plug

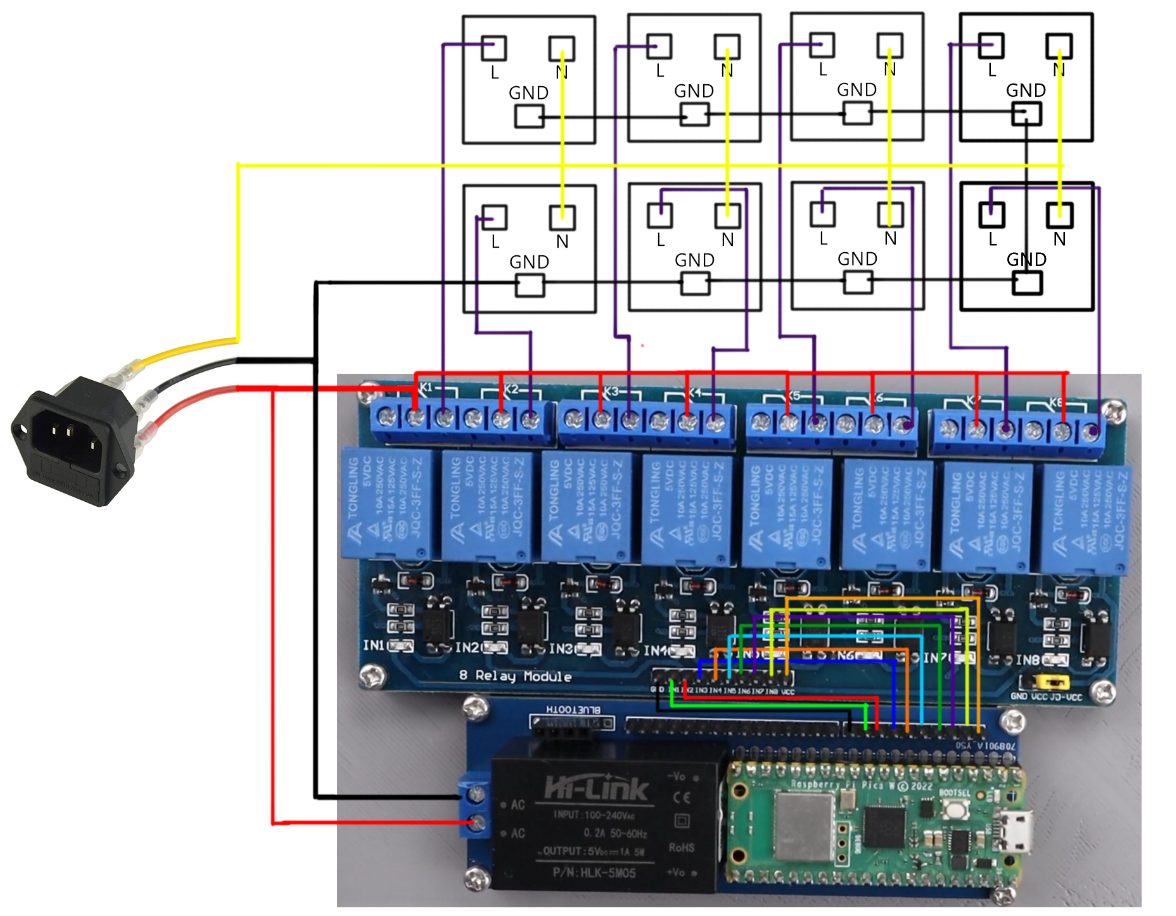
Connecting the Outlets
The next part involves connecting all the outlets to the relay. A diagram is provided to show how it was done for each outlet.
Programming the Raspberry Pi Pico W
Before closing everything or connecting power, we first need to write a program for the Raspberry Pi Pico W. Remember not to power the Pico through USB when external 5V is connected.
Full Code
Here is the code for the project, save it on the Pico W as boot.py
from machine import Pin
import network
import time
try:
  import usocket as socket
except:
  import socket

relay1=Pin(0,Pin.OUT)
relay2=Pin(1,Pin.OUT)
relay3=Pin(2,Pin.OUT)
relay4=Pin(3,Pin.OUT)
relay5=Pin(4,Pin.OUT)
relay6=Pin(5,Pin.OUT)
relay7=Pin(6,Pin.OUT)
relay8=Pin(7,Pin.OUT)

relay1.value(1)
relay2.value(1)
relay3.value(1)
relay4.value(1)
relay5.value(1)
relay6.value(1)
relay7.value(1)
relay8.value(1)

wlan = network.WLAN(network.STA_IF)
wlan.active(True)
wlan.connect("Open_Internet", "25802580")       # ssid, password

# connect the network
wait = 10
while wait > 0:
    if wlan.status() < 0 or wlan.status() >= 3:
        break
    wait -= 1
    print('waiting for connection...')
    time.sleep(1)

# Handle connection error
if wlan.status() != 3:
    raise RuntimeError('wifi connection failed')
else:
    print('connected')
    ip=wlan.ifconfig()[0]
    print('IP: ', ip)


def web_server():
  if relay1.value() == 1: relay_state1 = ''
  else: relay_state1 = 'checked'
  if relay2.value() == 1: relay_state2 = ''
  else: relay_state2 = 'checked'
  if relay3.value() == 1: relay_state3 = ''
  else: relay_state3 = 'checked'
  if relay4.value() == 1: relay_state4 = ''
  else: relay_state4 = 'checked'
  if relay5.value() == 1: relay_state5 = ''
  else: relay_state5 = 'checked'
  if relay6.value() == 1: relay_state6 = ''
  else: relay_state6 = 'checked'
  if relay7.value() == 1: relay_state7 = ''
  else: relay_state7 = 'checked'
  if relay8.value() == 1: relay_state8 = ''
  else: relay_state8 = 'checked'

  html = """
<html>
   <head>
    <meta charset="utf-8">
    <meta name="viewport" content="width=device-width, initial-scale=1">
      <meta name="viewport" content="width=device-width, initial-scale=1">
      <link href="https://cdn.jsdelivr.net/npm/bootstrap@5.3.1/dist/css/bootstrap.min.css" rel="stylesheet" integrity="sha384-4bw+/aepP/YC94hEpVNVgiZdgIC5+VKNBQNGCHeKRQN+PtmoHDEXuppvnDJzQIu9" crossorigin="anonymous">
      <style>
         body{font-family:Arial; text-align: center; margin: 0px auto; padding-top:30px;}
         .switch{position:relative;display:inline-block;width:120px;height:68px}.switch input{display:none}
         .slider{position:absolute;top:0;left:0;right:0;bottom:0;background-color:#ccc;border-radius:34px}
         .slider:before{position:absolute;content:"";height:52px;width:52px;left:8px;bottom:8px;background-color:#fff;-webkit-transition:.4s;transition:.4s;border-radius:68px}
         input:checked+.slider{background-color:#2196F3}
         input:checked+.slider:before{-webkit-transform:translateX(52px);-ms-transform:translateX(52px);transform:translateX(52px)}
      </style>
      <script>
      function toggleCheckbox(element,num) {
        let relay_str = "relay" + num.toString();
        var xhr = new XMLHttpRequest();
        if(element.checked){
          xhr.open("GET", "/?relay=on".replace("relay",relay_str), true);
          }
        else {
          xhr.open("GET", "/?relay=off".replace("relay",relay_str), true);
        }
        xhr.send();
      }
      </script>
      <script src="https://cdn.jsdelivr.net/npm/bootstrap@5.3.1/dist/js/bootstrap.bundle.min.js" integrity="sha384-HwwvtgBNo3bZJJLYd8oVXjrBZt8cqVSpeBNS5n7C8IVInixGAoxmnlMuBnhbgrkm" crossorigin="anonymous"></script>
   </head>
   <body>
    <h1>Awesome Plug</h1>
    <h2>NerdCave</h2>

    <div class="container">
      <div class="row">
        <div class="col">
          <h2>Left-Light</h2>
        <label class="switch"><input type="checkbox" onchange="toggleCheckbox(this,1)" %s><span class="slider"></span></label>
        </div>

        <div class="col">
          <h2>Right-Light</h2>
          <label class="switch"><input type="checkbox" onchange="toggleCheckbox(this,2)" %s><span class="slider"></span></label>
        </div>

      </div>

      <div class="row">
        <div class="col">
          <h2>Charger</h2>
        <label class="switch"><input type="checkbox" onchange="toggleCheckbox(this,3)" %s><span class="slider"></span></label>
        </div>

        <div class="col">
          <h2>Fan</h2>
          <label class="switch"><input type="checkbox" onchange="toggleCheckbox(this,4)" %s><span class="slider"></span></label>
        </div>

      </div>

      <div class="row">
        <div class="col">
          <h2>Solder Station</h2>
        <label class="switch"><input type="checkbox" onchange="toggleCheckbox(this,5)" %s><span class="slider"></span></label>
        </div>

        <div class="col">
          <h2>Lamp</h2>
          <label class="switch"><input type="checkbox" onchange="toggleCheckbox(this,6)" %s><span class="slider"></span></label>
        </div>

      </div>

      <div class="row">
        <div class="col">
          <h2>LED</h2>
        <label class="switch"><input type="checkbox" onchange="toggleCheckbox(this,7)" %s><span class="slider"></span></label>
        </div>

        <div class="col">
          <h2>Camera</h2>
          <label class="switch"><input type="checkbox" onchange="toggleCheckbox(this,8)" %s><span class="slider"></span></label>
        </div>

      </div>
    </div>
   </body>

</html>
""" % (relay_state1, relay_state2, relay_state3, relay_state4, relay_state5, relay_state6, relay_state7, relay_state8)
  return html

s = socket.socket(socket.AF_INET, socket.SOCK_STREAM)
s.bind(('', 80))
s.listen(5)

while True:
  try:
    conn, addr = s.accept()
    conn.settimeout(3.0)
#    print('Got a connection from %s' % str(addr))
    request = conn.recv(1024)
    conn.settimeout(None)
    request = str(request)

#    print('Content = %s' % request)
    relay1_on = request.find('/?relay1=on')
    relay1_off = request.find('/?relay1=off')
    if relay1_on == 6:
      print('RELAY1 ON')
      relay1.value(0)
    if relay1_off == 6:
      print('RELAY1 OFF')
      relay1.value(1)
    relay2_on = request.find('/?relay2=on')
    relay2_off = request.find('/?relay2=off')
    if relay2_on == 6:
      print('RELAY2 ON')
      relay2.value(0)
    if relay2_off == 6:
      print('RELAY2 OFF')
      relay2.value(1)

    relay3_on = request.find('/?relay3=on')
    relay3_off = request.find('/?relay3=off')
    if relay3_on == 6:
      print('RELAY3 ON')
      relay3.value(0)
    if relay3_off == 6:
      print('RELAY3 OFF')
      relay3.value(1)

    relay4_on = request.find('/?relay4=on')
    relay4_off = request.find('/?relay4=off')
    if relay4_on == 6:
      print('RELAY4 ON')
      relay4.value(0)
    if relay4_off == 6:
      print('RELAY4 OFF')
      relay4.value(1)

    relay5_on = request.find('/?relay5=on')
    relay5_off = request.find('/?relay5=off')
    if relay5_on == 6:
      print('RELAY5 ON')
      relay5.value(0)
    if relay5_off == 6:
      print('RELAY5 OFF')
      relay5.value(1)

    relay6_on = request.find('/?relay6=on')
    relay6_off = request.find('/?relay6=off')
    if relay6_on == 6:
      print('RELAY3 ON')
      relay6.value(0)
    if relay6_off == 6:
      print('RELAY3 OFF')
      relay6.value(1)

    relay7_on = request.find('/?relay7=on')
    relay7_off = request.find('/?relay7=off')
    if relay7_on == 6:
      print('RELAY7 ON')
      relay7.value(0)
    if relay7_off == 6:
      print('RELAY3 OFF')
      relay7.value(1)

    relay8_on = request.find('/?relay8=on')
    relay8_off = request.find('/?relay8=off')
    if relay8_on == 6:
      print('RELAY8 ON')
      relay8.value(0)
    if relay8_off == 6:
      print('RELAY8 OFF')
      relay8.value(1)

    response = web_server()
    conn.send('HTTP/1.1 200 OK\n')
    conn.send('Content-Type: text/html\n')
    conn.send('Connection: close\n\n')
    conn.sendall(response)
    conn.close()
  except OSError as e:
    conn.close()
    print('Connection closed')
Code explanation
Importing Required Libraries
from machine import Pin
import network
import time
try:
  import usocket as socket
except:
  import socket
We import Pin from the machine module to control the GPIO pins of the Raspberry Pi Pico W. The network module is used to connect to the Wi-Fi network. The usocket (or socket in case usocket is not available) module is used to create and manage the web server.
Initializing the Relay Pins
relay1=Pin(0,Pin.OUT)
relay2=Pin(1,Pin.OUT)
relay3=Pin(2,Pin.OUT)
relay4=Pin(3,Pin.OUT)
relay5=Pin(4,Pin.OUT)
relay6=Pin(5,Pin.OUT)
relay7=Pin(6,Pin.OUT)
relay8=Pin(7,Pin.OUT)
We set up GPIO pins 0 to 7 as output pins, each controlling one of the eight relays.
Setting Initial State of Relays
relay1.value(1)
relay2.value(1)
relay3.value(1)
relay4.value(1)
relay5.value(1)
relay6.value(1)
relay7.value(1)
relay8.value(1)
We set the initial state of all relays to 1 (OFF state).
Connecting to Wi-Fi
wlan = network.WLAN(network.STA_IF)
wlan.active(True)
wlan.connect("NerdCave_internet", "8SUB8")       # ssid, password
We set up the Raspberry Pi Pico W to connect to the Wi-Fi network with the SSID and password provided.
Checking the Wi-Fi Connection
wait = 10
while wait > 0:
    if wlan.status() < 0 or wlan.status() >= 3:
        break
    wait -= 1
    print('waiting for connection...')
    time.sleep(1)

if wlan.status() != 3:
    raise RuntimeError('wifi connection failed')
else:
    print('connected')
    ip=wlan.ifconfig()[0]
    print('IP: ', ip)
We wait for the Raspberry Pi Pico W to connect to the Wi-Fi network, and print the IP address once it is connected.
Defining the Web Server
def web_server():
  if relay1.value() == 1: relay_state1 = ''
  else: relay_state1 = 'checked'
  ...
  ...
We define a function web_server() that checks the state of the relays and creates the HTML code for the web server. The HTML code includes JavaScript to handle the toggling of the relays through the checkboxes in the user interface.
Creating the Socket and Handling Connections
s = socket.socket(socket.AF_INET, socket.SOCK_STREAM)
s.bind(('', 80))
s.listen(5)

while True:
  # Code to accept connections and handle HTTP requests
Conclusion
This project does need a few improvements and will definetly come back to this in the future.