Motivational Box
YouTube Video
Introduction
Do you ever find yourself struggling to stay motivated and on track with your daily tasks? Maybe you start off strong, but as the day goes on, you find yourself getting distracted or losing focus. If so, you’re not alone. In this project tutorial, I’m going to show you a fun and effective way to stay motivated and achieve your goals. It’s called the Motivational Box, and the goal of it is simple. I have a few tasks I want to complete, the RED LED indicated an uncompleted task, once I completed the task I will press the arcade button it will turn the LED to the corresponding arcade button (or any color of your choosing) and update it on a site where I can track the days I completed my tasks. The graph is inspired by GitHub code contribution heatmap.
Now for you to understand why I created this project I need to tell you a story. The last few months, I was really struggling with my motivation. I had a lot of goals that I wanted to achieve, but I just couldn’t seem to get started. I tried all kinds of things - setting reminders on my phone, using sticky notes, even trying to hire a personal coach or telling all my friends and colleagues today is the day I am going to change. But nothing really worked.
Disclaimer - JLCPCB was generous enough to sponsor this project and provide the PCB used in this project.
Components + Tools Breakdown
The following table is the list of components needed along with the quantity of each:
| Components | Quantity |
|---|---|
| Raspberry Pi Pico W | 1 |
| Custom PCB (JLCPCB) | 11 |
| Arcade Buttons | 5 |
| 3D Printed Parts | Few various parts |
| Wires | Few |
The following tools will be needed to built the motivational box.
| Tools |
|---|
| Soldering Iron + Solder |
| Screwdriver |
| Hotglue gun |
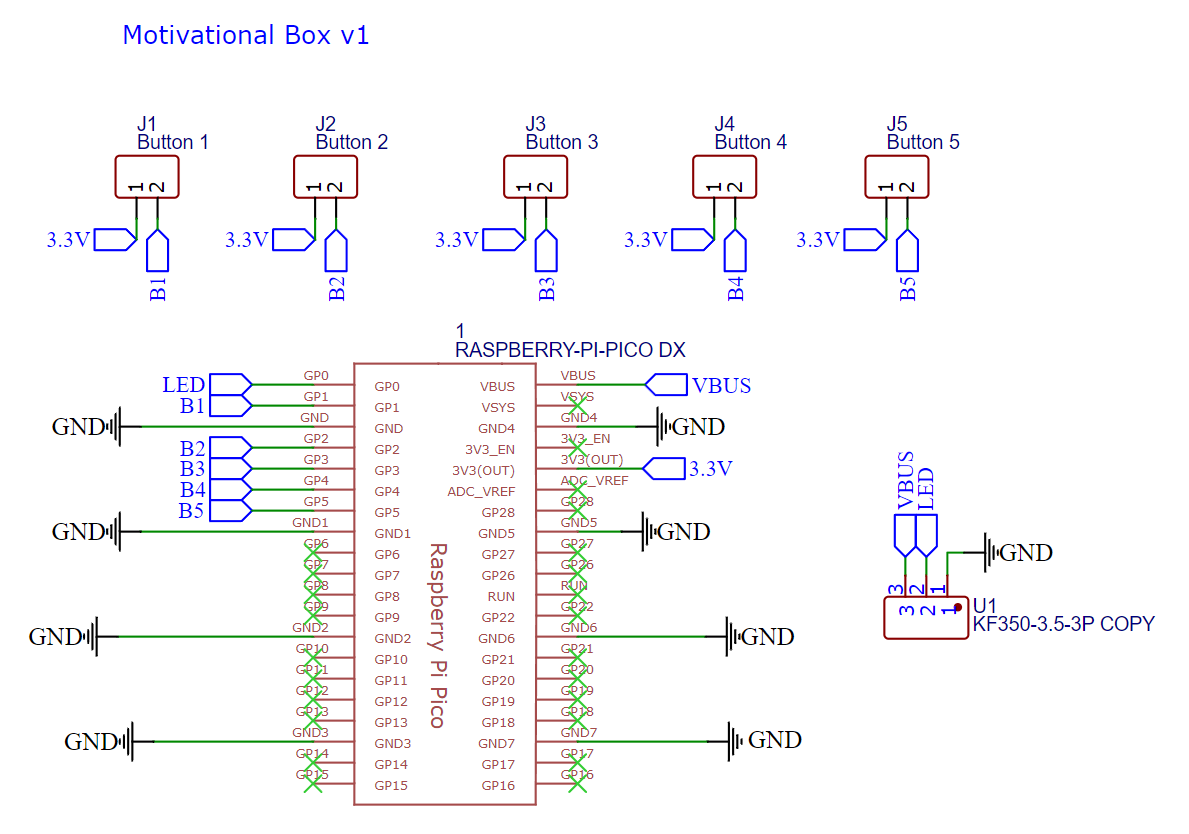
Schematic Diagram
The schematic diagram is shown below. The design is straightforward as each button was connected to a GPIO pin to the Raspberry Pi Pico W, and a connector for the neopixel RGB LEDs.
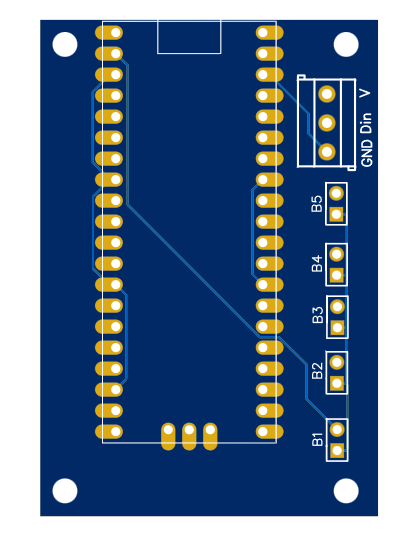
PCB ( JLCPCB )
The PCB was ordered through JLCPCB. They offer great PCBs at a low cost and have promotions and coupons available throughout the year. You can sign up using here, or using the following link:
https://jlcpcb.com/?from=NerdCave that will support me as a creator to keep making content that is accesseble and open source at no charge to you.
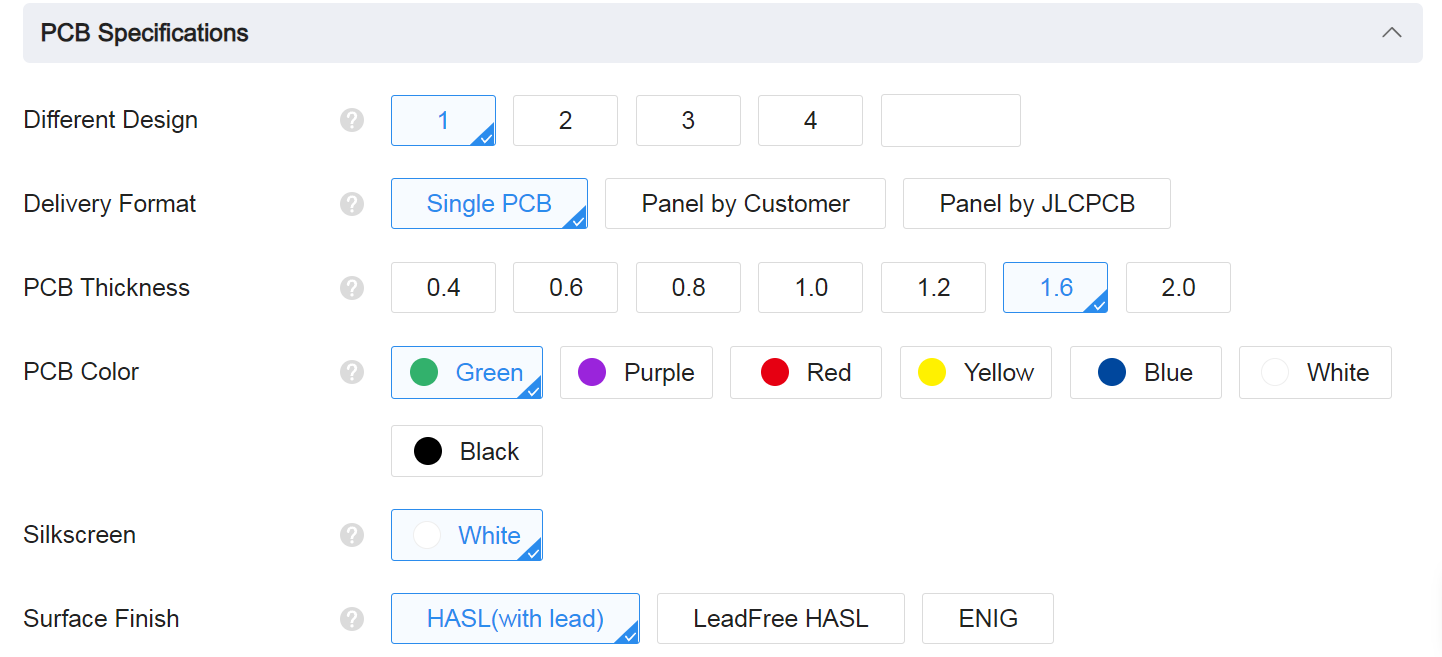
Ordering the PCB is very simple:
Download the Gerber file here or using the link: https://github.com/Guitarman9119/Raspberry-Pi-Pico-/blob/main/Motivational%20Box/Motivational%20Box%20Gerber.zip
Sign up through https://jlcpcb.com/?from=NerdCave
Click on Add gerber file

leave all the settings as default given. You might want change the PCB color which you can do here:
Enter you shipping details, save to cart
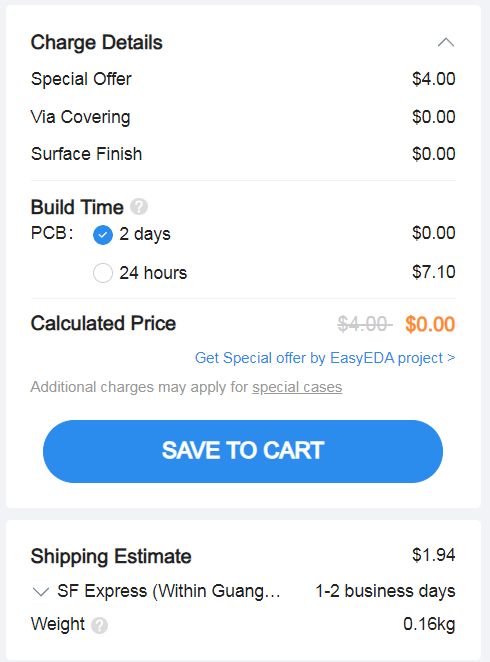
Then after a few days depending on your location you will receive your great quality PCB.
MicroPython
To following along with this tutorial make sure you have all the following files as indicated. You can download it from my GitHub repository. Here a short in depth overview of the main python script with code snippets explained.
Github Link: https://github.com/Guitarman9119/Raspberry-Pi-Pico-/tree/main/Motivational%20Box/Code%20-%20Pico
# Import necessary libraries and modules
import os
import json
import utime
from neopixel import Neopixel
from machine import Pin, RTC, SPI
import urequests
import network, json, time
from time import sleep
import binascii

# Initialize Neopixel strip and set colors
numpix = 10
strip = Neopixel(numpix, 0, 0, "GRB")

# Define LED colors
blank = (0, 0, 0)
red = (255, 0, 0)
orange = (255, 50, 0)
yellow = (255, 150, 0)
green = (0, 255, 0)
blue = (0, 100, 255)
indigo = (100, 0, 90)
violet = (200, 0, 100)
white = (255, 255, 255)

# Set strip brightness
strip.brightness(255)

# Define the pin numbers for the buttons
button_pins = [1, 2, 3, 4, 5]

# Define task names associated with each button
task_names = ['Task 1', 'Task 2', 'Task 3', 'Task 4', 'Task 5']

# Define the LED ranges for each task
task_led_ranges = [[8, 9], [6, 7], [4, 5], [2, 3], [0, 1]]

# Read WiFi and other configuration from config.json
with open('config.json') as f:
    config = json.load(f)

# Check if config.json contains updated credentials
if config['ssid'] == 'Enter_Wifi_SSID':
    assert False, ("config.json has not been updated with your unique keys and data")

# Create WiFi connection and turn it on
wlan = network.WLAN(network.STA_IF)
wlan.active(True)

# Connect to WiFi router
print("Connecting to WiFi: {}".format(config['ssid']))
wlan.connect(config['ssid'], config['ssid_password'])

# Wait until WiFi is connected
while not wlan.isconnected:
    pass

print("Internet connected")

# Function to check if a file or directory exists
def file_or_dir_exists(filename):
    try:
        os.stat(filename)
        return True
    except OSError:
        return False

# Function to synchronize time with WorldTimeAPI
def sync_time_with_worldtimeapi_org(rtc, blocking=True):
    TIME_API = "http://worldtimeapi.org/api/timezone/Asia/Shanghai"

    response = None
    while True:
        try:
            response = urequests.get(TIME_API)
            break
        except:
            if blocking:
                response.close()
                continue
            else:
                response.close()
                return

    # Process the response to get the current time details
    json = response.json()
    current_time = json["datetime"]
    the_date, the_time = current_time.split("T")
    year, month, mday = [int(x) for x in the_date.split("-")]
    the_time = the_time.split(".")[0]
    hours, minutes, seconds = [int(x) for x in the_time.split(":")]

    # Extract additional time-related details
    year_day = json["day_of_year"]
    week_day = json["day_of_week"]
    is_dst = json["dst"]
    response.close()

    # Update the RTC with the obtained time details
    rtc.datetime((year, month, mday, week_day, hours, minutes, seconds, 0))

rtc = RTC()

# Synchronize time with WorldTimeAPI
sync_time_with_worldtimeapi_org(rtc)

# Initialize a counter for forcing time sync
force_sync_counter = 0

# If a specific condition is met, force time synchronization
if force_sync_counter > 85000:  # A little less than a day
    force_sync_counter = 0
    sync_time_with_worldtimeapi_org(rtc, blocking=False)
force_sync_counter = force_sync_counter + 1

# Get year, month, day, and time components from RTC
Y, M, D, W, H, _, _, _ = rtc.datetime()

# Function to get SHA key from GitHub repository
def get_sha_git():
    token = "see instruction below"
    repo = 'Guitarman9119/motivational_box'
    path = 'static/db.json'

    # Make a request to GitHub API to get file details
    r = urequests.get(
        f'https://api.github.com/repos/{repo}/contents/{path}',
        headers={
            'Authorization': f'Token {token}',
            'User-Agent': 'Pico User Agent 1.0'
        }
    )

    # Process the response to get the SHA key
    js = r.json()
    return js['sha']

# Function to update data in a GitHub repository
def update_git():
    token = "see instruction below"
    repo = 'Guitarman9119/motivational_box'
    path = 'static/db.json'

    # Read the data from the local file
    with open("db.json", "r") as file:
        data = file.read()

    # Encode the data using Base64
    encoded_data = binascii.b2a_base64(data.encode())

    # Get the current SHA key for comparison
    sha = get_sha_git()

    # Make a request to GitHub API to update the file
    r = urequests.put(
        f'https://api.github.com/repos/{repo}/contents/{path}',
        headers={
            'Authorization': f'Token {token}',
            'User-Agent': 'Pico User Agent 1.0'
        },
        json={
            "message": "update daily tasks db.json",
            "content": encoded_data,
            "branch": "main",
            'sha': sha
        }
    )

# Function to create a database (if not exists)
def create_db(db_path):
    if not file_or_dir_exists(db_path):
        with open(db_path, 'w') as f:
            json.dump({}, f)

# Function to mark a task as completed in the database
def set_task_completed(task_name, db_path):
    rtc = RTC()
    sync_time_with_worldtimeapi_org(rtc)
    create_db(db_path)

    Y, M, D, W, H, _, _, _ = rtc.datetime()
    day_month_year = f"{Y}/{M}/{D}"

    print("Task completed", task_name, day_month_year)  # Print the completed task

    db = json.load(open(db_path, 'r'))

    if day_month_year not in db:
        db[day_month_year] = {}

    db[day_month_year][task_name] = True

    with open(db_path, 'w') as f:
        json.dump(db, f)

# Function to get completed tasks from the database
def get_completed_tasks(db_path):
    rtc = RTC()
    create_db(db_path)
    db = json.load(open(db_path, 'r'))

    Y, M, D, W, H, _, _, _ = rtc.datetime()
    day_month_year = f"{Y}/{M}/{D}"

    if day_month_year not in db:
        return []

    return [task for task in db[day_month_year] if db[day_month_year][task] == True]

# Function to update LEDs based on task status
def update_leds(task_status):
    # Clear all LEDs to blank (black) color
    for i in range(numpix):
        strip.set_pixel(i, blank)

    # Set LED colors based on task status
    for i, status in enumerate(task_status):
        led_range = task_led_ranges[i]
        if status:
            if i == 0:
                color = orange
            elif i == 1:
                color = green
            elif i == 2:
                color = yellow
            elif i == 3:
                color = white
            elif i == 4:
                color = blue
        else:
            color = red

        # Set LED colors within the specified range
        for j in range(led_range[0], led_range[1] + 1):
            strip.set_pixel(j, color)

    strip.show()  # Update the neopixel LEDs
    update_git()  # Update data in GitHub repository
    print("LEDs Updated")

# Function to update task status and LEDs
def update_tasks(task_names, db_path):
    task_status = [False for _ in task_names]
    for completed_task in get_completed_tasks(db_path):
        try:
            task_index = task_names.index(completed_task)
            task_status[task_index] = True
        except:
            print("Invalid task found", completed_task)
    update_leds(task_status)

# Function to check if a button is pressed and update tasks
def check_button_pressed(task_names, db_path):
    for i, pin in enumerate(task_pins):
        if pin.value() == 1:
            task_name = task_names[i]
            if task_name not in get_completed_tasks(db_path):
                set_task_completed(task_name, db_path)
                print(f"{task_name} completed")
                update_tasks(task_names, db_path)

# Function for continuous updates of tasks and LEDs
def update_loop(task_names, db_path):
    # Calculate the next update time (12 pm tomorrow)
    Y, M, D, W, H, _, _, _ = rtc.datetime()
    year_s = Y * 365 * 24 * 60 * 60
    month_s = M * 30 * 24 * 60 * 60
    day_s = (D + 1) * 24 * 60 * 60  # Next day
    hour_s = 12 * 60 * 60  # 12 pm
    next_update_s = year_s + month_s + day_s + hour_s

    # Continuous loop for updates
    while True:
        Y, M, D, W, H, _, _, _ = rtc.datetime()
        year_s = Y * 365 * 24 * 60 * 60
        month_s = M * 30 * 24 * 60 * 60
        day_s = D * 24 * 60 * 60
        hour_s = H * 60 * 60
        current_s = year_s + month_s + day_s + hour_s

        check_button_pressed(task_names, db_path)  # Check for button press

        # Perform updates if the current time exceeds the next update time
        if current_s > next_update_s:
            update_tasks(task_names, db_path)  # Update task status and LEDs

            Y, M, D, W, H, _, _, _ = rtc.datetime()
            year_s = Y * 365 * 24 * 60 * 60
            month_s = M * 30 * 24 * 60 * 60
            day_s = (D + 1) * 24 * 60 * 60  # Next day
            hour_s = 12 * 60 * 60  # 12 pm
            next_update_s = year_s + month_s + day_s + hour_s

            update_git()  # Update data in GitHub repository

# Get the current working directory
cwd = os.getcwd()

# Construct the path for the database file
db_path = cwd + '/db.json'

# Main execution of the script
if __name__ == '__main__':
    # Update initial task status on LEDs
    update_tasks(task_names, db_path)

    # Enter the loop for continuous updates
    update_loop(task_names, db_path)
before creating the token from github let’s first look at the website and hosting
Website Tracker
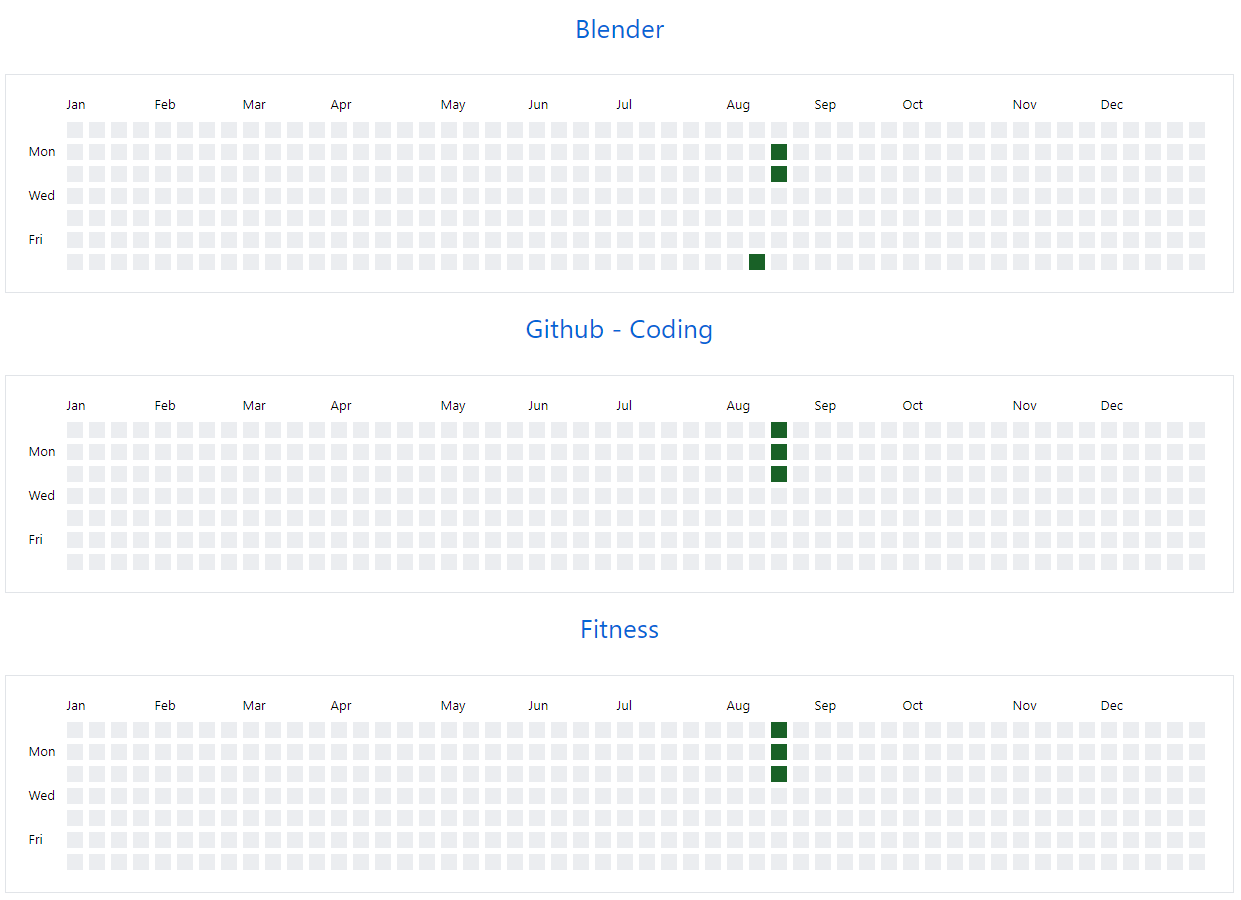
You can download the tracker website files here: https://github.com/Guitarman9119/motivational_box/tree/main
The easiest method will be to clone the repository and make the neccecary changes so it corresponds to the tasks you have made for yourself.
Edit the index.html and change the heading to each corresponding task you have chosen for yourself:
<!DOCTYPE html>
<html lang="en">
<head>
  <meta charset="UTF-8">
  <meta name="viewport" content="width=device-width, initial-scale=1.0">
  <title>Task Heatmaps</title>
  <link rel="stylesheet" href="https://cdnjs.cloudflare.com/ajax/libs/meyer-reset/2.0/reset.min.css">
  <link rel="stylesheet" href="styles.css">
</head>
<body>


  <h1>Blender</h1>
  <div class="graph-container">
  <div class="graph">
    <ul class="months">
here we can change the h1 to be any other task.
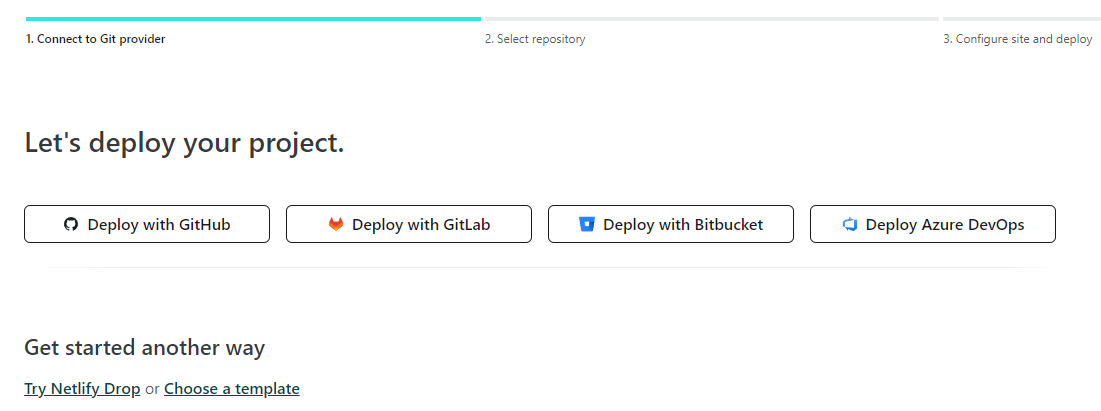
Hosting the website:
Netlify was used to host the tracker as it offers free hosting for small projects. Sign up to netlify and add a new site

You can deploy with GitHub. This will guide you through the steps to allow netlify to access and read your repository to host your tracker online.
How to create github token
- Log in to Your GitHub Account: Make sure you’re logged in to your GitHub account.
- Access Personal Access Tokens Settings:
- Click on your profile picture in the upper-right corner.
- Choose “Settings” from the dropdown menu.
- In the left sidebar, select “Developer settings”, then click on “Personal access tokens”.
- Generate a New Token:
- Click on the “Fine-grained tokens” button.
- Click on generate new token
- You might be prompted to enter your GitHub password to proceed.
- Configure Token Settings:
- Enter a meaningful name for your token to help you remember its purpose.
- Choose the desired expiration for the token. You can choose between no expiration, a set expiration, or a custom expiration.
- Select Scopes: GitHub provides a range of scopes that determine the level of access your token will have. You can grant access to specific repositories, organizations, and services. Be cautious and only select the scopes that are necessary for your intended use.
- Repository access: Select the repository where you will have your website.
- Generate Token: Once you’ve selected the appropriate scopes, click the “Generate token” button at the bottom of the page.
- Copy and Store the Token: After generating the token, GitHub will display the token value on the screen. This is the only time you’ll see the token, so be sure to copy it and store it securely. Treat this token like a password, as it grants access to your account.
- Use the Token: You can now use the generated token in your applications, scripts, or any other place where you need to authenticate with GitHub. When making API requests, include the token in the headers (Authorization header) as a bearer token. Use this token in code above.
Remember to keep your tokens secure and never share them publicly. If you believe a token has been compromised, you can regenerate or delete it from the GitHub settings.
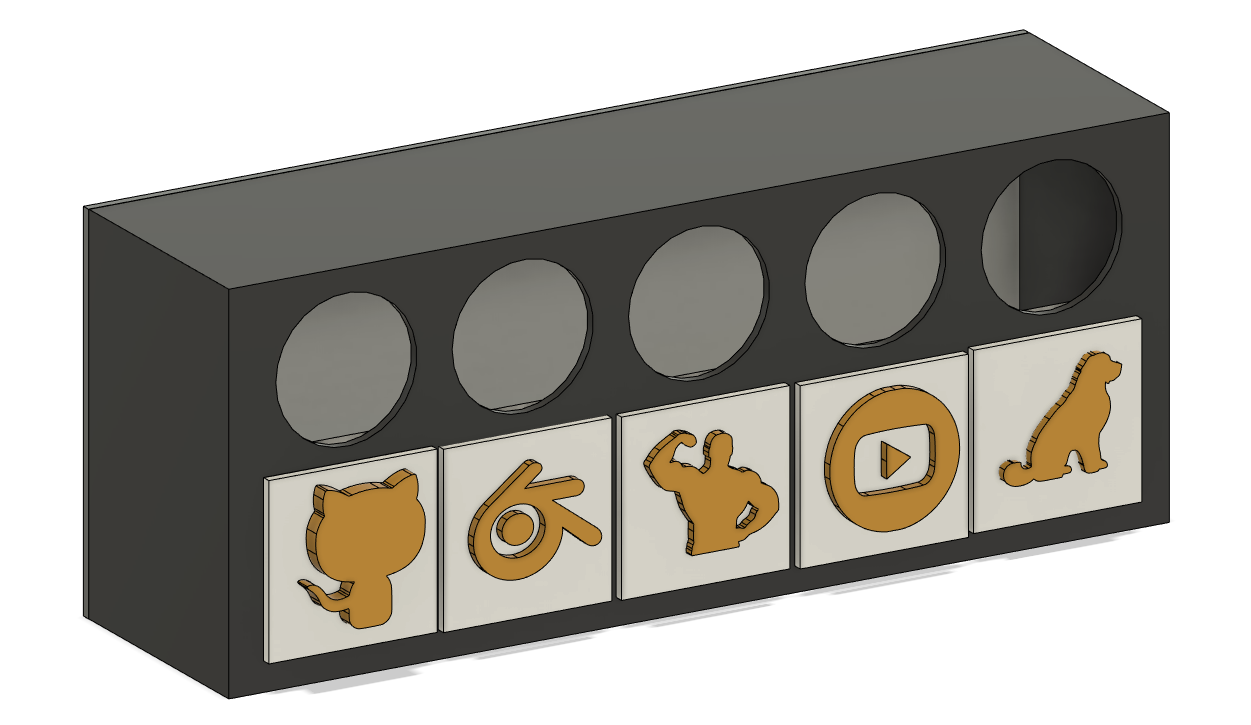
Motivational Box Design
The box was designed in Fustion 360. It is important that you use white filament for task indicator to allow the LED to diffuse through the white filament to indicate the task status.
You can download all the 3D files here: https://github.com/Guitarman9119/Raspberry-Pi-Pico-/tree/main/Motivational%20Box/3D%20STL%20Files
Conclusion
It was a fun project to create and I do believe that using this box will keep me motivated. If you have any questions you can comment down below, or follow me on YouTube and comment on the video if you need any help creating your own motivational box.