Synchronize RTC over Wi-Fi with Raspberry Pi Pico W
Learn to synchronize the RTC of your Raspberry Pi Pico W over the internet for accurate timekeeping.
Introduction
In this tutorial, we will learn how to synchronize the real-time clock (RTC) of the Raspberry Pi Pico W over Wi-Fi using the IP Geolocation API. This project will allow our microcontroller to keep accurate time by fetching the current date and time from the internet. It’s a great way to understand how to interact with APIs, as well as how to manage timekeeping in your microcontroller projects.
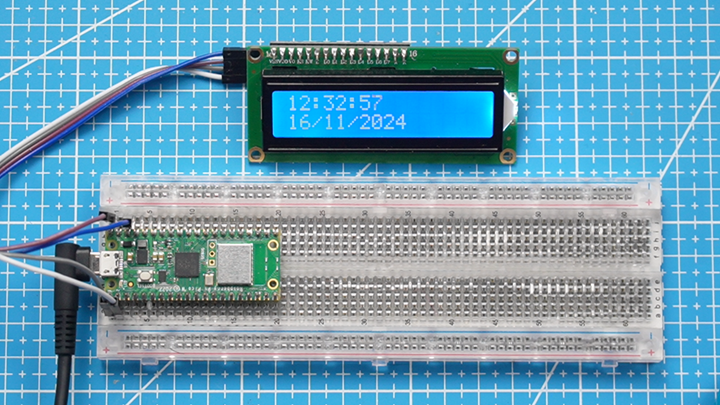
We will create this project using a few simple components and a breadboard. By the end of this tutorial, you will be able to display the synchronized time on an LCD screen connected to your Pico W.
The image below shows a typical LCD setup, which we will use to display the time.

Components Needed
To build this RTC synchronization project, you will need the following components:
| Component | Quantity |
|---|---|
| Raspberry Pi Pico W | 1 |
| Micro USB Cable | 1 |
| Breadboard | 1 |
| Wires | Several |
| I2C LCD Display | 1 |
Software
Thonny IDE: A Python IDE that supports MicroPython, which you will use to write and upload your code to the Pico W. MicroPython Firmware: Ensure your Raspberry Pi Pico W has MicroPython installed. You can download it from the official Raspberry Pi website. If it is your first time using the Raspberry Pi Pico W, check out the Introduction section to learn how to set up the Pico with MicroPython.
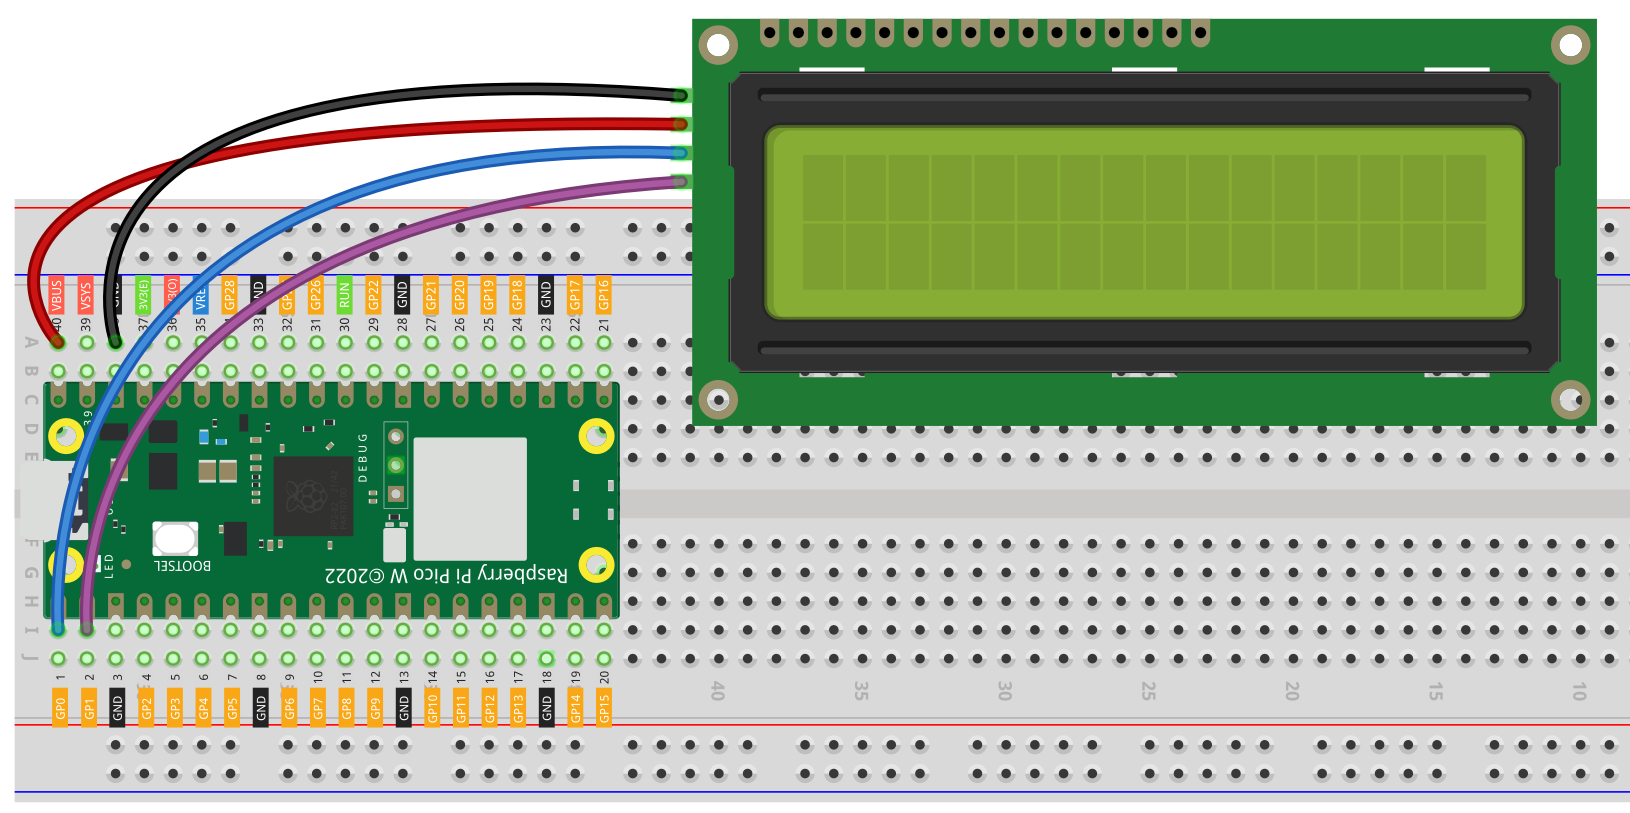
Schematic Diagram
Below is the wiring diagram for connecting your I2C LCD display to the Raspberry Pi Pico W.

Setting Up Your API Key
Before we dive into the code, you’ll need to set up an API key with the IP Geolocation API. Follow these steps to get your key:
Visit the IP Geolocation API Website: Go to ipgeolocation.io. Sign Up: Click on the “Sign Up” button to create a free account. You will need to provide your email address and create a password. Verify Your Email: After signing up, check your email for a verification message. Click on the verification link to activate your account. Get Your API Key: Once your account is activated, log in to the dashboard. You will see your API key displayed prominently. Copy this key; you will need it for your project. Create a Configuration File: Create a file named config.json in the same directory as your code. This file will store your Wi-Fi credentials and API key. Here’s an example of how your config.json file should look:
{
    "ssid": "your_wifi_ssid",
    "ssid_password": "your_wifi_password",
    "date_time_api": "your_api_key",
    "time_zone": "your_time_zone"  // e.g., "Asia/Shanghai"
}
Replace your_wifi_ssid, your_wifi_password, your_api_key, and your_time_zone with your actual Wi-Fi details and the API key you copied from the dashboard.
Code:
Here’s the complete code that connects to Wi-Fi, synchronizes the RTC using the IP Geolocation API, and displays the current time on the LCD. You can download the complete code using the following link. Download
main.py
import utime
from machine import I2C, Pin, RTC
import json
import network
import urequests
from lcd_api import LcdApi
from pico_i2c_lcd import I2cLcd

# LCD Setup
I2C_ADDR = 63
I2C_NUM_ROWS = 2
I2C_NUM_COLS = 16
i2c = I2C(0, sda=Pin(0), scl=Pin(1), freq=400000)
lcd = I2cLcd(i2c, I2C_ADDR, I2C_NUM_ROWS, I2C_NUM_COLS)

# Wi-Fi Configuration
def connect_wifi():
    with open('config.json') as f:
        config = json.load(f)

    wlan = network.WLAN(network.STA_IF)
    wlan.active(True)
    wlan.connect(config['ssid'], config['ssid_password'])

    print("Connecting to WiFi...")
    while not wlan.isconnected():
        utime.sleep(1)
        print("Still trying to connect...")

    print("Connected to Wi-Fi:", wlan.ifconfig())

# Function to sync time with IP Geolocation API
def sync_time_with_ip_geolocation_api(rtc):
    with open('config.json') as f:
        config = json.load(f)

    date_time_api = config['date_time_api']
    timezone = config['time_zone']

    url = f'http://api.ipgeolocation.io/timezone?apiKey={date_time_api}&tz={timezone}'
    response = urequests.get(url)
    data = response.json()

    print("API Response:", data)

    if 'date_time' in data:
        current_time = data["date_time"]
        print("Current Time String:", current_time)

        if " " in current_time:
            the_date, the_time = current_time.split(" ")
            year, month, mday = map(int, the_date.split("-"))
            hours, minutes, seconds = map(int, the_time.split(":"))

            week_day = data.get("day_of_week", 0)  # Default to 0 if not available
            rtc.datetime((year, month, mday, week_day, hours, minutes, seconds, 0))
            print("RTC Time After Setting:", rtc.datetime())
        else:
            print("Error: Unexpected time format:", current_time)
    else:
        print("Error: The expected data is not present in the response.")

# Function to display time on LCD
def display_time(rtc):
    previous_time_str = ""
    previous_date_str = ""

    while True:
        current_time = rtc.datetime()  # Get current time
        # Format the time string
        time_str = f"{current_time[4]:02}:{current_time[5]:02}:{current_time[6]:02}"  # HH:MM:SS
        date_str = f"{current_time[2]:02}/{current_time[1]:02}/{current_time[0]}"  # DD/MM/YYYY


        # Update only if the time or date has changed
        if time_str != previous_time_str:
            lcd.move_to(0, 0)  # Move cursor to the first row
            lcd.putstr(time_str)  # Display time without padding

        if date_str != previous_date_str:
            lcd.move_to(0, 1)  # Move cursor to the second row
            lcd.putstr(date_str)  # Display date without padding

        # Save the current time and date for the next comparison
        previous_time_str = time_str
        previous_date_str = date_str

        utime.sleep(1)  # Update every second

# Main program flow
def main():
    connect_wifi()
    rtc = RTC()
    sync_time_with_ip_geolocation_api(rtc)

    # Start displaying time
    display_time(rtc)

main()
Code explanation
1. Importing Libraries
import utime
from machine import I2C, Pin, RTC
import json
import network
import urequests
from lcd_api import LcdApi
from pico_i2c_lcd import I2cLcd
utime: This module provides time-related functions, including sleep functionality, which will be used for delays in the code.
machine : This module allows interaction with the hardware of the Raspberry Pi Pico. It provides access to GPIO pins, I2C, and RTC (Real-Time Clock).
json : This module is used for parsing JSON data. It will be used to read configuration settings and handle the API response.
network : This module handles network connections. It will be used to connect to Wi-Fi.
urequests : This module is a lightweight HTTP library for making requests. It will be used to fetch data from the IP Geolocation API.
lcd_api and pico_i2c_lcd : These modules are used for interfacing with an I2C LCD display, allowing us to show the current time and date.
LCD Setup
I2C_ADDR = 63
I2C_NUM_ROWS = 2
I2C_NUM_COLS = 16
i2c = I2C(0, sda=Pin(0), scl=Pin(1), freq=400000)
lcd = I2cLcd(i2c, I2C_ADDR, I2C_NUM_ROWS, I2C_NUM_COLS)
- I2C_ADDR : The I2C address of the LCD (commonly 0x27 or 0x3F, but can vary).
- I2C_NUM_ROWS and I2C_NUM_COLS : These define the dimensions of the LCD (2 rows and 16 columns in this case).
- i2c = I2C(…) : Initializes the I2C bus using GPIO pins 0 (SDA) and 1 (SCL) with a frequency of 400 kHz.
- lcd = I2cLcd(…) : Creates an instance of the I2cLcd class to control the LCD.
Wi-Fi Configuration
def connect_wifi():
    with open('config.json') as f:
        config = json.load(f)

    wlan = network.WLAN(network.STA_IF)
    wlan.active(True)
    wlan.connect(config['ssid'], config['ssid_password'])

    print("Connecting to WiFi...")
    while not wlan.isconnected():
        utime.sleep(1)
        print("Still trying to connect...")

    print("Connected to Wi-Fi:", wlan.ifconfig())
- connect_wifi() : This function handles connecting the Raspberry Pi Pico W to a Wi-Fi network.
- with open(‘config.json’) as f: : Opens the config.json file to read Wi-Fi credentials (SSID and password).
- network.WLAN(network.STA_IF) : Initializes the Wi-Fi in station mode (STA mode).
- wlan.active(True) : Activates the WLAN interface.
- wlan.connect(…) : Connects to the specified Wi-Fi network using credentials from the configuration file.
- Connection Loop: The function continuously checks if the device is connected to Wi-Fi and prints messages until the connection is successful.
Syncing Time with IP Geolocation API
def sync_time_with_ip_geolocation_api(rtc):
    with open('config.json') as f:
        config = json.load(f)

    date_time_api = config['date_time_api']
    timezone = config['time_zone']

    url = f'http://api.ipgeolocation.io/timezone?apiKey={date_time_api}&tz={timezone}'
    response = urequests.get(url)
    data = response.json()

    print("API Response:", data)

    if 'date_time' in data:
        current_time = data["date_time"]
        print("Current Time String:", current_time)

        if " " in current_time:
            the_date, the_time = current_time.split(" ")
            year, month, mday = map(int, the_date.split("-"))
            hours, minutes, seconds = map(int, the_time.split(":"))

            week_day = data.get("day_of_week", 0)  # Default to 0 if not available
            rtc.datetime((year, month, mday, week_day, hours, minutes, seconds, 0))
            print("RTC Time After Setting:", rtc.datetime())
        else:
            print("Error: Unexpected time format:", current_time)
    else:
        print("Error: The expected data is not present in the response.")
- sync_time_with_ip_geolocation_api(rtc) : This function synchronizes the RTC of the Pico with the current time from the IP Geolocation API.
- Reading Config: It reads the API key and time zone from the configuration file.
- API Request: Constructs the URL for the API request and makes a GET request using urequests.get(url).
- Parsing Response: The response is parsed as JSON. The function checks if the date_time key exists in the response.
- Extracting Date and Time: If the time format is correct, it extracts the year, month, day, hours, minutes, and seconds, and sets the RTC using rtc.datetime(…).
Displaying Time on LCD
def display_time(rtc):
    previous_time_str = ""
    previous_date_str = ""

    while True:
        current_time = rtc.datetime()  # Get current time
        time_str = f"{current_time[4]:02}:{current_time[5]:02}:{current_time[6]:02}"  # HH:MM:SS
        date_str = f"{current_time[2]:02}/{current_time[1]:02}/{current_time[0]}"  # DD/MM/YYYY

        # Update only if the time or date has changed
        if time_str != previous_time_str:
            lcd.move_to(0, 0)  # Move cursor to the first row
            lcd.putstr(time_str)  # Display time without padding

        if date_str != previous_date_str:
            lcd.move_to(0, 1)  # Move cursor to the second row
            lcd.putstr(date_str)  # Display date without padding

        # Save the current time and date for the next comparison
        previous_time_str = time_str
        previous_date_str = date_str

        utime.sleep(1)  # Update every second
- display_time(rtc) : This function continuously displays the current time and date on the LCD.
- Time Formatting: The current time is formatted as HH:MM:SS and the date as DD/MM/YYYY.
- Updating Display: The display is only updated if the time or date has changed since the last check, reducing unnecessary writes to the LCD.
- utime.sleep(1) : The loop pauses for 1 second between updates to keep the display current without overwhelming the LCD.
Main Program Flow
def main():
    connect_wifi()
    rtc = RTC()
    sync_time_with_ip_geolocation_api(rtc)

    # Start displaying time
    display_time(rtc)

main()
- main() : This is the main function that orchestrates the flow of the program.
- Connecting to Wi-Fi: Calls connect_wifi() to establish a Wi-Fi connection.
- RTC Initialization: Creates an instance of the RTC.
- Syncing Time: Calls sync_time_with_ip_geolocation_api(rtc) to synchronize the RTC.
- Displaying Time: Finally, it calls display_time(rtc) to begin showing the current time on the LCD.
- main() : The last line calls the main() function to execute the program.