Tutorial - LCD1602
In this tutorial we will look at how to connect the LCD1602 module to the Raspberry Pi 5
Introduction
LCD1602 is a 16-character by 2-line alphanumeric LCD (Liquid Crystal Display) module. It is a commonly used display module that can display up to 32 ASCII characters in two lines of 16 characters each. The module consists of a display controller and a standard HD44780 LCD controller.
The LCD1602 module is widely used in various electronic projects, such as DIY robots, weather stations, and digital clocks, because of its low power consumption and easy-to-use interface. It can display alphanumeric characters, symbols, and graphics, making it a versatile display option.
The LCD1602 module is an important component in many electronic projects, providing a simple and reliable way to display information in an easy-to-read format. Its versatility and ease of use make it a popular choice for hobbyists and professionals alike.
Components Needed
| Component | Quantity |
|---|---|
| Raspberry Pi 5 | 1 |
| Breadboard | 1 |
| Wires | Several |
| I2C LCD1602 | 1 |
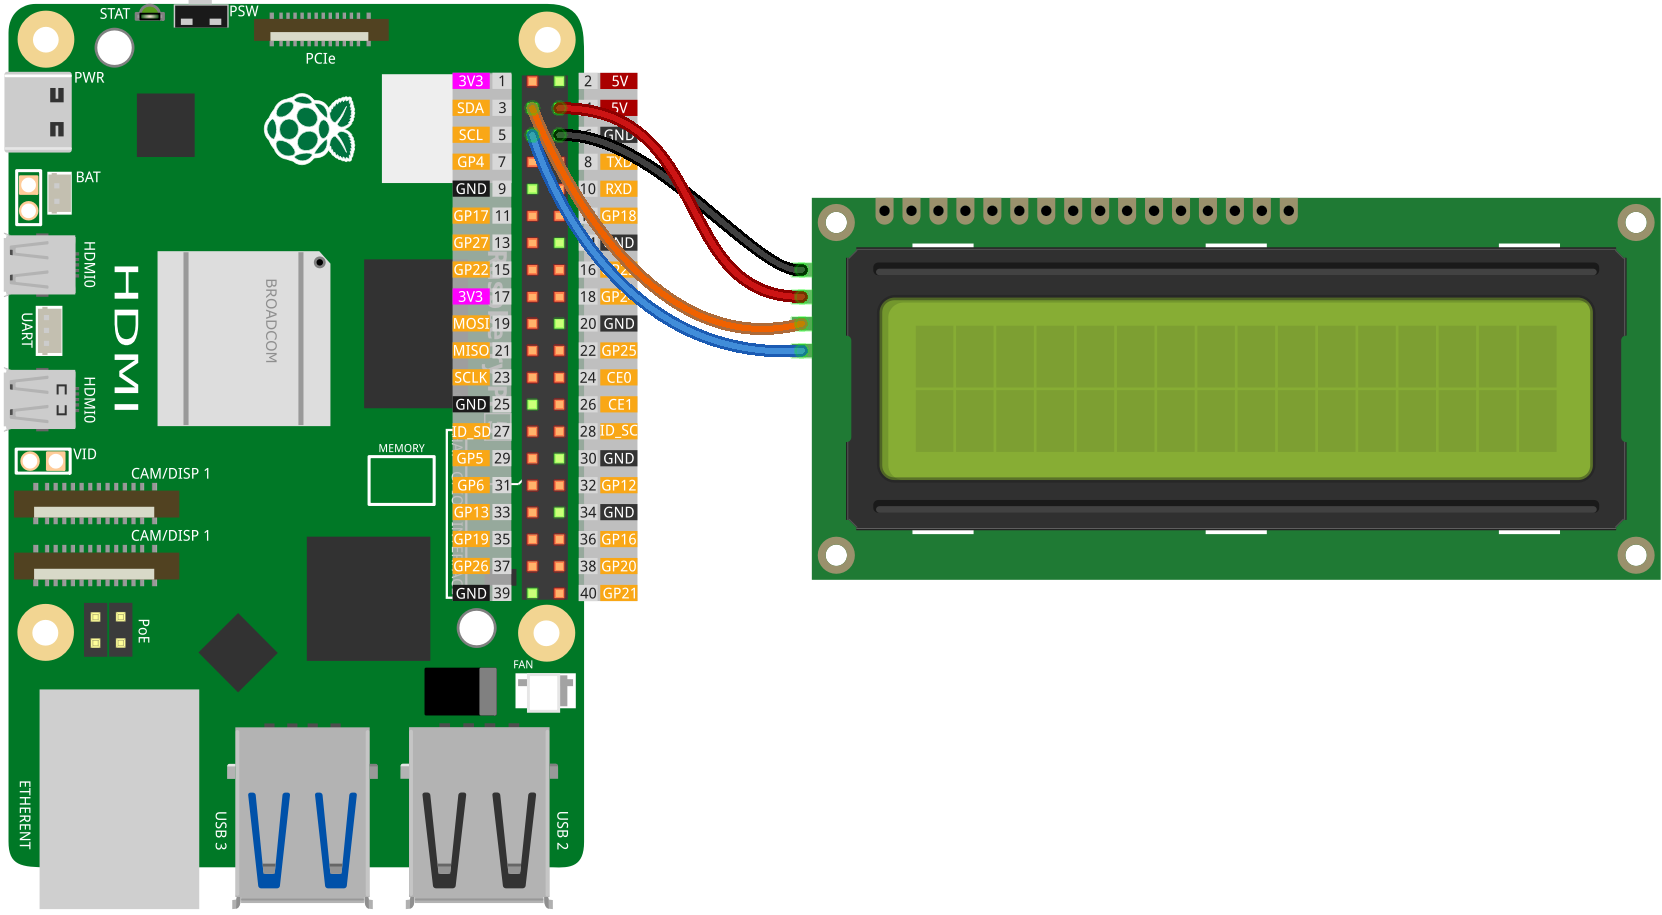
Fritzing Diagram
Connect the LCD to your Raspberry Pi as shown in the following diagram.
LCD Library
import smbus
import time

class LCD:
    def __init__(self, pi_rev = 2, i2c_addr = 0x3F, backlight = True):

        # device constants
        self.I2C_ADDR  = i2c_addr
        self.LCD_WIDTH = 16   # Max. characters per line

        self.LCD_CHR = 1 # Mode - Sending data
        self.LCD_CMD = 0 # Mode - Sending command

        self.LCD_LINE_1 = 0x80 # LCD RAM addr for line one
        self.LCD_LINE_2 = 0xC0 # LCD RAM addr for line two

        if backlight:
            # on
            self.LCD_BACKLIGHT  = 0x08
        else:
            # off
            self.LCD_BACKLIGHT = 0x00

        self.ENABLE = 0b00000100 # Enable bit

        # Timing constants
        self.E_PULSE = 0.0005
        self.E_DELAY = 0.0005

        # Open I2C interface
        if pi_rev == 2:
            # Rev 2 Pi uses 1
            self.bus = smbus.SMBus(1)
        elif pi_rev == 1:
            # Rev 1 Pi uses 0
            self.bus = smbus.SMBus(0)
        else:
            raise ValueError('pi_rev param must be 1 or 2')

        # Initialise display
        self.lcd_byte(0x33, self.LCD_CMD) # 110011 Initialise
        self.lcd_byte(0x32, self.LCD_CMD) # 110010 Initialise
        self.lcd_byte(0x06, self.LCD_CMD) # 000110 Cursor move direction
        self.lcd_byte(0x0C, self.LCD_CMD) # 001100 Display On,Cursor Off, Blink Off
        self.lcd_byte(0x28, self.LCD_CMD) # 101000 Data length, number of lines, font size
        self.lcd_byte(0x01, self.LCD_CMD) # 000001 Clear display

    def lcd_byte(self, bits, mode):
        # Send byte to data pins
        # bits = data
        # mode = 1 for data, 0 for command

        bits_high = mode | (bits & 0xF0) | self.LCD_BACKLIGHT
        bits_low = mode | ((bits<<4) & 0xF0) | self.LCD_BACKLIGHT

        # High bits
        self.bus.write_byte(self.I2C_ADDR, bits_high)
        self.toggle_enable(bits_high)

        # Low bits
        self.bus.write_byte(self.I2C_ADDR, bits_low)
        self.toggle_enable(bits_low)

    def toggle_enable(self, bits):
        time.sleep(self.E_DELAY)
        self.bus.write_byte(self.I2C_ADDR, (bits | self.ENABLE))
        time.sleep(self.E_PULSE)
        self.bus.write_byte(self.I2C_ADDR,(bits & ~self.ENABLE))
        time.sleep(self.E_DELAY)

    def message(self, string, line = 1):
        # display message string on LCD line 1 or 2
        if line == 1:
            lcd_line = self.LCD_LINE_1
        elif line == 2:
            lcd_line = self.LCD_LINE_2
        else:
            raise ValueError('line number must be 1 or 2')

        string = string.ljust(self.LCD_WIDTH," ")

        self.lcd_byte(lcd_line, self.LCD_CMD)

        for i in range(self.LCD_WIDTH):
            self.lcd_byte(ord(string[i]), self.LCD_CHR)

    def clear(self):
        # clear LCD display
        self.lcd_byte(0x01, self.LCD_CMD)
Code
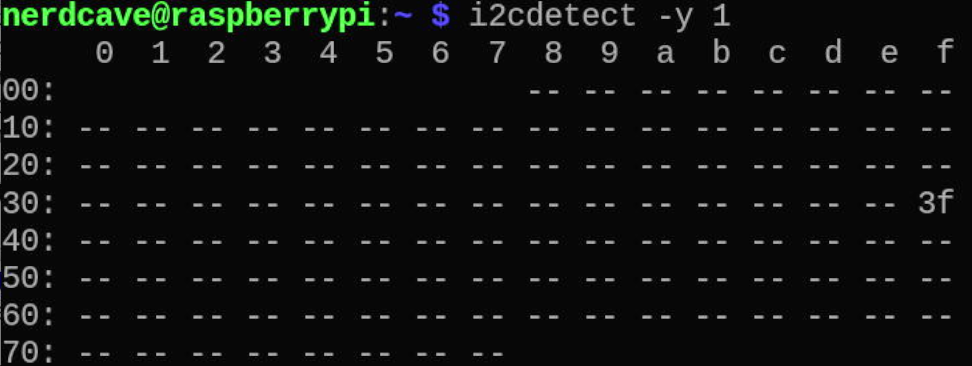
You can verify the address of the connected I2C device using the following command
i2cdetect -y 1
Addresses of any connected I2C devices will be shown.
Make sure that the Library and the following demo code is in the same directory.
import time
from LCD import LCD

# Initialize the LCD with specific parameters: Raspberry Pi revision, I2C address, and backlight status
lcd = LCD(2, 0x3f, True)  # Using Raspberry Pi revision 2 and above, I2C address 0x3f, backlight enabled

# Display messages on the LCD
lcd.message("NerdCave", 1)        # Display 'NerdCave!' on line 1
lcd.message("Tutorials", 2)    # Display '    - Tutoarials' on line 2

# Keep the messages displayed for 5 seconds
time.sleep(5)

# Clear the LCD display
lcd.clear()
Code Explanation
Import required libraries: The script imports two Python libraries
import time
from LCD import LCD
time is a standard Python library for handling time-related tasks.
The LCD library is a custom library. There are various of other custom libraries available.
Initialize the LCD: This line creates an instance of the LCD class.
lcd = LCD(2, 0x3f, True)
Here, the LCD constructor takes three parameters:
The first parameter 2 signifies that we are using a Raspberry Pi revision 2 and later versions.
The second parameter 0x3f is the I2C address of the LCD.
The third parameter True enables the backlight of the LCD.
Display messages on the LCD:
lcd.message("NerdCave", 1)
lcd.message("Tutorials", 2)
These commands use the message method of the lcd object to display respective messages on the LCD display. The first argument is the message to display and the second argument is the line number. So NerdCave is displayed on line 1 and Tutorials on line 2.
Pause for 5 seconds:
time.sleep(5)
The time.sleep(5)
time.sleep(5) command pauses the script for 5 seconds. During this time, the messages continue to display on the LCD screen.
Clear the screen:
lcd.clear()
Finally, lcd.clear() is used to clear the LCD display.