WS2812B LED Controller
YouTube Video
Introduction
Welcome to this tutorial on creating a custom PCB controller for the WS2812B LED using either the Raspberry Pi Pico or the D1 Mini. This PCB simplifies the process of controlling these popular addressable LEDs by utilizing the Neopixel library with the Raspberry Pi Pico or WLED firmware. Whether you’re looking to enhance your lighting projects or explore new possibilities with LED control, this guide will walk you through the entire process.
Components - Breakdown
The following is the list of components needed:
| Components | Quantity |
|---|---|
| Custom PCB | 1 |
| Raspberry Pi Pico W | 1 |
| D1 Mini | 1 |
| 12*12 mm Push Buttons | 2 |
| 2.54 20 pin Header | 2 |
| Screw Terminals 2.54mm Pitch (2-Pin) | 7 |
| Miscellaneous | Depending on Design |
Schematic Diagram
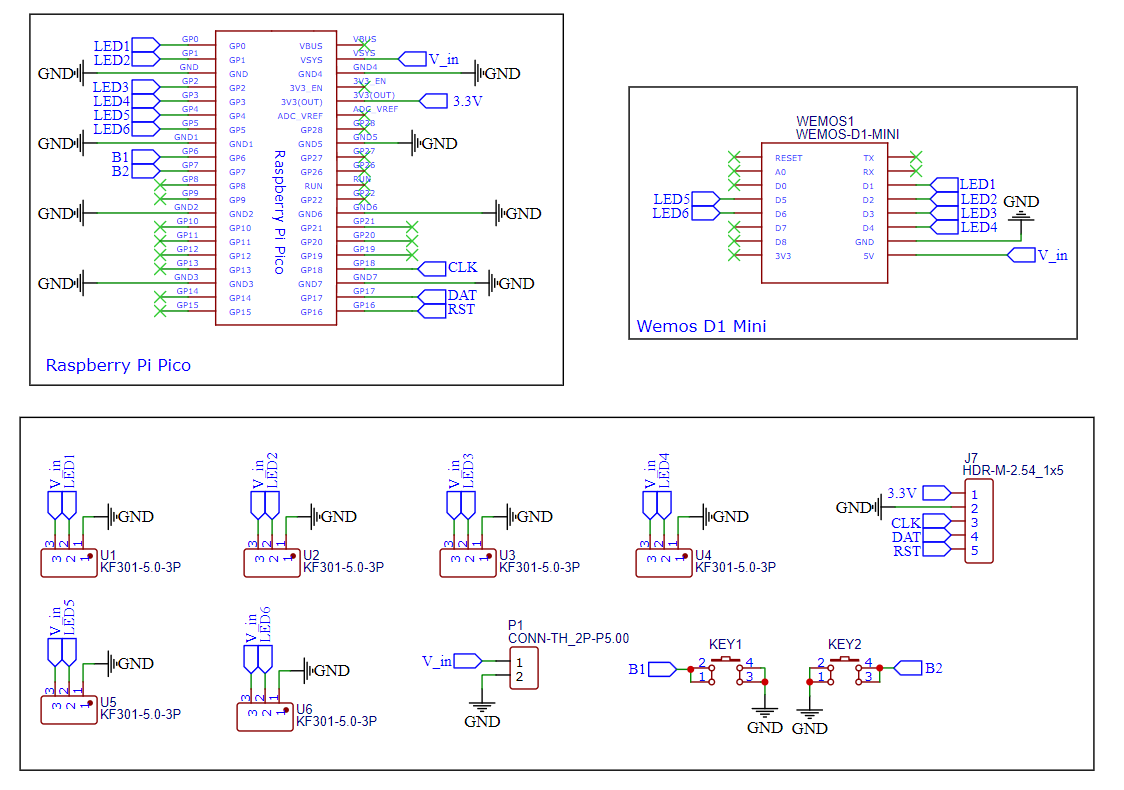
The schematic diagram was created using EasyEDA. All components used are through-hole types, making the soldering process easier and more accessible, especially for beginners. This design offers enhanced reliability, as the leads pass completely through the board and are soldered in place, resulting in stronger and more durable connections.
PCB Design
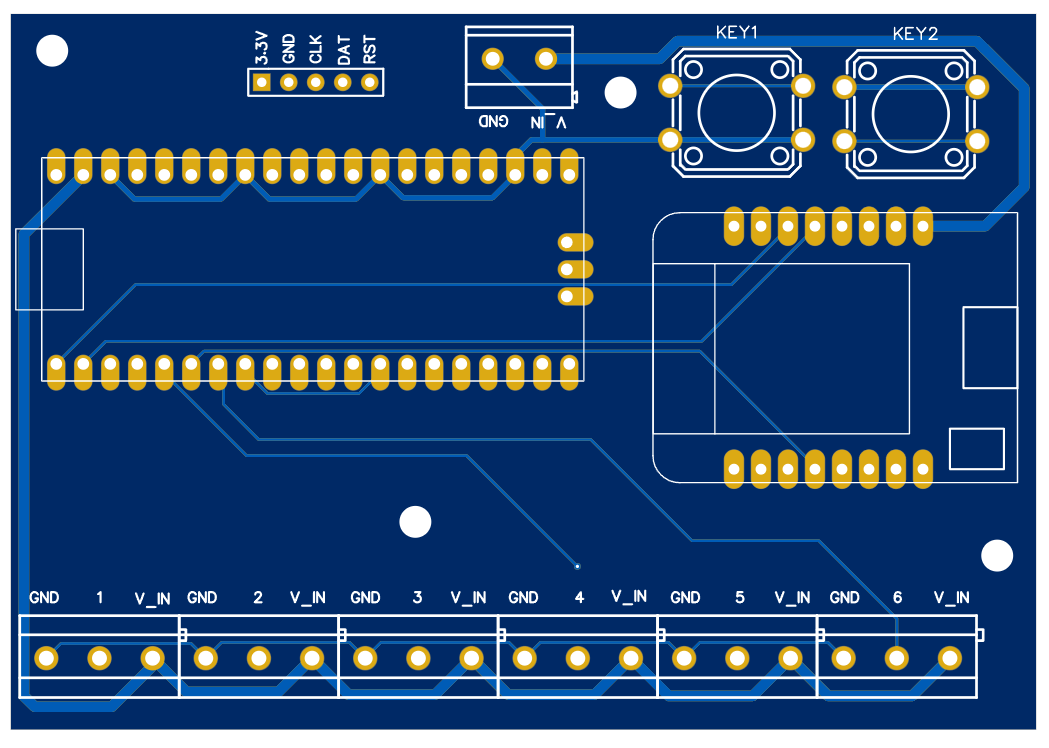
The PCB was designed using EasyEDA, a free and user-friendly web-based tool that supports circuit design, simulation, and PCB layout. This design includes several key features:
- Two Push Buttons: Control the LED strip with preset colors for easy operation.
- Bluetooth Connector: An integrated connector for adding Bluetooth functionality via the HC-05 module, allowing for wireless control.
- Mounting Holes: The PCB is equipped with four 3mm mounting holes, making it easy to secure within an enclosure.
PCB Top:
Order PCB (JLCPCB)
The PCB was ordered through JLCPCB. They offer great PCBs at a low cost and have promotions and coupons available throughout the year. You can sign up using here, or using the following link:
https://jlcpcb.com/?from=Nerd that will support me as a creator to keep making content that is accessible and open source at no charge to you.
Ordering the PCB is very simple:
Download the Gerber file here.
Click on Add Gerber file

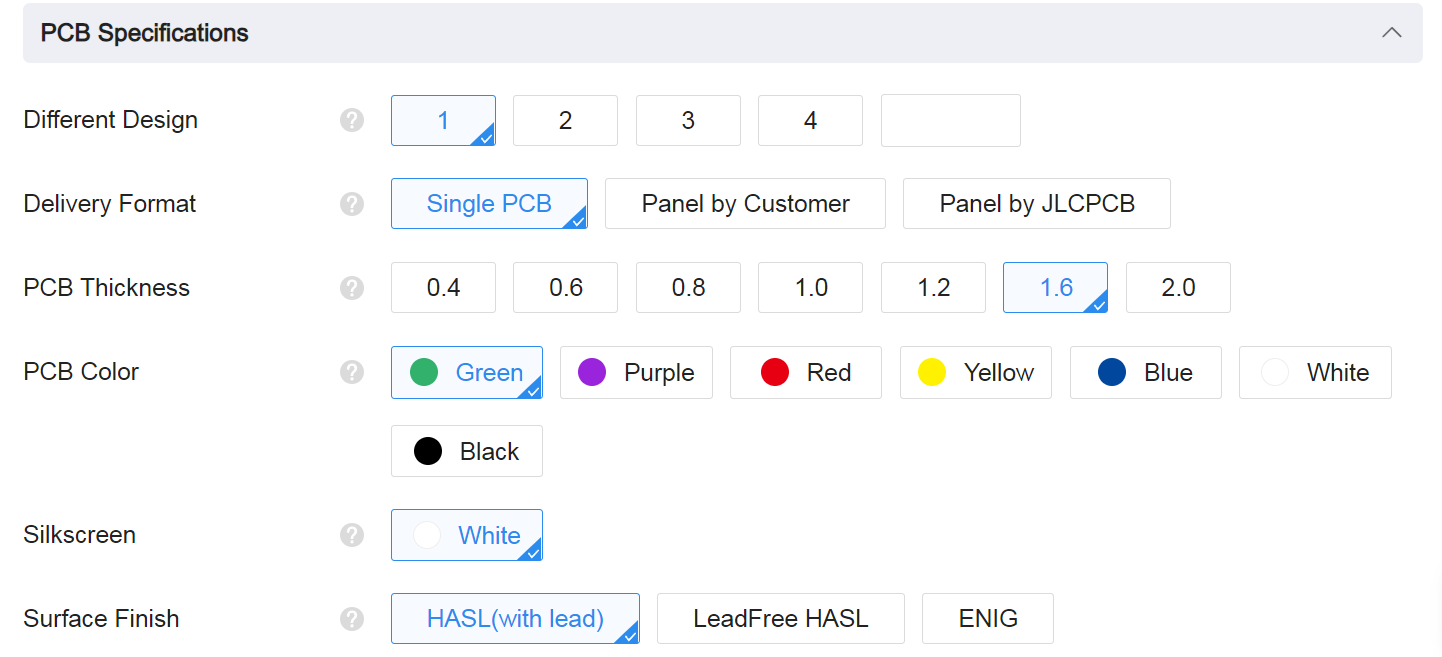
leave all the settings as default given. You might want change the PCB color which you can do here:
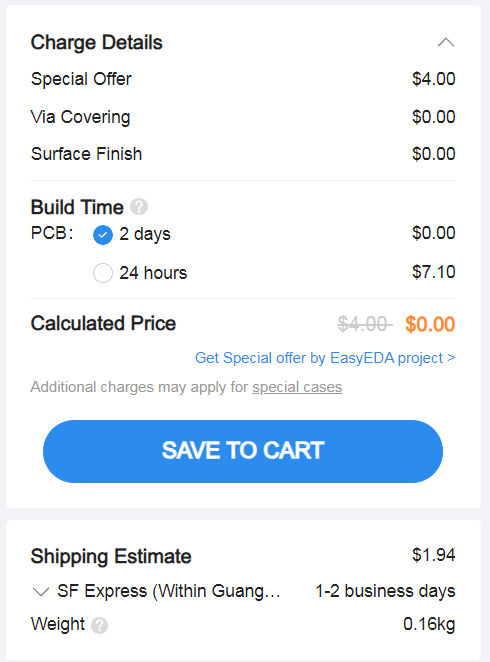
Enter you shipping details, save to cart
Then after a few days depending on your location you will receive your great quality PCB.
Code
The following code demonstrates how to control WS2812B LED strips using the Neopixel library on the Raspberry Pi Pico. This example defines several colors and initializes multiple LED strips with the ability to control their colors.
main.py
from neopixel import Neopixel

# Defined colors
colors_rgb = {
    'red': (255, 0, 0),
    'orange': (255, 50, 0),
    'yellow': (255, 255, 0),
    'green': (0, 255, 0),
    'blue': (0, 0, 255),
    'indigo': (100, 0, 90),
    'violet': (200, 0, 100),
    'blank': (0, 0, 0)
}

def init_strips(num_leds_for_each_strip, led_indexes, brightness):
    strips = [Neopixel(num_leds, index, index, "GRB") for num_leds, index in zip(num_leds_for_each_strip, led_indexes)]
    for strip in strips:
        strip.brightness(brightness)
    return strips

def control_each_strip(strips, num_leds_for_each_strip, color_names):
    for idx, strip in enumerate(strips):
        color_name = color_names[idx]
        # Get color value based on color_name
        color_values = colors_rgb.get(color_name, None)
        if not color_values:
            print(f'Invalid color name: {color_name}, valid values are {list(colors_rgb.keys())}')
            continue
        for i in range(num_leds_for_each_strip[idx]):
            strip.set_pixel(i, color_values)

        strip.show()

num_leds_for_each_strip = [26, 4, 4, 4, 4, 4]  # number of LEDs for each strip
led_indexes = [0, 1, 2, 3, 4, 5]
strips = init_strips(num_leds_for_each_strip, led_indexes, brightness=100)
control_each_strip(strips, num_leds_for_each_strip, ['blue', 'yellow', 'green', 'red', 'violet', 'orange'])
Code Explanation
- Color Definitions: The colors_rgb dictionary maps color names to their respective RGB values.
- init_strips Function: Initializes the LED strips with the specified number of LEDs and sets their brightness.
- control_each_strip Function: Loops through each strip, retrieves the corresponding color, and sets each LED in the strip to that color.
- Configuration Variables: num_leds_for_each_strip specifies how many LEDs each strip contains, while led_indexes denotes the indexes of the strips.
neopixel.py
import array, time
from machine import Pin
import rp2

# PIO state machine for RGB. Pulls 24 bits (rgb -> 3 * 8bit) automatically
@rp2.asm_pio(sideset_init=rp2.PIO.OUT_LOW, out_shiftdir=rp2.PIO.SHIFT_LEFT, autopull=True, pull_thresh=24)
def ws2812():
    T1 = 2
    T2 = 5
    T3 = 3
    wrap_target()
    label("bitloop")
    out(x, 1)               .side(0)    [T3 - 1]
    jmp(not_x, "do_zero")   .side(1)    [T1 - 1]
    jmp("bitloop")          .side(1)    [T2 - 1]
    label("do_zero")
    nop().side(0)                       [T2 - 1]
    wrap()

# PIO state machine for RGBW. Pulls 32 bits (rgbw -> 4 * 8bit) automatically
@rp2.asm_pio(sideset_init=rp2.PIO.OUT_LOW, out_shiftdir=rp2.PIO.SHIFT_LEFT, autopull=True, pull_thresh=32)
def sk6812():
    T1 = 2
    T2 = 5
    T3 = 3
    wrap_target()
    label("bitloop")
    out(x, 1)               .side(0)    [T3 - 1]
    jmp(not_x, "do_zero")   .side(1)    [T1 - 1]
    jmp("bitloop")          .side(1)    [T2 - 1]
    label("do_zero")
    nop()                   .side(0)    [T2 - 1]
    wrap()


# Delay here is the reset time. You need a pause to reset the LED strip back to the initial LED
# however, if you have quite a bit of processing to do before the next time you update the strip
# you could put in delay=0 (or a lower delay)
#
# Class supports different order of individual colors (GRB, RGB, WRGB, GWRB ...). In order to achieve
# this, we need to flip the indexes: in 'RGBW', 'R' is on index 0, but we need to shift it left by 3 * 8bits,
# so in it's inverse, 'WBGR', it has exactly right index. Since micropython doesn't have [::-1] and recursive rev()
# isn't too efficient we simply do that by XORing (operator ^) each index with 3 (0b11) to make this flip.
# When dealing with just 'RGB' (3 letter string), this means same but reduced by 1 after XOR!.
# Example: in 'GRBW' we want final form of 0bGGRRBBWW, meaning G with index 0 needs to be shifted 3 * 8bit ->
# 'G' on index 0: 0b00 ^ 0b11 -> 0b11 (3), just as we wanted.
# Same hold for every other index (and - 1 at the end for 3 letter strings).

class Neopixel:
    def __init__(self, num_leds, state_machine, pin, mode="RGB", delay=0.0001):
        self.pixels = array.array("I", [0 for _ in range(num_leds)])
        self.mode = set(mode)   # set for better performance
        if 'W' in self.mode:
            # RGBW uses different PIO state machine configuration
            self.sm = rp2.StateMachine(state_machine, sk6812, freq=8000000, sideset_base=Pin(pin))
            # dictionary of values required to shift bit into position (check class desc.)
            self.shift = {'R': (mode.index('R') ^ 3) * 8, 'G': (mode.index('G') ^ 3) * 8,
                          'B': (mode.index('B') ^ 3) * 8, 'W': (mode.index('W') ^ 3) * 8}
        else:
            self.sm = rp2.StateMachine(state_machine, ws2812, freq=8000000, sideset_base=Pin(pin))
            self.shift = {'R': ((mode.index('R') ^ 3) - 1) * 8, 'G': ((mode.index('G') ^ 3) - 1) * 8,
                          'B': ((mode.index('B') ^ 3) - 1) * 8, 'W': 0}
        self.sm.active(1)
        self.num_leds = num_leds
        self.delay = delay
        self.brightnessvalue = 255

    # Set the overal value to adjust brightness when updating leds
    def brightness(self, brightness=None):
        if brightness == None:
            return self.brightnessvalue
        else:
            if brightness < 1:
                brightness = 1
        if brightness > 255:
            brightness = 255
        self.brightnessvalue = brightness

    # Create a gradient with two RGB colors between "pixel1" and "pixel2" (inclusive)
    # Function accepts two (r, g, b) / (r, g, b, w) tuples
    def set_pixel_line_gradient(self, pixel1, pixel2, left_rgb_w, right_rgb_w, how_bright = None):
        if pixel2 - pixel1 == 0:
            return
        right_pixel = max(pixel1, pixel2)
        left_pixel = min(pixel1, pixel2)

        for i in range(right_pixel - left_pixel + 1):
            fraction = i / (right_pixel - left_pixel)
            red = round((right_rgb_w[0] - left_rgb_w[0]) * fraction + left_rgb_w[0])
            green = round((right_rgb_w[1] - left_rgb_w[1]) * fraction + left_rgb_w[1])
            blue = round((right_rgb_w[2] - left_rgb_w[2]) * fraction + left_rgb_w[2])
            # if it's (r, g, b, w)
            if len(left_rgb_w) == 4 and 'W' in self.mode:
                white = round((right_rgb_w[3] - left_rgb_w[3]) * fraction + left_rgb_w[3])
                self.set_pixel(left_pixel + i, (red, green, blue, white), how_bright)
            else:
                self.set_pixel(left_pixel + i, (red, green, blue), how_bright)

    # Set an array of pixels starting from "pixel1" to "pixel2" (inclusive) to the desired color.
    # Function accepts (r, g, b) / (r, g, b, w) tuple
    def set_pixel_line(self, pixel1, pixel2, rgb_w, how_bright = None):
        for i in range(pixel1, pixel2 + 1):
            self.set_pixel(i, rgb_w, how_bright)

    # Set red, green and blue value of pixel on position <pixel_num>
    # Function accepts (r, g, b) / (r, g, b, w) tuple
    def set_pixel(self, pixel_num, rgb_w, how_bright = None):
        if how_bright == None:
            how_bright = self.brightness()
        pos = self.shift

        red = round(rgb_w[0] * (how_bright / 255))
        green = round(rgb_w[1] * (how_bright / 255))
        blue = round(rgb_w[2] * (how_bright / 255))
        white = 0
        # if it's (r, g, b, w)
        if len(rgb_w) == 4 and 'W' in self.mode:
            white = round(rgb_w[3] * (how_bright / 255))

        self.pixels[pixel_num] = white << pos['W'] | blue << pos['B'] | red << pos['R'] | green << pos['G']

    # Converts HSV color to rgb tuple and returns it
    # Function accepts integer values for <hue>, <saturation> and <value>
    # The logic is almost the same as in Adafruit NeoPixel library:
    # https://github.com/adafruit/Adafruit_NeoPixel so all the credits for that
    # go directly to them (license: https://github.com/adafruit/Adafruit_NeoPixel/blob/master/COPYING)
    def colorHSV(self, hue, sat, val):
        if hue >= 65536:
            hue %= 65536

        hue = (hue * 1530 + 32768) // 65536
        if hue < 510:
            b = 0
            if hue < 255:
                r = 255
                g = hue
            else:
                r = 510 - hue
                g = 255
        elif hue < 1020:
            r = 0
            if hue < 765:
                g = 255
                b = hue - 510
            else:
                g = 1020 - hue
                b = 255
        elif hue < 1530:
            g = 0
            if hue < 1275:
                r = hue - 1020
                b = 255
            else:
                r = 255
                b = 1530 - hue
        else:
            r = 255
            g = 0
            b = 0

        v1 = 1 + val
        s1 = 1 + sat
        s2 = 255 - sat

        r = ((((r * s1) >> 8) + s2) * v1) >> 8
        g = ((((g * s1) >> 8) + s2) * v1) >> 8
        b = ((((b * s1) >> 8) + s2) * v1) >> 8

        return r, g, b


    # Rotate <num_of_pixels> pixels to the left
    def rotate_left(self, num_of_pixels):
        if num_of_pixels == None:
            num_of_pixels = 1
        self.pixels = self.pixels[num_of_pixels:] + self.pixels[:num_of_pixels]

    # Rotate <num_of_pixels> pixels to the right
    def rotate_right(self, num_of_pixels):
        if num_of_pixels == None:
            num_of_pixels = 1
        num_of_pixels = -1 * num_of_pixels
        self.pixels = self.pixels[num_of_pixels:] + self.pixels[:num_of_pixels]

    # Update pixels
    def show(self):
        # If mode is RGB, we cut 8 bits of, otherwise we keep all 32
        cut = 8
        if 'W' in self.mode:
            cut = 0
        for i in range(self.num_leds):
            self.sm.put(self.pixels[i], cut)
        time.sleep(self.delay)

    # Set all pixels to given rgb values
    # Function accepts (r, g, b) / (r, g, b, w)
    def fill(self, rgb_w, how_bright = None):
        for i in range(self.num_leds):
            self.set_pixel(i, rgb_w, how_bright)

    # Clear the strip
    def clear(self):
        self.pixels = array.array("I", [0 for _ in range(self.num_leds)])
Conclusion:
In this tutorial, we’ve explored how to create a custom PCB controller for WS2812B LEDs using either a Raspberry Pi Pico or a D1 Mini. We walked through the entire process, from designing the PCB and ordering it through JLCPCB to setting up the Raspberry Pi Pico and D1 Mini with WLED firmware.
What We’ve Learned
- PCB Design: How to design a PCB using EasyEDA, incorporating features such as push buttons and Bluetooth connectivity.
- Firmware Installation: How to flash WLED onto a D1 Mini to enable easy, wireless control of your LED strips.
- LED Control: Basic programming with the Neopixel library on the Raspberry Pi Pico and WLED setup for intuitive LED management.
Benefits of the Project
- Custom Control: With this setup, you gain precise control over your LED strips, allowing for a wide range of colors and effects.
- Flexibility: By using either the Raspberry Pi Pico or the D1 Mini, you can choose the hardware that best fits your needs and preferences.
- Enhanced Creativity: This project provides a solid foundation for various creative applications, from ambient lighting to interactive displays.
I encourage you to experiment with the design, modify the code, and explore the many possibilities that WLED and Neopixel control offer. Share your results, projects, or any modifications you make with our community. Your feedback and creativity help inspire others and contribute to the ongoing development of open-source projects.
Thank you for following along with this tutorial. I hope you enjoyed the process and are excited to apply what you’ve learned to your own projects. Happy building!