Raspberry Pi Pico WS2812B Dice
YouTube Video
Introduction
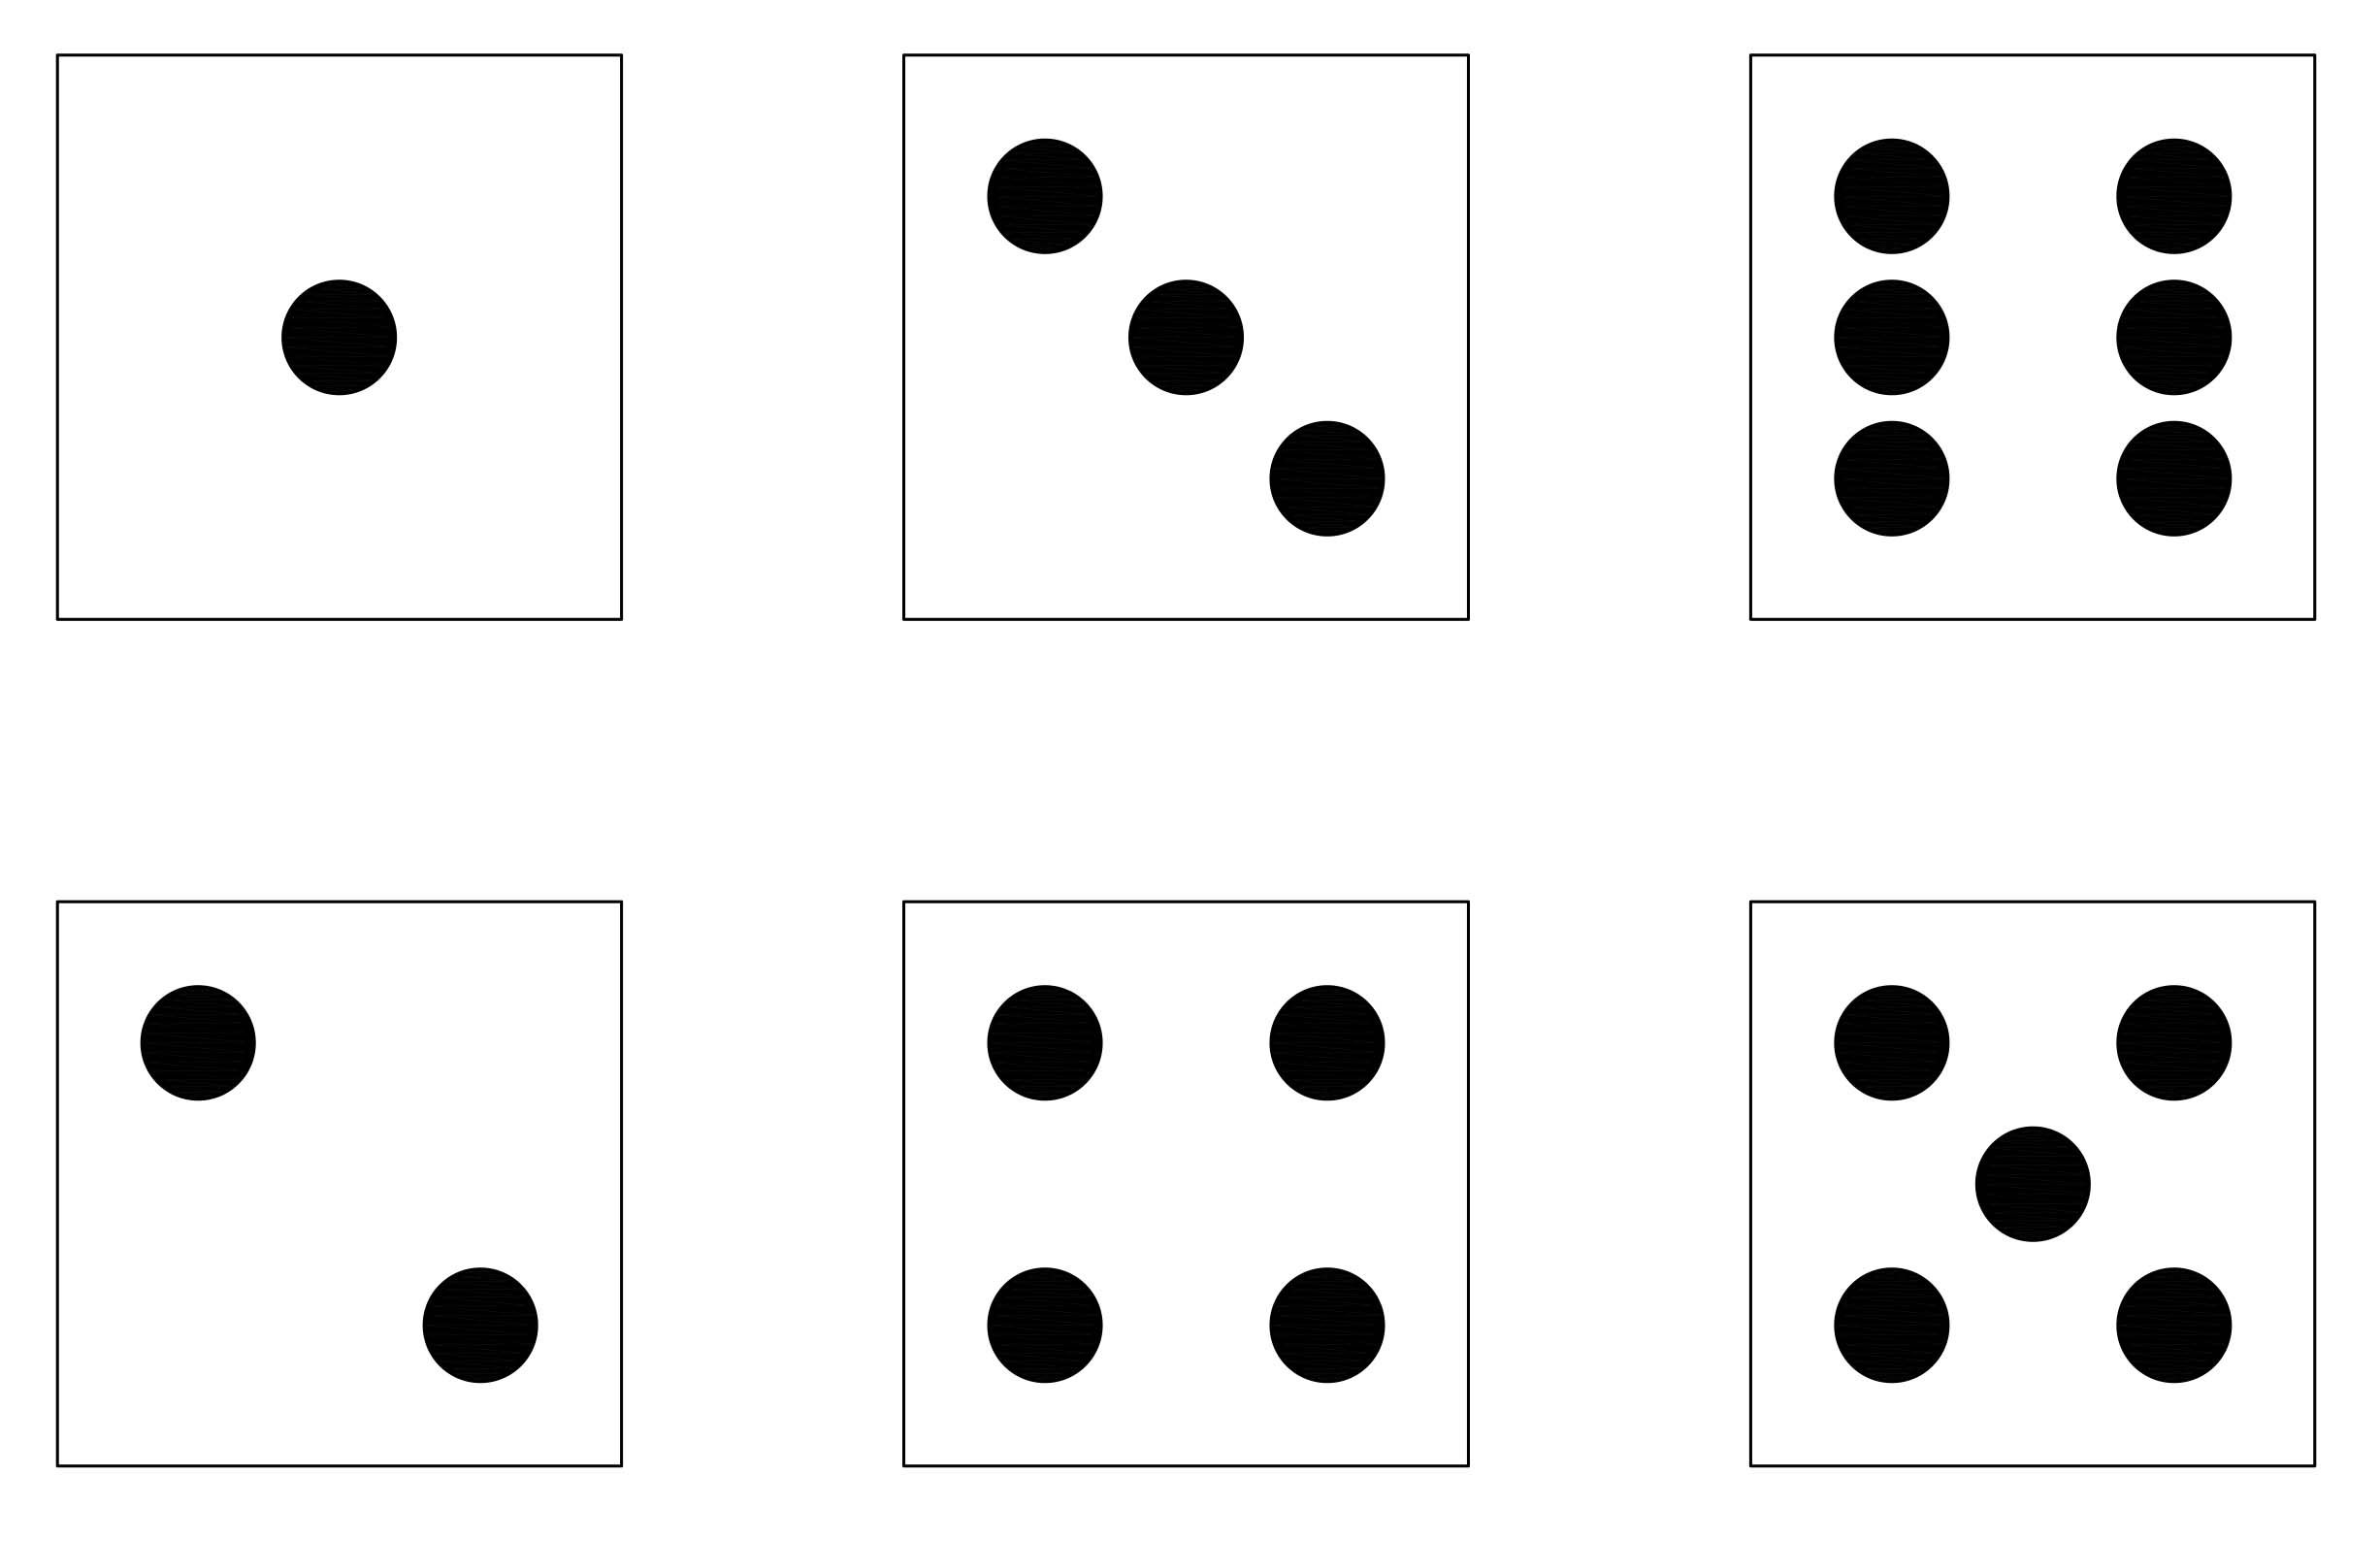
In this project, we are recreating a previous Raspberry Pi Pico Dice build using WS2812B through-hole LEDs. With three push buttons, you can roll either the left die, the right die, or both dice together using the middle button. The PCB design for this project will to mimic the face patterns of a standard die shown below.
Disclaimer - JLCPCB was generous enough to sponsor this project and provide the PCB used in this project.
Components + Tools Breakdown
| Components | Quantity |
|---|---|
| Custom PCB (JLCPB) | 1 |
| Raspberry Pi Pico | 1 |
| WS2812B 8mm THT | 14 |
| 2.54 20 pin Header | 2 |
| 12x12 PCB mount buttons | 3 |
| 3D printed enclosure | 1 |
| Tools / Equipment | |
|---|---|
| Soldering Iron + Solder | |
| Computer + Thonny IDE | |
| Screw driver | |
| 3D printer |
WS2812B 8mm
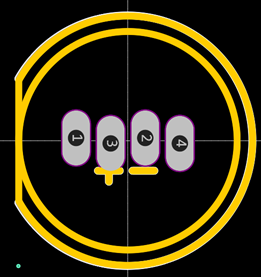
I purchased the LEDs online from Taobao and discovered that their pinout was different from the commonly available part. To fix this, I edited the footprint in EasyEDA to match the LEDs I received. For easier soldering, I also changed the pads to oval shapes and slightly staggered the pins.
This is the edited part in EasyEDA. The Din and Dout pins was swapped.
PCB ( JLCPCB )
PCB Design
Once the prototype was working, I designed a custom PCB in EasyEDA.
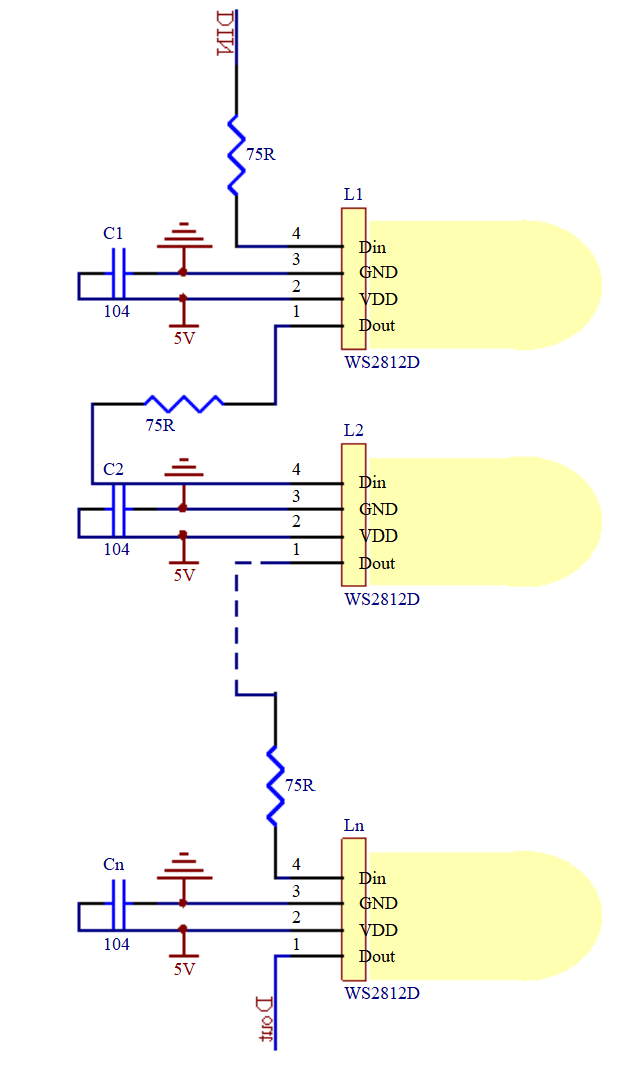
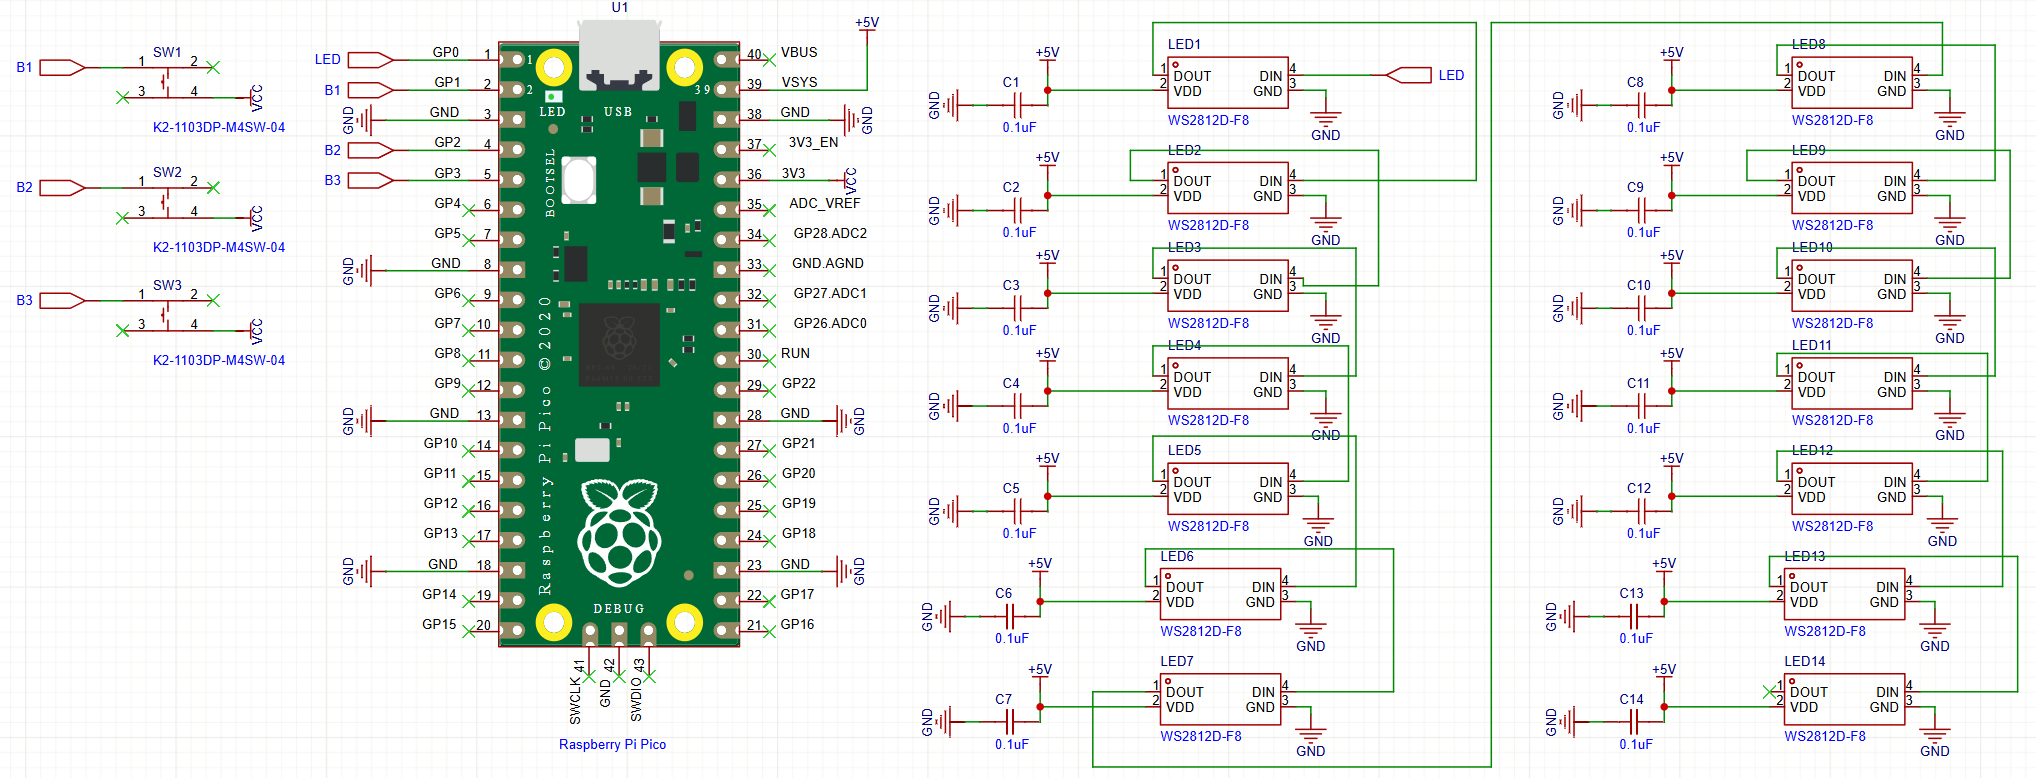
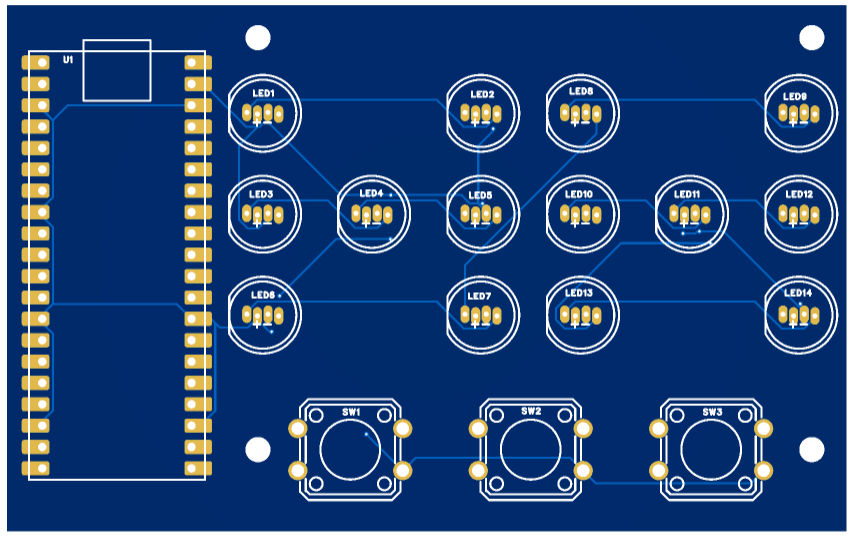
The schematic for the Pico Dice PCB is shown below:
Here is the PCB layout. As shown, the LEDs are arranged to mimic the face patterns of a standard die.
The PCB was manufactured by JLCPCB, who offer high-quality boards at low cost, often with discounts and coupons available throughout the year. You can support me as a creator by signing up using this link:
https://jlcpcb.com/?from=Nerd that will support me as a creator to keep making content that is accessible and open source at no charge to you.
Ordering the PCB is very simple:
Download the Gerber file here.
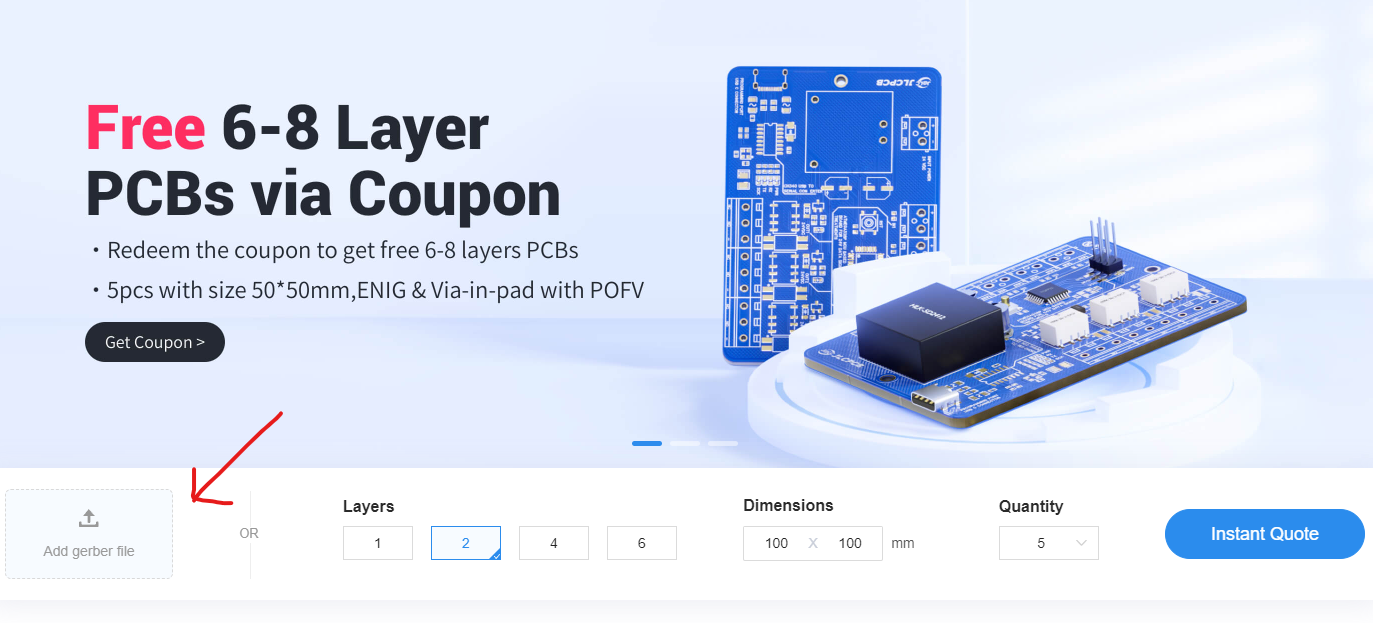
Click on Add Gerber file
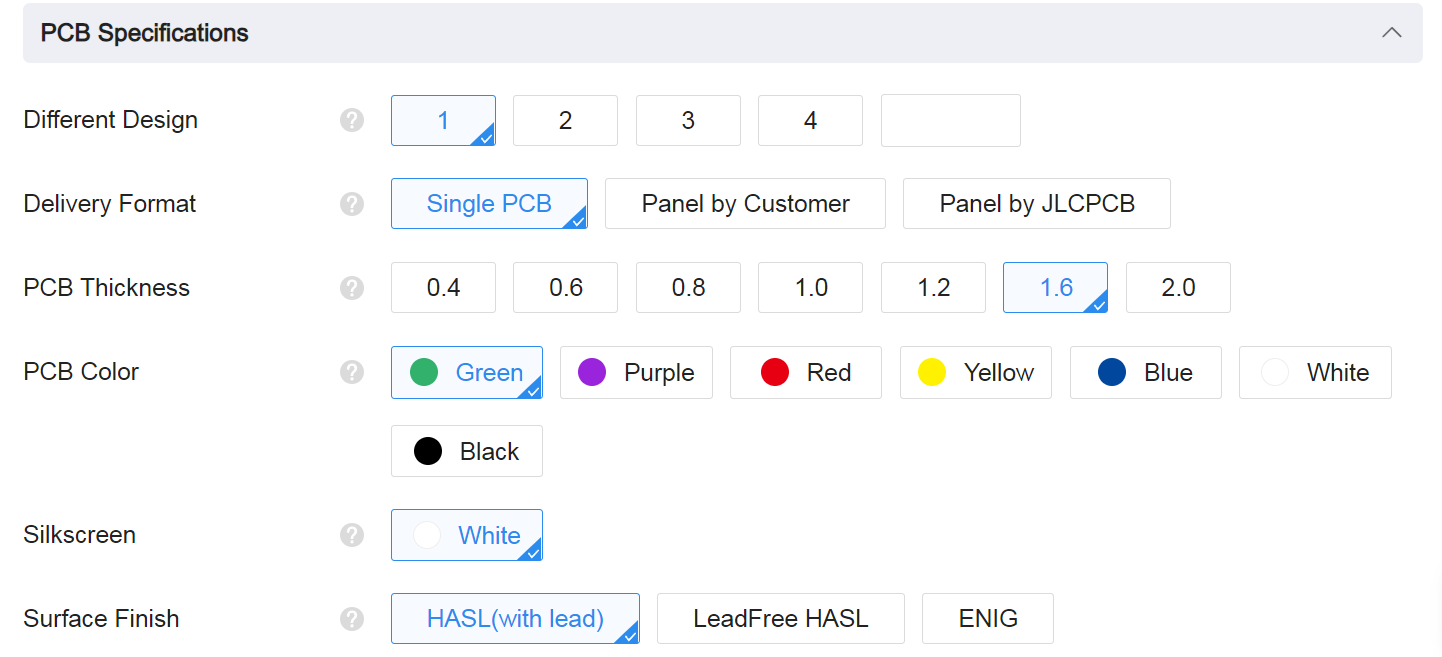
leave all the settings as default given. You might want change the PCB color which you can do here:
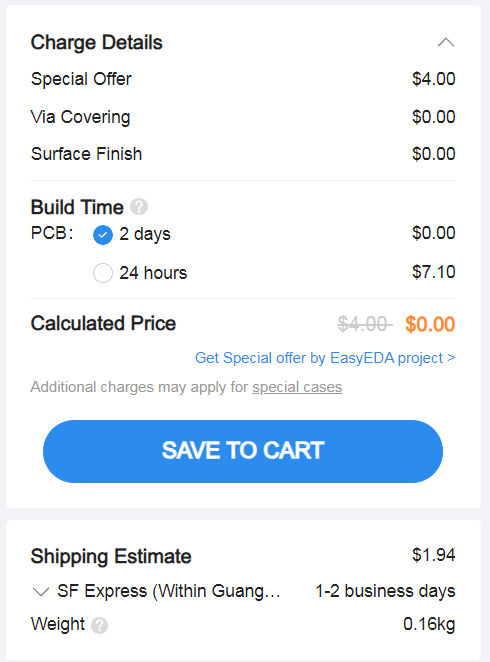
Enter you shipping details, save to cart
Then after a few days depending on your location you will receive your great quality PCB.
Final Code
Upload the following two scripts on the raspberry pi pico.
neopixel.py
import array, time
from machine import Pin
import rp2

# PIO state machine for RGB. Pulls 24 bits (rgb -> 3 * 8bit) automatically
@rp2.asm_pio(sideset_init=rp2.PIO.OUT_LOW, out_shiftdir=rp2.PIO.SHIFT_LEFT, autopull=True, pull_thresh=24)
def ws2812():
    T1 = 2
    T2 = 5
    T3 = 3
    wrap_target()
    label("bitloop")
    out(x, 1)               .side(0)    [T3 - 1]
    jmp(not_x, "do_zero")   .side(1)    [T1 - 1]
    jmp("bitloop")          .side(1)    [T2 - 1]
    label("do_zero")
    nop().side(0)                       [T2 - 1]
    wrap()

# PIO state machine for RGBW. Pulls 32 bits (rgbw -> 4 * 8bit) automatically
@rp2.asm_pio(sideset_init=rp2.PIO.OUT_LOW, out_shiftdir=rp2.PIO.SHIFT_LEFT, autopull=True, pull_thresh=32)
def sk6812():
    T1 = 2
    T2 = 5
    T3 = 3
    wrap_target()
    label("bitloop")
    out(x, 1)               .side(0)    [T3 - 1]
    jmp(not_x, "do_zero")   .side(1)    [T1 - 1]
    jmp("bitloop")          .side(1)    [T2 - 1]
    label("do_zero")
    nop()                   .side(0)    [T2 - 1]
    wrap()


# Delay here is the reset time. You need a pause to reset the LED strip back to the initial LED
# however, if you have quite a bit of processing to do before the next time you update the strip
# you could put in delay=0 (or a lower delay)
#
# Class supports different order of individual colors (GRB, RGB, WRGB, GWRB ...). In order to achieve
# this, we need to flip the indexes: in 'RGBW', 'R' is on index 0, but we need to shift it left by 3 * 8bits,
# so in it's inverse, 'WBGR', it has exactly right index. Since micropython doesn't have [::-1] and recursive rev()
# isn't too efficient we simply do that by XORing (operator ^) each index with 3 (0b11) to make this flip.
# When dealing with just 'RGB' (3 letter string), this means same but reduced by 1 after XOR!.
# Example: in 'GRBW' we want final form of 0bGGRRBBWW, meaning G with index 0 needs to be shifted 3 * 8bit ->
# 'G' on index 0: 0b00 ^ 0b11 -> 0b11 (3), just as we wanted.
# Same hold for every other index (and - 1 at the end for 3 letter strings).

class Neopixel:
    def __init__(self, num_leds, state_machine, pin, mode="RGB", delay=0.0001):
        self.pixels = array.array("I", [0 for _ in range(num_leds)])
        self.mode = set(mode)   # set for better performance
        if 'W' in self.mode:
            # RGBW uses different PIO state machine configuration
            self.sm = rp2.StateMachine(state_machine, sk6812, freq=8000000, sideset_base=Pin(pin))
            # dictionary of values required to shift bit into position (check class desc.)
            self.shift = {'R': (mode.index('R') ^ 3) * 8, 'G': (mode.index('G') ^ 3) * 8,
                          'B': (mode.index('B') ^ 3) * 8, 'W': (mode.index('W') ^ 3) * 8}
        else:
            self.sm = rp2.StateMachine(state_machine, ws2812, freq=8000000, sideset_base=Pin(pin))
            self.shift = {'R': ((mode.index('R') ^ 3) - 1) * 8, 'G': ((mode.index('G') ^ 3) - 1) * 8,
                          'B': ((mode.index('B') ^ 3) - 1) * 8, 'W': 0}
        self.sm.active(1)
        self.num_leds = num_leds
        self.delay = delay
        self.brightnessvalue = 255

    # Set the overal value to adjust brightness when updating leds
    def brightness(self, brightness=None):
        if brightness == None:
            return self.brightnessvalue
        else:
            if brightness < 1:
                brightness = 1
        if brightness > 255:
            brightness = 255
        self.brightnessvalue = brightness

    # Create a gradient with two RGB colors between "pixel1" and "pixel2" (inclusive)
    # Function accepts two (r, g, b) / (r, g, b, w) tuples
    def set_pixel_line_gradient(self, pixel1, pixel2, left_rgb_w, right_rgb_w, how_bright = None):
        if pixel2 - pixel1 == 0:
            return
        right_pixel = max(pixel1, pixel2)
        left_pixel = min(pixel1, pixel2)

        for i in range(right_pixel - left_pixel + 1):
            fraction = i / (right_pixel - left_pixel)
            red = round((right_rgb_w[0] - left_rgb_w[0]) * fraction + left_rgb_w[0])
            green = round((right_rgb_w[1] - left_rgb_w[1]) * fraction + left_rgb_w[1])
            blue = round((right_rgb_w[2] - left_rgb_w[2]) * fraction + left_rgb_w[2])
            # if it's (r, g, b, w)
            if len(left_rgb_w) == 4 and 'W' in self.mode:
                white = round((right_rgb_w[3] - left_rgb_w[3]) * fraction + left_rgb_w[3])
                self.set_pixel(left_pixel + i, (red, green, blue, white), how_bright)
            else:
                self.set_pixel(left_pixel + i, (red, green, blue), how_bright)

    # Set an array of pixels starting from "pixel1" to "pixel2" (inclusive) to the desired color.
    # Function accepts (r, g, b) / (r, g, b, w) tuple
    def set_pixel_line(self, pixel1, pixel2, rgb_w, how_bright = None):
        for i in range(pixel1, pixel2 + 1):
            self.set_pixel(i, rgb_w, how_bright)

    # Set red, green and blue value of pixel on position <pixel_num>
    # Function accepts (r, g, b) / (r, g, b, w) tuple
    def set_pixel(self, pixel_num, rgb_w, how_bright = None):
        if how_bright == None:
            how_bright = self.brightness()
        pos = self.shift

        red = round(rgb_w[0] * (how_bright / 255))
        green = round(rgb_w[1] * (how_bright / 255))
        blue = round(rgb_w[2] * (how_bright / 255))
        white = 0
        # if it's (r, g, b, w)
        if len(rgb_w) == 4 and 'W' in self.mode:
            white = round(rgb_w[3] * (how_bright / 255))

        self.pixels[pixel_num] = white << pos['W'] | blue << pos['B'] | red << pos['R'] | green << pos['G']

    # Converts HSV color to rgb tuple and returns it
    # Function accepts integer values for <hue>, <saturation> and <value>
    # The logic is almost the same as in Adafruit NeoPixel library:
    # https://github.com/adafruit/Adafruit_NeoPixel so all the credits for that
    # go directly to them (license: https://github.com/adafruit/Adafruit_NeoPixel/blob/master/COPYING)
    def colorHSV(self, hue, sat, val):
        if hue >= 65536:
            hue %= 65536

        hue = (hue * 1530 + 32768) // 65536
        if hue < 510:
            b = 0
            if hue < 255:
                r = 255
                g = hue
            else:
                r = 510 - hue
                g = 255
        elif hue < 1020:
            r = 0
            if hue < 765:
                g = 255
                b = hue - 510
            else:
                g = 1020 - hue
                b = 255
        elif hue < 1530:
            g = 0
            if hue < 1275:
                r = hue - 1020
                b = 255
            else:
                r = 255
                b = 1530 - hue
        else:
            r = 255
            g = 0
            b = 0

        v1 = 1 + val
        s1 = 1 + sat
        s2 = 255 - sat

        r = ((((r * s1) >> 8) + s2) * v1) >> 8
        g = ((((g * s1) >> 8) + s2) * v1) >> 8
        b = ((((b * s1) >> 8) + s2) * v1) >> 8

        return r, g, b


    # Rotate <num_of_pixels> pixels to the left
    def rotate_left(self, num_of_pixels):
        if num_of_pixels == None:
            num_of_pixels = 1
        self.pixels = self.pixels[num_of_pixels:] + self.pixels[:num_of_pixels]

    # Rotate <num_of_pixels> pixels to the right
    def rotate_right(self, num_of_pixels):
        if num_of_pixels == None:
            num_of_pixels = 1
        num_of_pixels = -1 * num_of_pixels
        self.pixels = self.pixels[num_of_pixels:] + self.pixels[:num_of_pixels]

    # Update pixels
    def show(self):
        # If mode is RGB, we cut 8 bits of, otherwise we keep all 32
        cut = 8
        if 'W' in self.mode:
            cut = 0
        for i in range(self.num_leds):
            self.sm.put(self.pixels[i], cut)
        time.sleep(self.delay)

    # Set all pixels to given rgb values
    # Function accepts (r, g, b) / (r, g, b, w)
    def fill(self, rgb_w, how_bright = None):
        for i in range(self.num_leds):
            self.set_pixel(i, rgb_w, how_bright)

    # Clear the strip
    def clear(self):
        self.pixels = array.array("I", [0 for _ in range(self.num_leds)])
main.py
from machine import Pin
import utime
import urandom
from neopixel import Neopixel

urandom.seed(utime.ticks_us())

# ============================
# NeoPixel Setup
# ============================
NUM_LEDS = 14
PIN_NUM = 0
STATE_MACHINE = 0

np = Neopixel(NUM_LEDS, STATE_MACHINE, PIN_NUM, "GRB")
np.brightness(80)  # 1–255

# Dice layout
DICE_LEN = 7
DICE1_START = 0
DICE2_START = 7

OFF = (0, 0, 0)

# ============================
# Buttons (Pico: GP1/2/3)
# ============================
button1 = Pin(1, Pin.IN, Pin.PULL_DOWN)  # roll dice 1
button2 = Pin(2, Pin.IN, Pin.PULL_DOWN)  # roll both
button3 = Pin(3, Pin.IN, Pin.PULL_DOWN)  # roll dice 2

# Dice pip patterns for 1–6 (7 LEDs per die)
numbers = [
    [0, 0, 0, 1, 0, 0, 0],  # 1
    [1, 0, 0, 0, 0, 0, 1],  # 2
    [1, 0, 0, 1, 0, 0, 1],  # 3
    [1, 1, 0, 0, 0, 1, 1],  # 4
    [1, 1, 0, 1, 0, 1, 1],  # 5
    [1, 1, 1, 0, 1, 1, 1],  # 6
]


def show():
    np.show()

def clear_all():
    np.clear()
    np.show()

def clear_range(start, length):
    for i in range(start, start + length):
        np.set_pixel(i, OFF)

def show_number(start, number, color):
    pattern = numbers[number - 1]
    for i in range(DICE_LEN):
        np.set_pixel(start + i, color if pattern[i] else OFF)

def other_die_start(dice_start):
    return DICE2_START if dice_start == DICE1_START else DICE1_START


DEBOUNCE_MS = 60
_last_press_ms = {1: 0, 2: 0, 3: 0}
_last_state = {1: 0, 2: 0, 3: 0}

def _read_pin(btn: Pin) -> int:
    return 1 if btn.value() else 0

def was_pressed(pin_num: int, btn: Pin) -> bool:
    """
    Returns True only on a rising edge (0->1), debounced.
    """
    now = utime.ticks_ms()
    cur = _read_pin(btn)
    prev = _last_state[pin_num]
    _last_state[pin_num] = cur

    if cur == 1 and prev == 0:
        # rising edge
        if utime.ticks_diff(now, _last_press_ms[pin_num]) > DEBOUNCE_MS:
            _last_press_ms[pin_num] = now
            return True
    return False

def any_button_down():
    return button1.value() or button2.value() or button3.value()

# ------------------------------------------------------------
# Rainbow (idle animation)
# ------------------------------------------------------------
def wheel(pos):
    pos = 255 - (pos & 255)
    if pos < 85:
        return (255 - pos * 3, 0, pos * 3)
    if pos < 170:
        pos -= 85
        return (0, pos * 3, 255 - pos * 3)
    pos -= 170
    return (pos * 3, 255 - pos * 3, 0)

def rainbow_step(offset):
    for i in range(NUM_LEDS):
        np.set_pixel(i, wheel((i * 256 // NUM_LEDS + offset) & 255))
    np.show()

# ------------------------------------------------------------
# Dice Roll Animation
# ------------------------------------------------------------
def roll_animation(dice1=False, dice2=False,
                   color1=(255, 255, 255), color2=(255, 0, 255),
                   steps=16, start_delay_ms=40, end_delay_ms=180):
    """
    Shows quick changing faces and slows down near the end (ease-out).
    """
    for s in range(steps):
        if dice1:
            show_number(DICE1_START, urandom.randint(1, 6), color1)
        if dice2:
            show_number(DICE2_START, urandom.randint(1, 6), color2)

        np.show()

        delay = start_delay_ms + (end_delay_ms - start_delay_ms) * s // max(1, steps - 1)
        utime.sleep_ms(delay)

# ------------------------------------------------------------
# Roll functions
# ------------------------------------------------------------
def roll_one(dice_start, color, hold_s=2, blank_other=True):
    # Turn off the other die during the single roll (less distracting)
    if blank_other:
        clear_range(other_die_start(dice_start), DICE_LEN)
        np.show()

    roll_animation(
        dice1=(dice_start == DICE1_START),
        dice2=(dice_start == DICE2_START),
        color1=color,
        color2=color,
        steps=16
    )

    final = urandom.randint(1, 6)
    show_number(dice_start, final, color)
    np.show()

    utime.sleep(hold_s)

    # Clear both dice after showing result
    clear_range(dice_start, DICE_LEN)
    if blank_other:
        clear_range(other_die_start(dice_start), DICE_LEN)
    np.show()

def roll_both(color1=(0, 255, 0), color2=(255, 0, 255), hold_s=3):
    roll_animation(dice1=True, dice2=True, color1=color1, color2=color2, steps=18)

    d1 = urandom.randint(1, 6)
    d2 = urandom.randint(1, 6)
    show_number(DICE1_START, d1, color1)
    show_number(DICE2_START, d2, color2)
    np.show()

    utime.sleep(hold_s)

    clear_range(DICE1_START, DICE_LEN)
    clear_range(DICE2_START, DICE_LEN)
    np.show()

# ============================================================
# Main loop
# ============================================================
clear_all()

rainbow_offset = 0
last_idle_tick = utime.ticks_ms()
IDLE_FRAME_MS = 40  # lower = faster rainbow

while True:
    # Idle animation (only when no buttons are held down)
    if not any_button_down():
        now = utime.ticks_ms()
        if utime.ticks_diff(now, last_idle_tick) > IDLE_FRAME_MS:
            last_idle_tick = now
            rainbow_step(rainbow_offset)
            rainbow_offset = (rainbow_offset + 2) & 255

    # Button actions (edge-triggered)
    if was_pressed(1, button1):
        # Dice 1 only (other die off)
        roll_one(DICE1_START, (255, 0, 255), hold_s=2, blank_other=True)

    if was_pressed(2, button2):
        # Both dice
        roll_both(color1=(0, 255, 0), color2=(255, 0, 255), hold_s=3)

    if was_pressed(3, button3):
        # Dice 2 only (other die off)
        roll_one(DICE2_START, (255, 0, 255), hold_s=2, blank_other=True)

    utime.sleep_ms(5)
Enclosure
The enclosure was designed in Fusion 360.
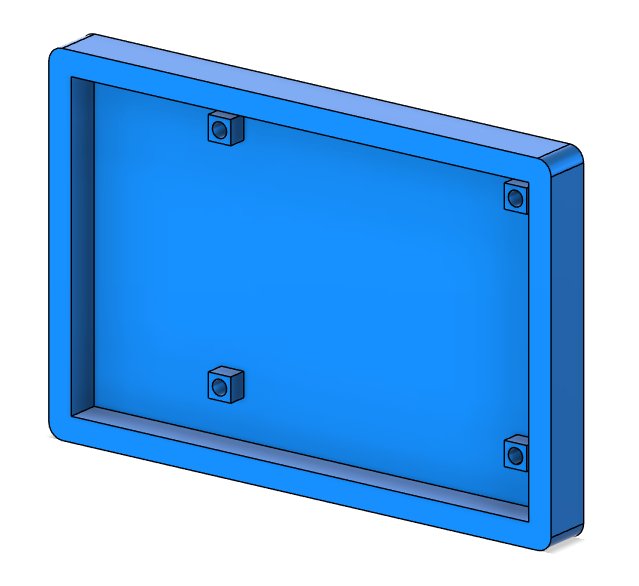
You can download all the 3D files here: Link
Conclusion
This is a simple but fun project, and it makes a great introduction for beginners learning soldering, coding, and 3D modeling.
If you have any questions, feel free to leave a comment on my YouTube video. And while you’re there, consider subscribing to the channel to support more open-source projects like this one.