Fibonnaci Clock Version 2
YouTube Video
Introduction
In this tutorial, we build a Fibonacci Clock using the Raspberry Pi Pico W, a custom PCB, and WS2812B addressable LEDs.
Instead of displaying time using traditional numbers or clock hands, this clock represents time using colored Fibonacci blocks. Each block corresponds to a number in the Fibonacci sequence and lights up in different colors to show hours and minutes.
The Fibonacci sequence is a series of numbers where each number is the sum of the two previous ones. The first five numbers are:
1, 1, 2, 3, and 5
Using these five values, we can represent any hour (1–12) and minute value in 5‑minute increments. Each block contains a group of LEDs mounted on a custom PCB, and a 3D‑printed enclosure makes the Fibonacci squares clearly visible.
The Raspberry Pi Pico W connects to Wi‑Fi, synchronizes the current time using an online API, calculates the Fibonacci representation of the time, and lights the blocks accordingly using MicroPython.
This project combines math, electronics, programming, and design into a functional and educational clock.
How to Read the Fibonacci Clock
At first glance, a Fibonacci Clock may look confusing, but it follows a simple set of rules.
1. Fibonacci Blocks
The clock is made up of five blocks, each representing a Fibonacci number:
numbers.png)
Each block may be lit in a different color depending on how it contributes to the time.
2. Color Meanings
Each block uses color to indicate its purpose:
- Red → Hours
- Blue → Minutes
- Green → Both hours and minutes
- White → Not used
3. Reading the Hours
To calculate the hour:
- Add the values of all red blocks.
- Add the values of all green blocks.
Hour = Red blocks + Green blocks
Example:
Red blocks: 3 + 1
Green block: 2
Hour = 6
4. Reading the Minutes
To calculate the minutes:
- Add the values of all blue blocks.
- Add the values of all green blocks.
- Multiply the total by 5.
Minutes = (Blue blocks + Green blocks) × 5
Example:
Blue block: 5
Green block: 2
Total = 7
Minutes = 35
5. Full Time Example
If the clock shows:
- Red block: 3
- Blue block: 5
- Green block: 2
Then:
- Hours = 3 + 2 = 5
- Minutes = (5 + 2) × 5 = 35
➡️ The time is 5:35
Why This Works
Because Fibonacci numbers can be combined in many ways, these five blocks are sufficient to represent all hours from 1 to 12 and all minute values from 0 to 55 (in 5‑minute steps).
The Fibonacci Clock is a unique way to visualize time while demonstrating concepts from mathematics, logic, and microcontrollers.
Component List
Here is the breakdown of components needed for the Fibonnaci Clock:
| Components | Quantity |
|---|---|
| Custom PCB | 1 |
| Raspberry Pi Pico W | 1 |
| WS2810B LEDs | 50 |
| 2.54 20 pin Header | 2 |
| M3 Socket Head 0 35mm | 2 |
| USB C socket | 1 |
The following tools will be needed:
| Equipment |
|---|
| Multicolor - 3D Printer |
| Soldering Hot plate |
| Allen Wrenche |
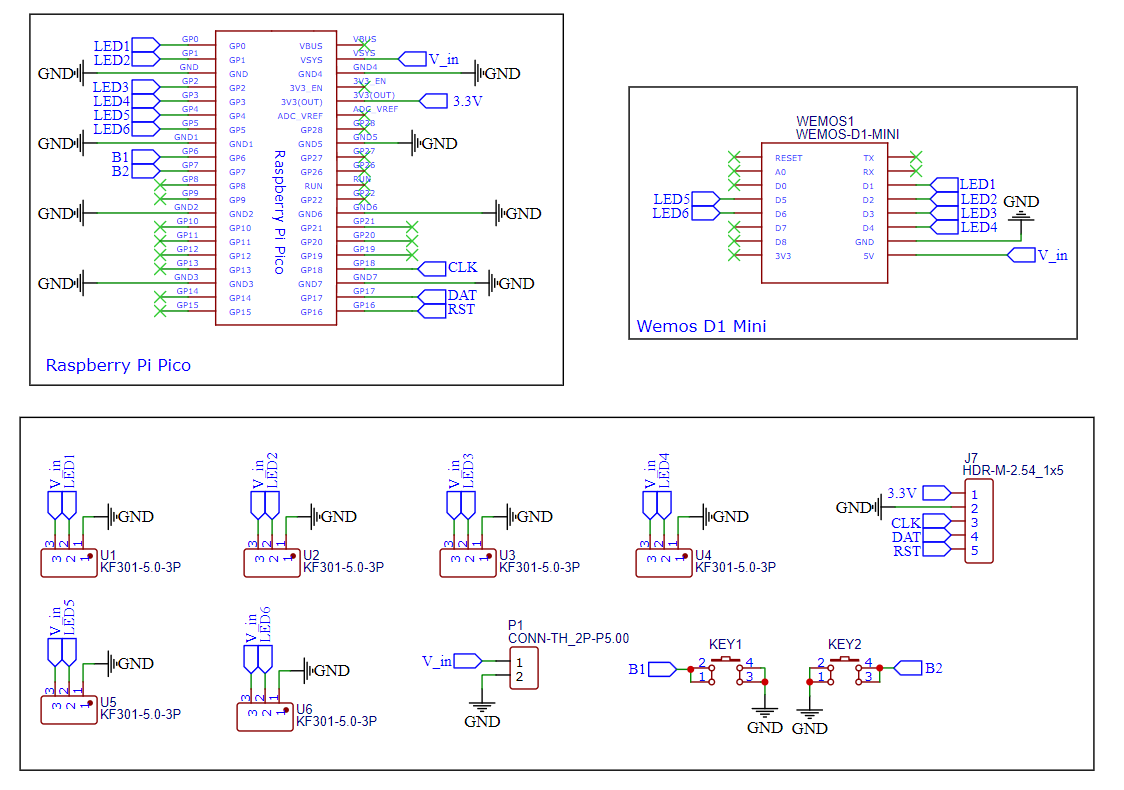
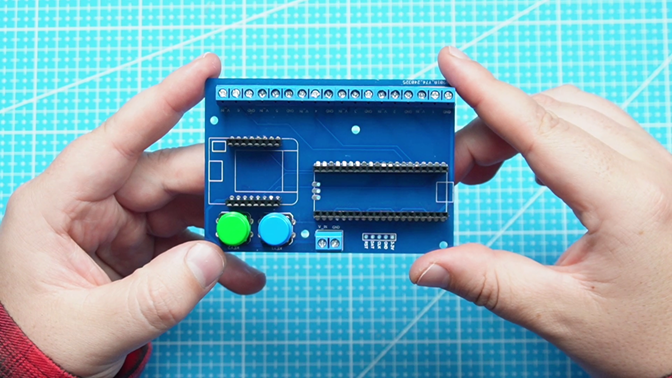
Schematic Diagram
The schematic diagram was created using EasyEDA. All components used are through-hole types, making the soldering process easier and more accessible. The PCB allows us to easily connect the 5 different WS2812 neopixel LEDs to the Pico.
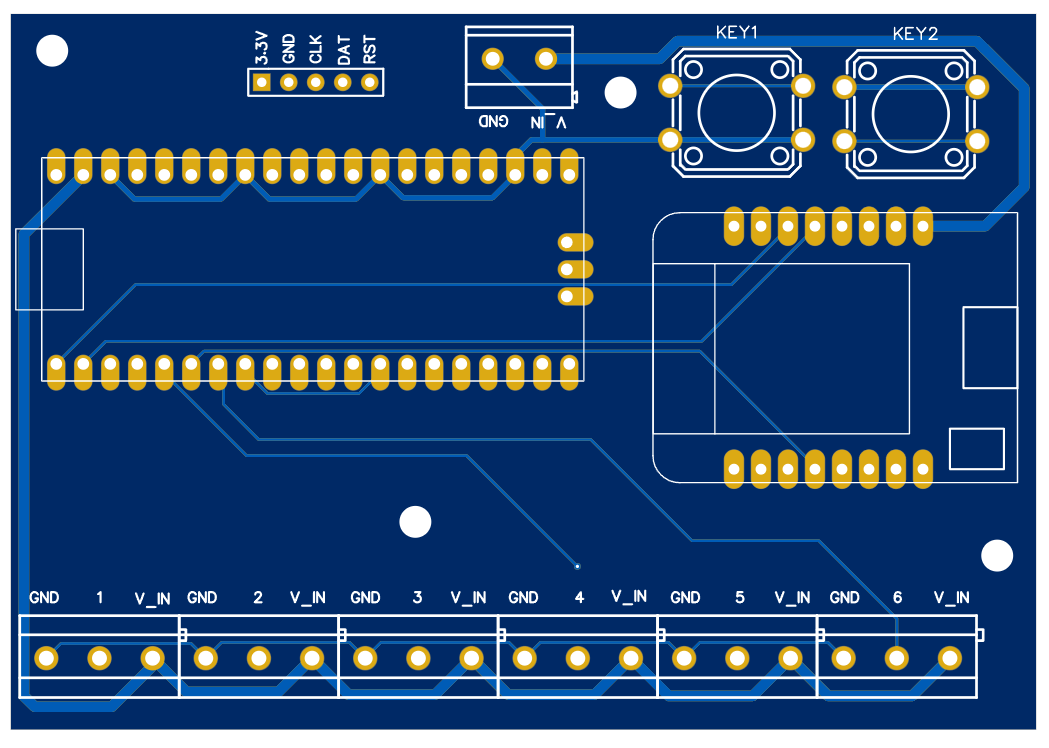
PCB Design
Features of PCB
- Two Push Buttons: Two buttons are added to PCB, which could be used for brightness control, color change, or different modes
- Bluetooth Connector: An integrated connector for adding Bluetooth functionality via the HC-05 module, allowing for wireless control.
- Mounting Holes: The PCB is equipped with four 3mm mounting holes, making it easy to secure within an enclosure.
PCB Top:
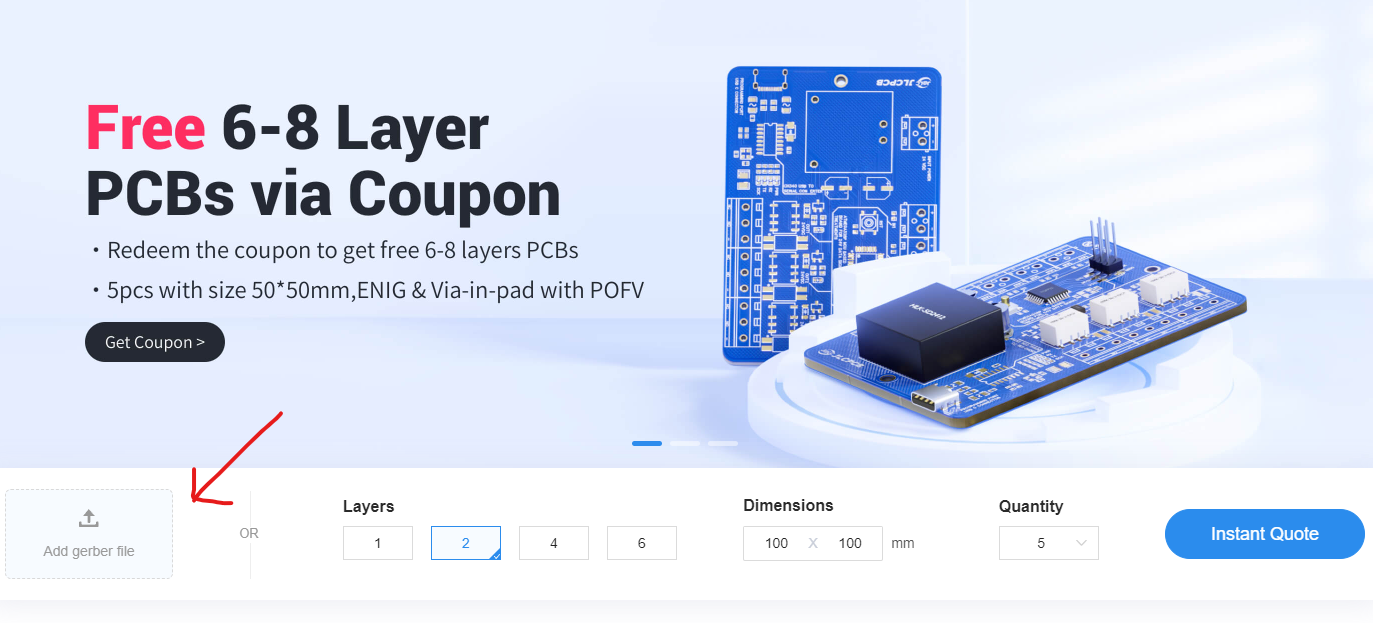
Order PCB (JLCPCB)
The PCB was ordered through JLCPCB. They offer great PCBs at a low cost and have promotions and coupons available throughout the year. You can sign up using here, or using the following link:
https://jlcpcb.com/?from=Nerd that will support me as a creator to keep making content that is accessible and open source at no charge to you.
Ordering the PCB is very simple:
Download the Gerber file here.
Click on Add Gerber file
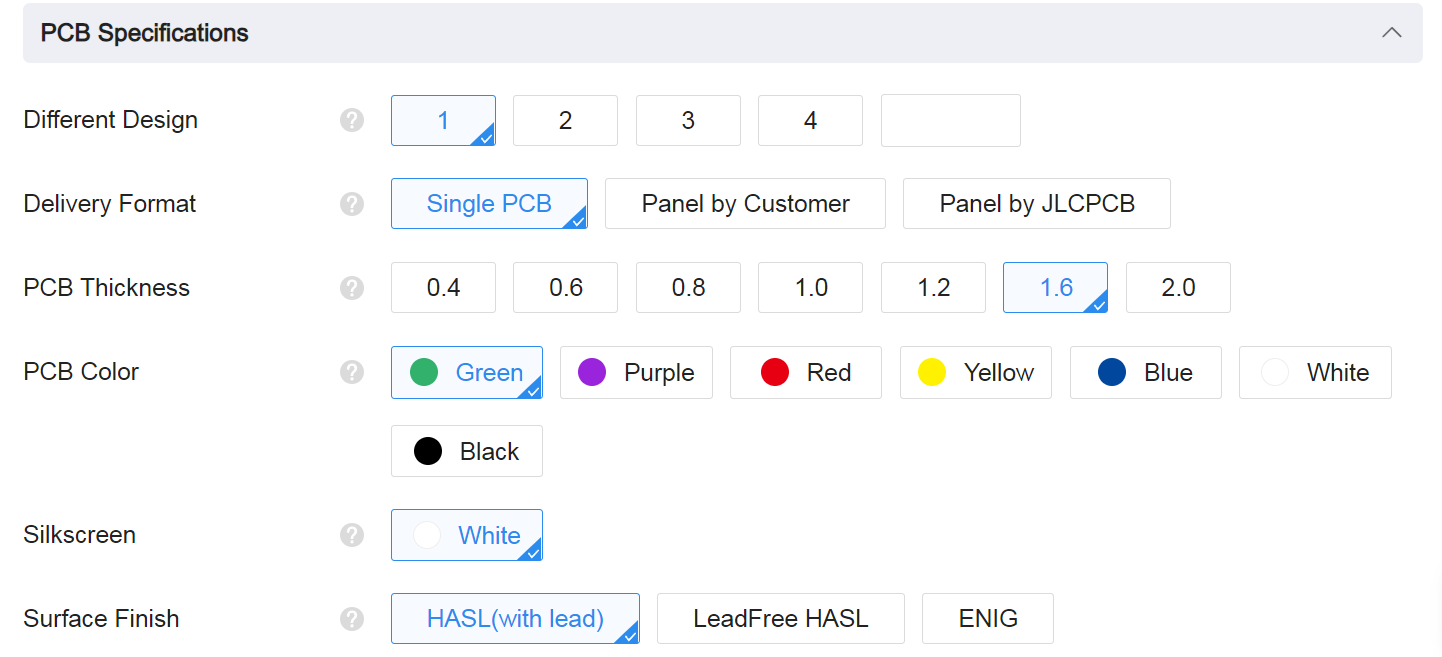
leave all the settings as default given. You might want change the PCB color which you can do here:
Enter you shipping details, save to cart
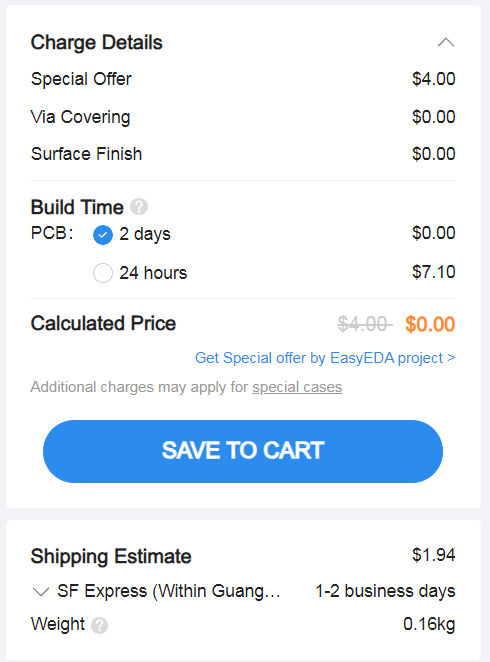
Then after a few days depending on your location you will receive your great quality PCB.
Code
In order to use the Fibonnaci Clock, you will have to create an account on IP Geolocation in order to access the API to get the correct time over Wifi. Visit the following tutorial to learn about it: Before we dive into the code, you’ll need to set up an API key with the IP Geolocation API. Follow these steps to get your key: Tutorial
Download the full demo code here, which include the neopixel and urequest library.
main.py
This is the main file that will be booted once your power the Pico. Comments is given in the code as detailed as possible and explained below.
from machine import Pin, RTC  # Import necessary classes
import utime
import json
import network
import urequests
from neopixel import Neopixel  # Assuming you have the Neopixel class defined as in your previous code
import math

# Define the number of pixels for each strip (50 LEDs for each block)
numpix1 = 50  # Strip for Fibonacci number 1
numpix2 = 50  # Strip for Fibonacci number 1
numpix3 = 50  # Strip for Fibonacci number 2
numpix4 = 50  # Strip for Fibonacci number 3
numpix5 = 50  # Strip for Fibonacci number 5

# Create instances of Neopixel for each strip with fixed GPIO pins
strip1 = Neopixel(numpix1, 0, 1, "GRB")  # Strip 1 connected to GPIO 28
strip2 = Neopixel(numpix2, 1, 0, "GRB")  # Strip 2 connected to GPIO 29
strip3 = Neopixel(numpix3, 2, 2, "GRB")  # Strip 3 connected to GPIO 30
strip4 = Neopixel(numpix4, 3, 3, "GRB")  # Strip 4 connected to GPIO 31
strip5 = Neopixel(numpix5, 4, 4, "GRB")  # Strip 5 connected to GPIO 32

# Define colors
red = (255, 0, 0)      # Hours color
blue = (0, 0, 255)     # Minutes color
green = (0, 255, 0) # Both hours and minutes color
white = (255, 255, 255)      # Off color

# Set brightness for all strips
strip1.brightness(255)
strip2.brightness(255)
strip3.brightness(255)
strip4.brightness(255)
strip5.brightness(255)

# Load configuration
with open('config.json') as f:
    config = json.load(f)

# Check config.json has updated credentials
if config['ssid'] == 'Enter_Wifi_SSID':
    raise ValueError("config.json has not been updated with your unique keys and data")

# Your OpenWeatherMap API details
weather_api_key = config['weather_api_key']
city = config['city']
country_code = config['country_code']
date_time_api = config['date_time_api']
timezone = config['time_zone']

# Wi-Fi Configuration
def connect_wifi():
    with open('config.json') as f:
        config = json.load(f)
        weather_api_key = config['weather_api_key']
        city = config['city']
        country_code = config['country_code']
        date_time_api = config['date_time_api']
        timezone = config['time_zone']

    wlan = network.WLAN(network.STA_IF)
    wlan.active(True)
    wlan.connect(config['ssid'], config['ssid_password'])

    print("Connecting to WiFi...")
    while not wlan.isconnected():
        utime.sleep(1)

    print("Connected to Wi-Fi:", wlan.ifconfig())

# Function to sync time with IP Geolocation API
def sync_time_with_ip_geolocation_api(rtc):
    url = f'http://api.ipgeolocation.io/timezone?apiKey={date_time_api}&tz={timezone}'
    response = urequests.get(url)
    data = response.json()

    # Print the full response to debug
    print("API Response:", data)

    if 'date_time' in data and 'timezone' in data:
        current_time = data["date_time"]
        print("Current Time String:", current_time)  # Debug print

        # Split the date and time directly from the returned format
        if " " in current_time:
            the_date, the_time = current_time.split(" ")
            year, month, mday = map(int, the_date.split("-"))
            hours, minutes, seconds = map(int, the_time.split(":"))

            week_day = data.get("day_of_week", 0)  # Default to 0 if not available
            rtc.datetime((year, month, mday, week_day, hours, minutes, seconds, 0))
            print("RTC Time After Setting:", rtc.datetime())
        else:
            print("Error: Unexpected time format:", current_time)
    else:
        print("Error: The expected data is not present in the response.")

# Initialize RTC (Real-Time Clock)
rtc = RTC()
connect_wifi()  # Connect to Wi-Fi
sync_time_with_ip_geolocation_api(rtc)  # Sync time from the API

# Fibonacci time function
def fib_time(hours, minutes):
    vals = [1, 1, 2, 3, 5]
    state = [0, 0, 0, 0, 0]

    # Calculate Fibonacci representation for hours
    remaining_hours = hours
    idx = len(vals) - 1
    for v in vals[::-1]:
        if remaining_hours == 0 or idx < 0: break
        if remaining_hours >= v:
            state[idx] += 1
            remaining_hours -= v
        idx -= 1

    # Calculate Fibonacci representation for minutes (in increments of 5)
    remaining_minutes = math.floor(minutes / 5)
    idx = len(vals) - 1
    for v in vals[::-1]:
        if remaining_minutes == 0 or idx < 0: break
        if remaining_minutes >= v:
            state[idx] += 2
            remaining_minutes -= v
        idx -= 1

    return state

# Main loop to update the NeoPixel LEDs based on the current time
while True:
    current_time = rtc.datetime()
    hours = current_time[4]%12  # Get hours
    minutes = current_time[5]  # Get minutes
    print(hours,minutes)
    state = fib_time(hours, minutes)

    print(state)
    # Update NeoPixel strips based on the state
    for i in range(5):
        if state[i] == 1:  # Hour representation
            # Light up the strip corresponding to the Fibonacci value for hours
            if i == 0:  # 1 hour
                strip1.fill(red)
            elif i == 1:  # 1 hour
                strip2.fill(red)
            elif i == 2:  # 2 hours (not applicable for 9:23)
                strip3.fill(red)
            elif i == 3:  # 3 hours (not applicable for 9:23)
                strip4.fill(red)
            elif i == 4:  # 5 hours (not applicable for 9:23)
                strip5.fill(red)
        elif state[i] == 2:  # Minute representation
            # Light up the strip corresponding to the Fibonacci value for minutes
            if i == 0:  # 1 minute
                strip1.fill(blue)
            elif i == 1:  # 1 minute
                strip2.fill(blue)
            elif i == 2:  # 2 minutes
                strip3.fill(blue)
            elif i == 3:  # 3 minutes
                strip4.fill(blue)
            elif i == 4:  # 5 minutes
                strip5.fill(blue)
        elif state[i] == 3:  # Both hour and minute representation
            # Light up the strip corresponding to the Fibonacci value for both
            if i == 0:  # 1 hour and 1 minute
                strip1.fill(green)
            elif i == 1:  # 1 hour and 1 minute
                strip2.fill(green)
            elif i == 2:  # 2 hour and 2 minute
                strip3.fill(green)
            elif i == 3:  # 3 hour and 3 minute
                strip4.fill(green)
            elif i == 4:  # 5 hour and 5 minute
                strip5.fill(green)
        else:  # Not used
            if i == 0:
                strip1.fill(white)
            elif i == 1:
                strip2.fill(white)
            elif i == 2:
                strip3.fill(white)
            elif i == 3:
                strip4.fill(white)
            elif i == 4:
                strip5.fill(white)

        # Show the updates
    strip1.show()
    strip2.show()
    strip3.show()
    strip4.show()
    strip5.show()
    utime.sleep(1)
config.json
You will need to update the following config.json file with your Wifi ssid and password, change the date_time_api to your key given by IP Geolocation, and update the time_zone
{
    "ssid": "Open_Internet",
    "ssid_password": "25802580",
    "query_interval_sec": 120,
    "date_time_api": "bf681acbba0d41ce97f85ef3582e7c82",
    "time_zone": "Asia/Shanghai",
}
Enclosure Design
The enclosure was designed in Fusion360. The enclosure consist of three main parts. The main body which the LED bracket will be inserted which you need to solder all the LED rows and then the insert squares which will diffuse the light from the LEDs. The STL files are available here
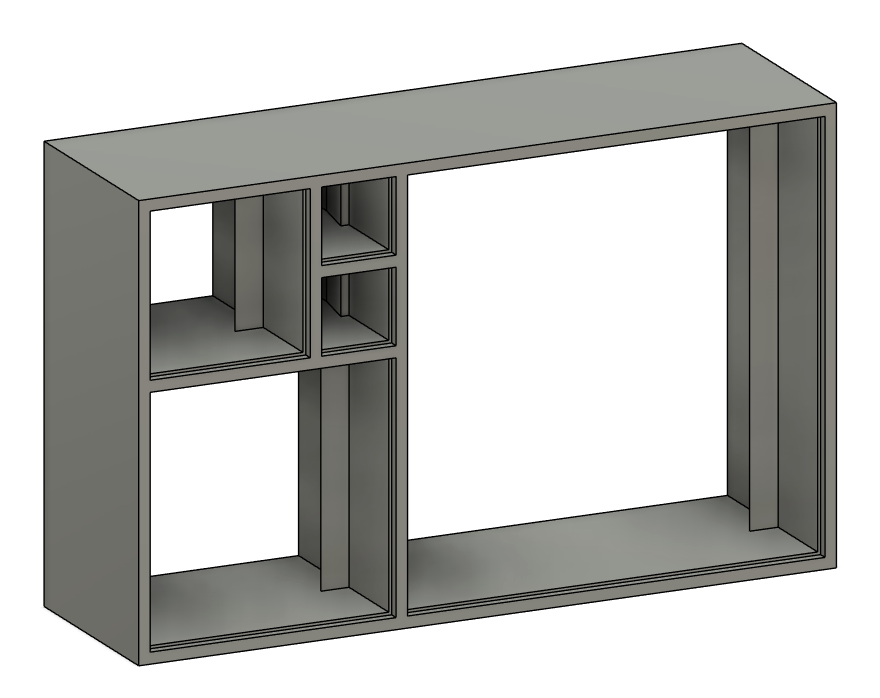

The parts does not require any supports when printing.
If anyone decides to recreate this project and comes up with an improved design for the case, please feel free to share it with me. I would love to see what you create!
Conclusion
The enclosure still needs to be updated as it does not have a back cover yet lol. So future plans is to make a version which will look more like golden ratio, and use LEDs connected on PCB.