Binary Clock / Weather Monitor
YouTube Video
Introduction
Welcome to this tutorial on creating a Binary Clock and Weather monitor using the Raspberry Pi Pico W. This tutorial is broken into two parts. The first part will focus on building a prototype on breadboard and second part will focus on creating a custom PCB with a 3D printed enclosure. The project will use the openweater.org API and worldtime clock API to collect the time and weather data.
Components - Prototype
The following is the list of components needed:
| Component | Quantity |
|---|---|
| Raspberry Pi Pico W | 1 |
| Micro USB Cable | 1 |
| Breadboard | 1 |
| Wires | Several |
| Resistor | 8 (330Ω) |
| Resistor | 5 (1KΩ) |
| LED Red | 8 |
| LED Blue | 5 |
| OLED1366 | 1 |
Schematic Diagram
The Fritzing diagram is shown below, since we have limited space on the breadboard we will just display hours and minutes in binary.
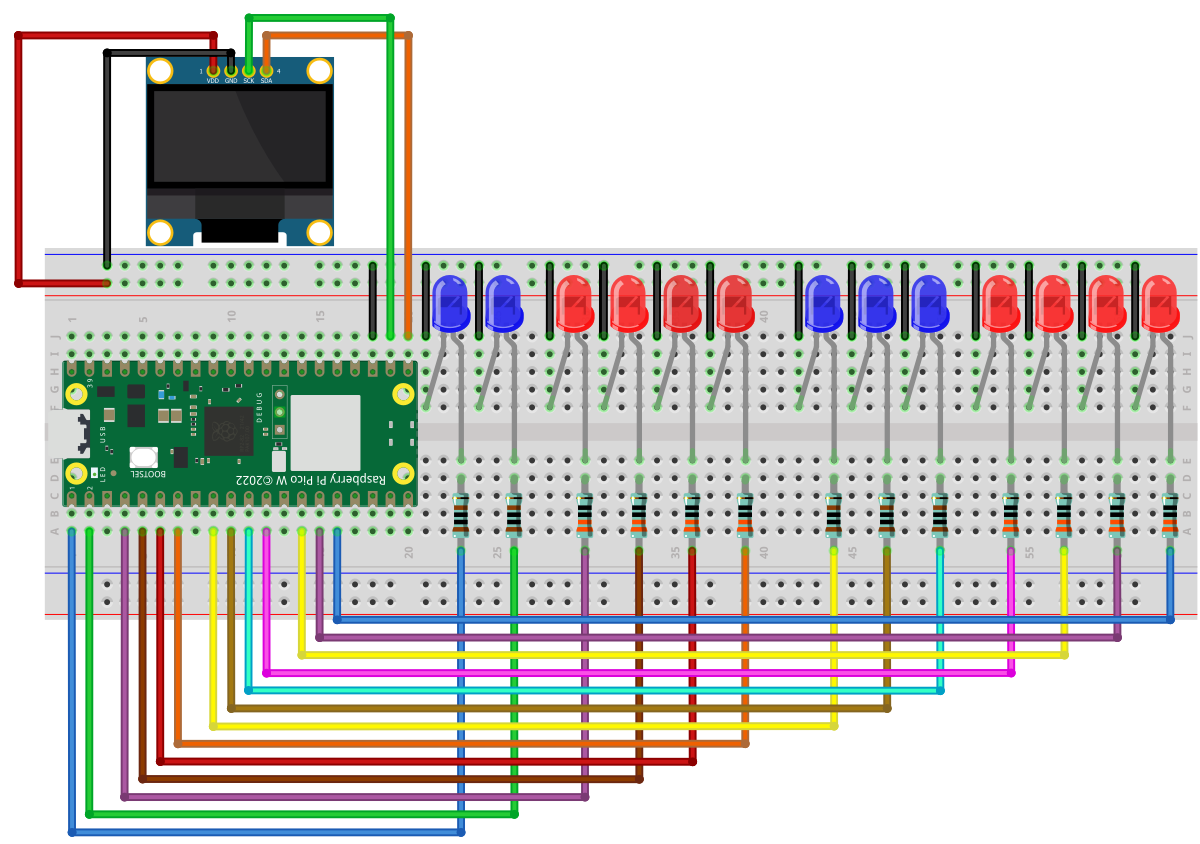
An important note when making the connections check the pins on the OLED display as some modules the GND and VCC pins are changed.
Code
You are going to need 4 files for this project
- config.json: In this file we will store all our private information, Wifi-Password, API Key and our city and country code.
- ssd1306.py: The library for controlling the ssd1306 OLED display
- urequests.py: Connecting the Pico W to the internet to use API to collect data
- main.py: The main program that will run on boot when the Pico is powered.
You can download the code using the following link, or copy it from this webpage below.
json
{

    "ssid": "Open_Internet",
    "ssid_password": "25802580",
    "query_interval_sec": 120,
    "weather_api_key": "ce54c4b03cfc0bd0fc037188def2d98e",
    "city": "Qingdao",
    "country_code": "CN",
    "date_time_api": "01bf0795f82e4e37bdd6fa163525131e",
    "time_zone": "Asia/Shanghai",
}
ssd1306.py
# MicroPython SSD1306 OLED driver, I2C and SPI interfaces

from micropython import const
import framebuf

# register definitions
SET_CONTRAST = const(0x81)
SET_ENTIRE_ON = const(0xA4)
SET_NORM_INV = const(0xA6)
SET_DISP = const(0xAE)
SET_MEM_ADDR = const(0x20)
SET_COL_ADDR = const(0x21)
SET_PAGE_ADDR = const(0x22)
SET_DISP_START_LINE = const(0x40)
SET_SEG_REMAP = const(0xA0)
SET_MUX_RATIO = const(0xA8)
SET_IREF_SELECT = const(0xAD)
SET_COM_OUT_DIR = const(0xC0)
SET_DISP_OFFSET = const(0xD3)
SET_COM_PIN_CFG = const(0xDA)
SET_DISP_CLK_DIV = const(0xD5)
SET_PRECHARGE = const(0xD9)
SET_VCOM_DESEL = const(0xDB)
SET_CHARGE_PUMP = const(0x8D)

# Subclassing FrameBuffer provides support for graphics primitives
# http://docs.micropython.org/en/latest/pyboard/library/framebuf.html
class SSD1306(framebuf.FrameBuffer):
    def __init__(self, width, height, external_vcc):
        self.width = width
        self.height = height
        self.external_vcc = external_vcc
        self.pages = self.height // 8
        self.buffer = bytearray(self.pages * self.width)
        super().__init__(self.buffer, self.width, self.height, framebuf.MONO_VLSB)
        self.init_display()

    def init_display(self):
        for cmd in (
            SET_DISP,  # display off
            # address setting
            SET_MEM_ADDR,
            0x00,  # horizontal
            # resolution and layout
            SET_DISP_START_LINE,  # start at line 0
            SET_SEG_REMAP | 0x01,  # column addr 127 mapped to SEG0
            SET_MUX_RATIO,
            self.height - 1,
            SET_COM_OUT_DIR | 0x08,  # scan from COM[N] to COM0
            SET_DISP_OFFSET,
            0x00,
            SET_COM_PIN_CFG,
            0x02 if self.width > 2 * self.height else 0x12,
            # timing and driving scheme
            SET_DISP_CLK_DIV,
            0x80,
            SET_PRECHARGE,
            0x22 if self.external_vcc else 0xF1,
            SET_VCOM_DESEL,
            0x30,  # 0.83*Vcc
            # display
            SET_CONTRAST,
            0xFF,  # maximum
            SET_ENTIRE_ON,  # output follows RAM contents
            SET_NORM_INV,  # not inverted
            SET_IREF_SELECT,
            0x30,  # enable internal IREF during display on
            # charge pump
            SET_CHARGE_PUMP,
            0x10 if self.external_vcc else 0x14,
            SET_DISP | 0x01,  # display on
        ):  # on
            self.write_cmd(cmd)
        self.fill(0)
        self.show()

    def poweroff(self):
        self.write_cmd(SET_DISP)

    def poweron(self):
        self.write_cmd(SET_DISP | 0x01)

    def contrast(self, contrast):
        self.write_cmd(SET_CONTRAST)
        self.write_cmd(contrast)

    def invert(self, invert):
        self.write_cmd(SET_NORM_INV | (invert & 1))

    def rotate(self, rotate):
        self.write_cmd(SET_COM_OUT_DIR | ((rotate & 1) << 3))
        self.write_cmd(SET_SEG_REMAP | (rotate & 1))

    def show(self):
        x0 = 0
        x1 = self.width - 1
        if self.width != 128:
            # narrow displays use centred columns
            col_offset = (128 - self.width) // 2
            x0 += col_offset
            x1 += col_offset
        self.write_cmd(SET_COL_ADDR)
        self.write_cmd(x0)
        self.write_cmd(x1)
        self.write_cmd(SET_PAGE_ADDR)
        self.write_cmd(0)
        self.write_cmd(self.pages - 1)
        self.write_data(self.buffer)


class SSD1306_I2C(SSD1306):
    def __init__(self, width, height, i2c, addr=0x3C, external_vcc=False):
        self.i2c = i2c
        self.addr = addr
        self.temp = bytearray(2)
        self.write_list = [b"\x40", None]  # Co=0, D/C#=1
        super().__init__(width, height, external_vcc)

    def write_cmd(self, cmd):
        self.temp[0] = 0x80  # Co=1, D/C#=0
        self.temp[1] = cmd
        self.i2c.writeto(self.addr, self.temp)

    def write_data(self, buf):
        self.write_list[1] = buf
        self.i2c.writevto(self.addr, self.write_list)


class SSD1306_SPI(SSD1306):
    def __init__(self, width, height, spi, dc, res, cs, external_vcc=False):
        self.rate = 10 * 1024 * 1024
        dc.init(dc.OUT, value=0)
        res.init(res.OUT, value=0)
        cs.init(cs.OUT, value=1)
        self.spi = spi
        self.dc = dc
        self.res = res
        self.cs = cs
        import time

        self.res(1)
        time.sleep_ms(1)
        self.res(0)
        time.sleep_ms(10)
        self.res(1)
        super().__init__(width, height, external_vcc)

    def write_cmd(self, cmd):
        self.spi.init(baudrate=self.rate, polarity=0, phase=0)
        self.cs(1)
        self.dc(0)
        self.cs(0)
        self.spi.write(bytearray([cmd]))
        self.cs(1)

    def write_data(self, buf):
        self.spi.init(baudrate=self.rate, polarity=0, phase=0)
        self.cs(1)
        self.dc(1)
        self.cs(0)
        self.spi.write(buf)
        self.cs(1)
urequests.py
import usocket

class Response:

    def __init__(self, f):
        self.raw = f
        self.encoding = "utf-8"
        self._cached = None

    def close(self):
        if self.raw:
            self.raw.close()
            self.raw = None
        self._cached = None

    @property
    def content(self):
        if self._cached is None:
            try:
                self._cached = self.raw.read()
            finally:
                self.raw.close()
                self.raw = None
        return self._cached

    @property
    def text(self):
        return str(self.content, self.encoding)

    def json(self):
        import ujson
        return ujson.loads(self.content)


def request(method, url, data=None, json=None, headers={}, stream=None):
    try:
        proto, dummy, host, path = url.split("/", 3)
    except ValueError:
        proto, dummy, host = url.split("/", 2)
        path = ""
    if proto == "http:":
        port = 80
    elif proto == "https:":
        import ussl
        port = 443
    else:
        raise ValueError("Unsupported protocol: " + proto)

    if ":" in host:
        host, port = host.split(":", 1)
        port = int(port)

    ai = usocket.getaddrinfo(host, port, 0, usocket.SOCK_STREAM)

    try:
        ai = ai[0]
    except:
        print("Count not resolve getaddrinfo for {} {}".format(host,port))

    s = usocket.socket(ai[0], ai[1], ai[2])
    try:
        s.connect(ai[-1])
        if proto == "https:":
            s = ussl.wrap_socket(s, server_hostname=host)
        s.write(b"%s /%s HTTP/1.0\r\n" % (method, path))
        if not "Host" in headers:
            s.write(b"Host: %s\r\n" % host)
        # Iterate over keys to avoid tuple alloc
        for k in headers:
            s.write(k)
            s.write(b": ")
            s.write(headers[k])
            s.write(b"\r\n")
        if json is not None:
            assert data is None
            import ujson
            data = ujson.dumps(json)
            s.write(b"Content-Type: application/json\r\n")
        if data:
            s.write(b"Content-Length: %d\r\n" % len(data))
        s.write(b"\r\n")
        if data:
            s.write(data)

        l = s.readline()
        #print(l)
        l = l.split(None, 2)
        status = int(l[1])
        reason = ""
        if len(l) > 2:
            reason = l[2].rstrip()
        while True:
            l = s.readline()
            if not l or l == b"\r\n":
                break
            #print(l)
            if l.startswith(b"Transfer-Encoding:"):
                if b"chunked" in l:
                    raise ValueError("Unsupported " + l)
            elif l.startswith(b"Location:") and not 200 <= status <= 299:
                raise NotImplementedError("Redirects not yet supported")
    except OSError:
        s.close()
        raise

    resp = Response(s)
    resp.status_code = status
    resp.reason = reason
    return resp


def head(url, **kw):
    return request("HEAD", url, **kw)

def get(url, **kw):
    return request("GET", url, **kw)

def post(url, **kw):
    return request("POST", url, **kw)

def put(url, **kw):
    return request("PUT", url, **kw)

def patch(url, **kw):
    return request("PATCH", url, **kw)

def delete(url, **kw):
    return request("DELETE", url, **kw)
main.py
import utime
from machine import Pin, I2C, RTC
import json
import urequests
import network
from ssd1306 import SSD1306_I2C

# Load configuration
with open('config.json') as f:
    config = json.load(f)

# Check config.json has updated credentials
if config['ssid'] == 'Enter_Wifi_SSID':
    raise ValueError("config.json has not been updated with your unique keys and data")

# Your OpenWeatherMap API details and ipgeolocation
weather_api_key = config['weather_api_key']
city = config['city']
country_code = config['country_code']
date_time_api = config['date_time_api']
timezone = config['time_zone']

# Create WiFi connection and turn it on
wlan = network.WLAN(network.STA_IF)
wlan.active(True)

# Connect to WiFi router
print("Connecting to WiFi:", config['ssid'])
wlan.connect(config['ssid'], config['ssid_password'])

# Wait until WiFi is connected
while not wlan.isconnected():
    utime.sleep(1)

print("Connected to Wi-Fi:", wlan.ifconfig())

# Function to sync time with IP Geolocation API
def sync_time_with_ip_geolocation_api(rtc):
    url = f'http://api.ipgeolocation.io/timezone?apiKey={date_time_api}&tz={timezone}'
    response = urequests.get(url)
    data = response.json()

    # Print the full response to debug
    print("API Response:", data)

    if 'date_time' in data and 'timezone' in data:
        current_time = data["date_time"]
        print("Current Time String:", current_time)  # Debug print

        # Split the date and time directly from the returned format
        if " " in current_time:
            the_date, the_time = current_time.split(" ")
            year, month, mday = map(int, the_date.split("-"))
            hours, minutes, seconds = map(int, the_time.split(":"))

            week_day = data.get("day_of_week", 0)  # Default to 0 if not available
            rtc.datetime((year, month, mday, week_day, hours, minutes, seconds, 0))
            print("RTC Time After Setting:", rtc.datetime())
        else:
            print("Error: Unexpected time format:", current_time)
    else:
        print("Error: The expected data is not present in the response.")

# Function to fetch weather data
def fetch_weather():
    open_weather_map_url = f"http://api.openweathermap.org/data/2.5/weather?q={city},{country_code}&appid={weather_api_key}&units=metric"
    print("Fetching weather data from:", open_weather_map_url)

    try:
        weather_data = urequests.get(open_weather_map_url)
        if weather_data.status_code == 200:
            weather_json = weather_data.json()
            print("Weather Data:", weather_json)

            # Extracting relevant weather information
            return {
                'location': f"{weather_json['name']} - {weather_json['sys']['country']}",
                'description': weather_json['weather'][0]['main'],
                'temperature': weather_json['main']['temp'],
                'pressure': weather_json['main']['pressure'],
                'humidity': weather_json['main']['humidity'],
                'wind_speed': weather_json['wind']['speed'],
            }
        else:
            print("Weather API Error:", weather_data.status_code, weather_data.text)
    except Exception as e:
        print("An error occurred while fetching weather data:", str(e))
    return None

# Initialize RTC and sync time
rtc = RTC()

#sync_time_with_ip_geolocation_api(rtc)
# Buttons (active high, with pull-downs)
btn_next = Pin(22, Pin.IN, Pin.PULL_DOWN)   # Cycle forward
btn_prev = Pin(26, Pin.IN, Pin.PULL_DOWN)   # Cycle backward

# Global page index
current_page = 0
total_pages = 3  # (time/date, basic weather, extended weather)


# Define the GPIO pins for the LEDs
hour_pins = [Pin(pin, Pin.OUT) for pin in [1,0]]  # 2 bits for hours (0-1)
hour_pins_ext = [Pin(pin, Pin.OUT) for pin in [11,4,3,2]]  # 4 bits for hours (2-5)
minute_pins = [Pin(pin, Pin.OUT) for pin in [8,7,6]]  # 3 bits for first minute (0-7)
minute_pins_ext = [Pin(pin, Pin.OUT) for pin in [21,20,10,9]]  # 4 bits for second minute (0-9)
second_pins = [Pin(pin, Pin.OUT) for pin in [15,14,13]]  # 3 bits for first second (0-7)
second_pins_ext = [Pin(pin, Pin.OUT) for pin in [12,5,19,18]]  # 4 bits for second second (0-9)


# Function to update the LEDs based on the current time
def update_leds():
    Y, M, D, W, H, Min, S, SS = rtc.datetime()
    print("Time:", f"{H:02}:{Min:02}:{S:02}")

    # ---- Hours ----
    hour_h1 = H // 10   # Tens digit of hour (0–2)
    hour_h2 = H % 10    # Ones digit of hour (0–9)

    # Clear hour LEDs
    for pin in hour_pins:
        pin.value(0)
    for pin in hour_pins_ext:
        pin.value(0)

    # Set hour tens (2 LEDs)
    # hour_pins[0] = "2"
    # hour_pins[1] = "1"
    if hour_h1 == 2:
        hour_pins[0].value(1)
    elif hour_h1 == 1:
        hour_pins[1].value(1)
    # if hour_h1 == 0 → both off (correct for 0X hours)

    # Set hour ones (4 LEDs → binary)
    for i in range(4):
        hour_pins_ext[i].value((hour_h2 >> (3 - i)) & 1)

    # ---- Minutes ----
    minute_h1 = Min // 10   # Tens digit of minutes (0–5)
    minute_h2 = Min % 10    # Ones digit of minutes (0–9)

    for i in range(3):  # 3 bits for tens
        minute_pins[i].value((minute_h1 >> (2 - i)) & 1)
    for i in range(4):  # 4 bits for ones
        minute_pins_ext[i].value((minute_h2 >> (3 - i)) & 1)

    # ---- Seconds ----
    second_h1 = S // 10   # Tens digit of seconds (0–5)
    second_h2 = S % 10    # Ones digit of seconds (0–9)

    for i in range(3):  # 3 bits for tens
        second_pins[i].value((second_h1 >> (2 - i)) & 1)
    for i in range(4):  # 4 bits for ones
        second_pins_ext[i].value((second_h2 >> (3 - i)) & 1)


# OLED display dimensions
WIDTH = 128
HEIGHT = 64

# Initialize I2C and OLED display
i2c = I2C(0, scl=Pin(17), sda=Pin(16), freq=400000)
display = SSD1306_I2C(WIDTH, HEIGHT, i2c)

# Function to update the OLED display with weather data
def update_display(weather_data):
    display.fill(0)  # Clear the display
    display.text('NerdCave Clock', 0, 0)
    display.text('Weather Data', 0, 10)
    display.text(weather_data['location'], 0, 20)
    display.text(f'Temp: {weather_data["temperature"]} C', 0, 30)
    display.text(f'Desc: {weather_data["description"]}', 0, 40)
    display.text(f'Humidity: {weather_data["humidity"]}%', 0, 50)
    display.show()  # Update the display

# Fetch initial weather data
weather_data = fetch_weather()
if weather_data:
    update_display(weather_data)

# Loop indefinitely, updating the LEDs every second and checking for weather updates every 10 minutes
last_weather_update = utime.time()

def display_time_date():
    Y, M, D, W, H, Min, S, SS = rtc.datetime()
    display.fill(0)
    display.text("NerdCave Clock", 0, 0)
    display.text(f"{Y}-{M:02}-{D:02}", 0, 20)
    display.text(f"{H:02}:{Min:02}:{S:02}", 0, 35)
    display.show()

def display_weather_basic(weather):
    display.fill(0)
    display.text("Weather:", 0, 0)
    display.text(weather['location'], 0, 12)
    display.text(f"T: {weather['temperature']} C", 0, 24)
    display.text(weather['description'], 0, 36)
    display.text(f"Humidity: {weather['humidity']}%", 0, 48)
    display.show()

def display_weather_extended(weather):
    display.fill(0)
    display.text("Weather Ext:", 0, 0)
    display.text(f"Pressure: {weather['pressure']}", 0, 16)
    display.text(f"Wind: {weather['wind_speed']} m/s", 0, 32)
    display.text(f"Temp: {weather['temperature']} C", 0, 48)
    display.show()

def handle_buttons():
    global current_page

    if btn_next.value():  # Forward button
        current_page = (current_page + 1) % total_pages
        utime.sleep_ms(300)  # debounce

    if btn_prev.value():  # Backward button
        current_page = (current_page - 1) % total_pages
        utime.sleep_ms(300)  # debounce


last_weather_update = utime.time()

last_weather_update = utime.time()
while True:
    update_leds()
    handle_buttons()

    # Decide what to display
    if current_page == 0:
        display_time_date()
    elif current_page == 1 and weather_data:
        display_weather_basic(weather_data)
    elif current_page == 2 and weather_data:
        display_weather_extended(weather_data)

    # Refresh weather every 10 minutes
    if utime.time() - last_weather_update > 600:
        weather_data = fetch_weather()
        last_weather_update = utime.time()

    utime.sleep(1)
Code Overview:
This code overview for the project that connects to Wi-Fi, fetches weather data from OpenWeatherMap, syncs time using an IP geolocation API, and displays the current time and weather information on an OLED display while controlling LEDs to represent the time.
Importing Libraries
import utime
from machine import Pin, I2C, RTC
import json
import urequests
import network
from ssd1306 import SSD1306_I2C
Here, we import necessary libraries:
- utime for time-related functions.
- machine for pin and I2C communication.
- json for handling JSON data.
- urequests for making HTTP requests.
- network for Wi-Fi connectivity.
- ssd1306 for controlling the OLED display.
Loading Configuration
# Load configuration
with open('config.json') as f:
    config = json.load(f)

# Check config.json has updated credentials
if config['ssid'] == 'Enter_Wifi_SSID':
    raise ValueError("config.json has not been updated with your unique keys and data")
This section reads configuration settings from a config.json file, which includes Wi-Fi credentials and API keys. It raises an error if the credentials have not been updated.
Wi-Fi Connection
# Create WiFi connection and turn it on
wlan = network.WLAN(network.STA_IF)
wlan.active(True)

# Connect to WiFi router
print("Connecting to WiFi:", config['ssid'])
wlan.connect(config['ssid'], config['ssid_password'])

# Wait until WiFi is connected
while not wlan.isconnected():
    utime.sleep(1)

print("Connected to Wi-Fi:", wlan.ifconfig())
This block initializes the Wi-Fi connection using the credentials from the configuration file and waits until the connection is established.
Syncing Time with IP Geolocation API
# Function to sync time with IP Geolocation API
def sync_time_with_ip_geolocation_api(rtc):
    url = f'http://api.ipgeolocation.io/timezone?apiKey={date_time_api}&tz={timezone}'
    response = urequests.get(url)
    data = response.json()

    # Print the full response to debug
    print("API Response:", data)

    if 'date_time' in data and 'timezone' in data:
        current_time = data["date_time"]
        print("Current Time String:", current_time)  # Debug print

        # Split the date and time directly from the returned format
        if " " in current_time:
            the_date, the_time = current_time.split(" ")
            year, month, mday = map(int, the_date.split("-"))
            hours, minutes, seconds = map(int, the_time.split(":"))

            week_day = data.get("day_of_week", 0)  # Default to 0 if not available
            rtc.datetime((year, month, mday, week_day, hours, minutes, seconds, 0))
            print("RTC Time After Setting:", rtc.datetime())
        else:
            print("Error: Unexpected time format:", current_time)
    else:
        print("Error: The expected data is not present in the response.")
This function retrieves the current time from an IP geolocation API and updates the RTC (Real-Time Clock) with the received date and time.
Fetching Weather Data
# Function to fetch weather data
def fetch_weather():
    open_weather_map_url = f"http://api.openweathermap.org/data/2.5/weather?q={city},{country_code}&appid={weather_api_key}&units=metric"
    print("Fetching weather data from:", open_weather_map_url)

    try:
        weather_data = urequests.get(open_weather_map_url)
        if weather_data.status_code == 200:
            weather_json = weather_data.json()
            print("Weather Data:", weather_json)

            # Extracting relevant weather information
            return {
                'location': f"{weather_json['name']} - {weather_json['sys']['country']}",
                'description': weather_json['weather'][0]['main'],
                'temperature': weather_json['main']['temp'],
                'pressure': weather_json['main']['pressure'],
                'humidity': weather_json['main']['humidity'],
                'wind_speed': weather_json['wind']['speed'],
            }
        else:
            print("Weather API Error:", weather_data.status_code, weather_data.text)
    except Exception as e:
        print("An error occurred while fetching weather data:", str(e))
    return None
This function fetches the current weather data for a specified city using the OpenWeatherMap API. It returns relevant weather information like location, description, temperature, pressure, humidity, and wind speed.
Initializing RTC and Syncing Time
# Initialize RTC and sync time
rtc = RTC()
sync_time_with_ip_geolocation_api(rtc)
An RTC object is created, and the time is synchronized using the previously defined function.
GPIO Pin Configuration for LEDs
# Define the GPIO pins for the LEDs
hour_pins = [Pin(pin, Pin.OUT) for pin in [1, 0]]  # 2 bits for hours (0-1)
hour_pins_ext = [Pin(pin, Pin.OUT) for pin in [11, 4, 3, 2]]  # 4 bits for hours (2-5)
minute_pins = [Pin(pin, Pin.OUT) for pin in [8, 7, 6]]  # 3 bits for first minute (0-7)
minute_pins_ext = [Pin(pin, Pin.OUT) for pin in [21, 20, 10, 9]]  # 4 bits for second minute (0-9)
second_pins = [Pin(pin, Pin.OUT) for pin in [15, 14, 13]]  # 3 bits for first second (0-7)
second_pins_ext = [Pin(pin, Pin.OUT) for pin in [12, 5, 19, 18]]  # 4 bits for second second (0-9)
This section defines GPIO pins for controlling LEDs that represent the current time in binary format.
Updating LEDs Based on Current Time
# Function to update the LEDs based on the current time
def update_leds():
    Y, M, D, W, H, Min, S, SS = rtc.datetime()
    print("Time:", H, ":", Min, ":", S)

    # First hour (H1) - 2 LEDs
    hour_h1 = H // 10  # This will be 2 (for 20-23)
    hour_h2 = H % 10   # This will be 1 (for 21)

    # Clear existing values for hour LEDs
    hour_pins[0].value(0)  # First LED for H1
    hour_pins[1].value(0)  # Second LED for H1
    for i in range(4):
        hour_pins_ext[i].value(0)  # Clear all LEDs for H2

    # Set the first hour (H1)
    if hour_h1 == 2:  # This means the hour is 20-23
        hour_pins[0].value(1)  # Set first LED on for H1 (1)
        hour_pins[1].value(0)  # Set second LED on for H1 (2)
    elif hour_h1 == 1:  # This means the hour is 10-19
        hour_pins[1].value(1)  # Set second LED on for H1 (2)
    elif hour_h1 == 0 and H > 0:  # If hour is 1 (01) to 9 (09)
        hour_pins[0].value(1)  # Set first LED on for H1 (1)

    # Set the second hour (H2) using 4 LEDs
    for i in range(4):
        hour_pins_ext[i].value((hour_h2 >> (3 - i)) & 1)  # Last 4 bits for H2

    # Update minute pins
    minute_msb = Min // 10  # Tens place for minutes
    minute_lsb = Min % 10   # Ones place for minutes
    for i in range(3):
        minute_pins[i].value((minute_msb >> (2 - i)) & 1)  # 3 bits for first minute
    for i in range(4):
        minute_pins_ext[i].value((minute_lsb >> (3 - i)) & 1)  # 4 bits for second minute

    # Update second pins
    second_msb = S // 10  # Tens place for seconds
    second_lsb = S % 10   # Ones place for seconds
    for i in range(3):
        second_pins[i].value((second_msb >> (2 - i)) & 1)  # 3 bits for first second
    for i in range(4):
        second_pins_ext[i].value((second_lsb >> (3 - i)) & 1)  # 4 bits for second second
This function updates the LED states based on the current time retrieved from the RTC.
OLED Display Initialization
# OLED display dimensions
WIDTH = 128
HEIGHT = 64

# Initialize I2C and OLED display
i2c = I2C(0, scl=Pin(17), sda=Pin(16), freq=400000)
display = SSD1306_I2C(WIDTH, HEIGHT, i2c)
Here, we define the dimensions of the OLED display and initialize it using I2C communication.
Updating the OLED Display with Weather Data
# Function to update the OLED display with weather data
def update_display(weather_data):
    display.fill(0)  # Clear the display
    display.text('NerdCave Clock', 0, 0)
    display.text('Weather Data', 0, 10)
    display.text(weather_data['location'], 0, 20)
    display.text(f'Temp: {weather_data["temperature"]} C', 0, 30)
    display.text(f'Desc: {weather_data["description"]}', 0, 40)
    display.text(f'Humidity: {weather_data["humidity"]}%', 0, 50)
    display.show()  # Update the display
This function updates the OLED display with the fetched weather data, including location, temperature, description, and humidity.
Fetching Initial Weather Data
# Fetch initial weather data
weather_data = fetch_weather()
if weather_data:
    update_display(weather_data)
Here, initial weather data is fetched and displayed on the OLED screen.
Main Loop for Updating LEDs and Weather Data
# Loop indefinitely, updating the LEDs every second and checking for weather updates every 10 minutes
last_weather_update = utime.time()
while True:
    update_leds()

    # Check if 10 minutes have passed
    if utime.time() - last_weather_update > 600:  # 600 seconds = 10 minutes
        weather_data = fetch_weather()
        if weather_data:
            update_display(weather_data)  # Update the display with new weather data
            last_weather_update = utime.time()  # Reset the timer

    utime.sleep(1)
The main loop continuously updates the LEDs every second and checks for weather updates every 10 minutes, updating the display when new weather data is available.
PCB Design
The PCB was designed using EasyEDA, a free and user-friendly web-based tool that supports circuit design, simulation, and PCB layout. I like the look of having the electronics exposed, so I have placed the resistors on the top face of the PCB.
This design includes several key features:
- Two Push Buttons: These two push buttons will be used to display different data on the OLED display
- Mounting Holes: The PCB is equipped with four 3mm mounting holes, making it easy to secure within an enclosure.
- Power input Terminal: This will allow to connect 5V through DC plug or calbe depending on your needs.
PCB Top:

Order PCB (JLCPCB)
The PCB was ordered through JLCPCB. They offer great PCBs at a low cost and have promotions and coupons available throughout the year. You can sign up using here, or using the following link:
https://jlcpcb.com/?from=Nerd that will support me as a creator to keep making content that is accessible and open source at no charge to you.
Ordering the PCB is very simple:
Download the Gerber file here.
Click on Add Gerber file
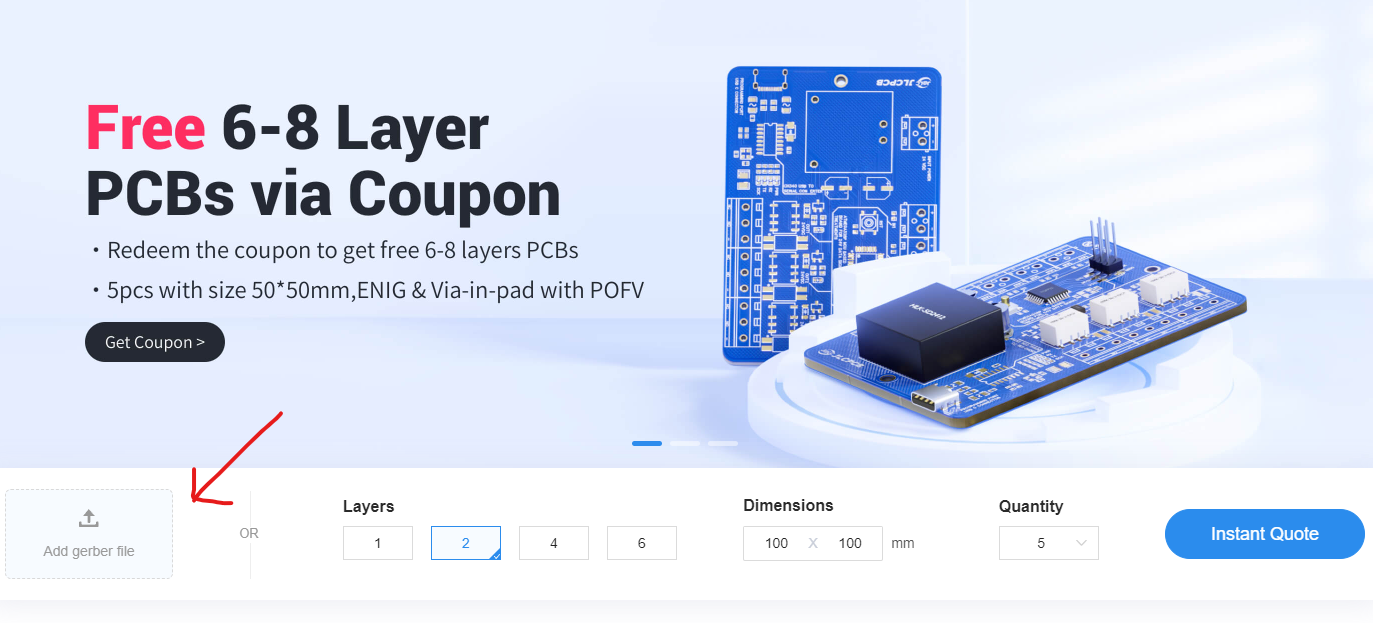
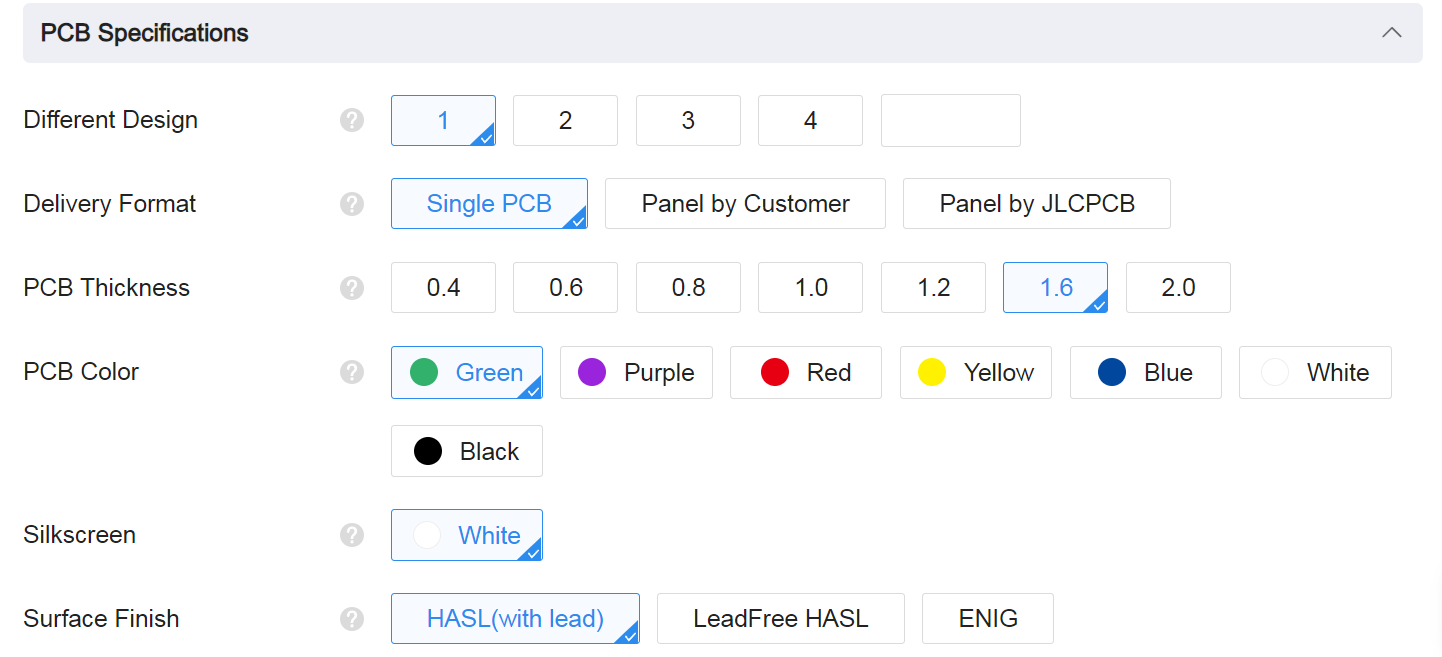
leave all the settings as default given. You might want change the PCB color which you can do here:
Enter you shipping details, save to cart
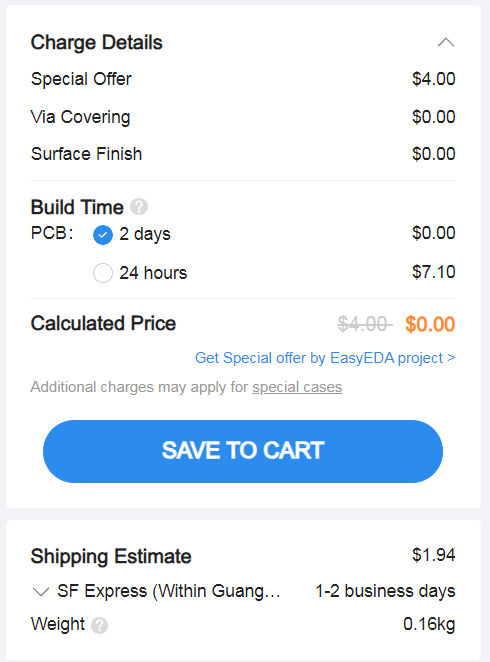
Then after a few days depending on your location you will receive your great quality PCB.
Enclosure Design:
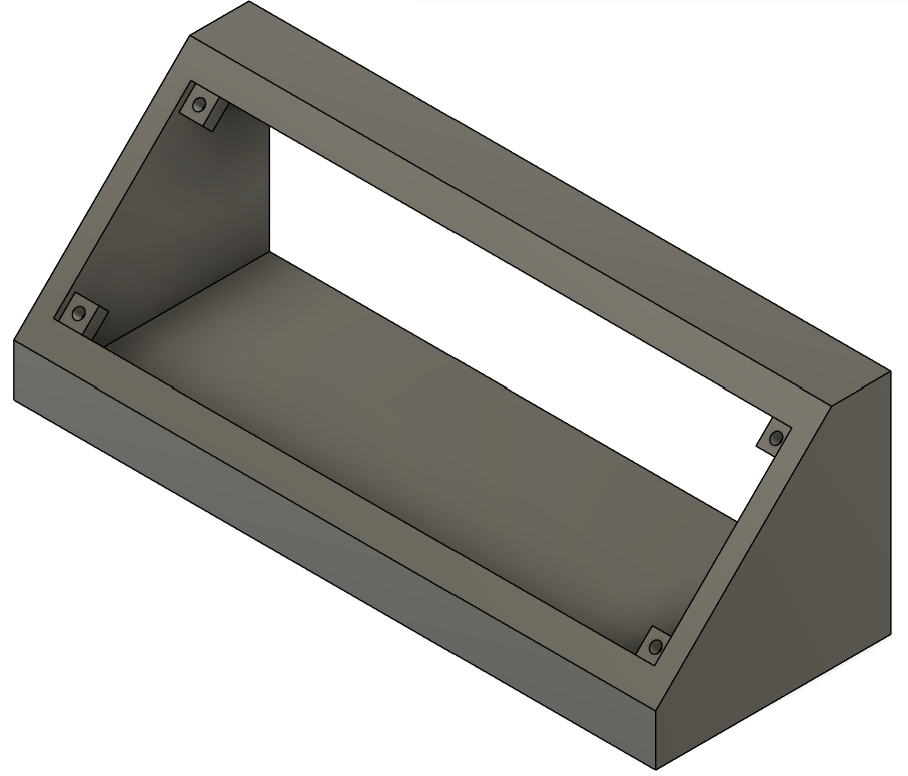
Download STL file here: download.
Conclusion:
Hope you enjoy this project.