4x4 Matrix Keypad
Introduction
A 4x4 matrix keypad gives you 16 buttons while only using 8 GPIO connections.
Instead of wiring every key separately, the keypad is arranged as:
- 4 rows
- 4 columns
When you press a key, one row connects to one column. The Pico scans the rows and checks the columns to work out which key was pressed.
Components Needed
| Component | Quantity |
|---|---|
| Raspberry Pi Pico or Pico W | 1 |
| Micro USB cable | 1 |
| Breadboard | 1 |
| Jumper wires | Several |
| 4x4 matrix keypad | 1 |
Fritzing Diagram
This connection diagram shows the keypad wiring used in this tutorial:
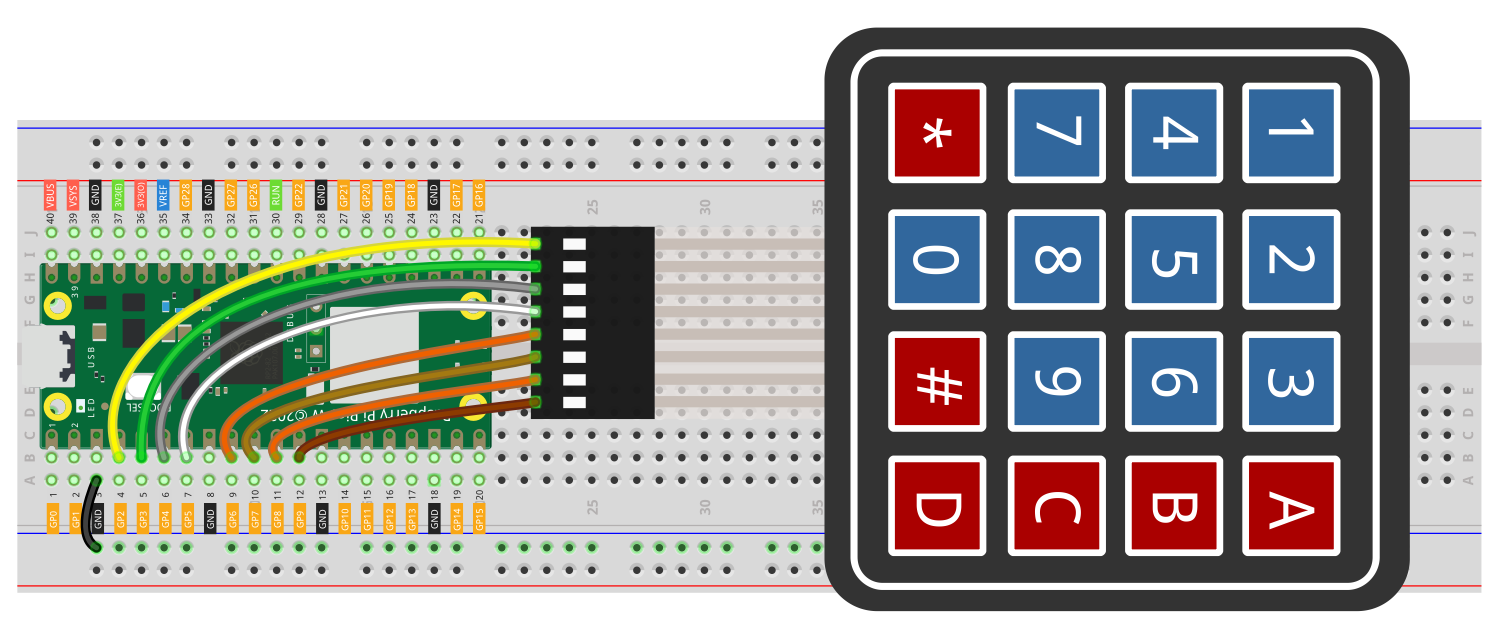
Wiring Notes
Example Pico pin mapping used here:
R1 -> GP2R2 -> GP3R3 -> GP4R4 -> GP5C1 -> GP6C2 -> GP7C3 -> GP8C4 -> GP9
Different keypad modules may label the pins differently, so check the order printed on your keypad before copying the wiring.
This tutorial uses the Pico's internal pull-up resistors on the column pins, so you do not need external resistors for the code below.
Example 1 - Read a Single Key
import machine
import utime

characters = [
    ["1", "2", "3", "A"],
    ["4", "5", "6", "B"],
    ["7", "8", "9", "C"],
    ["*", "0", "#", "D"],
]

row_pins = [2, 3, 4, 5]
col_pins = [6, 7, 8, 9]

rows = [machine.Pin(pin, machine.Pin.OUT) for pin in row_pins]
cols = [machine.Pin(pin, machine.Pin.IN, machine.Pin.PULL_UP) for pin in col_pins]

for row in rows:
    row.high()

def read_key():
    for row_index, row in enumerate(rows):
        row.low()

        for col_index, col in enumerate(cols):
            if col.value() == 0:
                row.high()
                return characters[row_index][col_index]

        row.high()

    return None

last_key = None

while True:
    key = read_key()

    if key != last_key and key is not None:
        print("Pressed:", key)

    last_key = key
    utime.sleep_ms(100)
Code Explanation
Import the modules
import machine
import utime
machine gives access to the GPIO pins. utime is used to slow the scan loop down a little.
Define the keypad layout
characters = [
    ["1", "2", "3", "A"],
    ["4", "5", "6", "B"],
    ["7", "8", "9", "C"],
    ["*", "0", "#", "D"],
]
This 2D list matches the physical keypad layout. Each row and column combination points to one key.
Set up the row and column pins
row_pins = [2, 3, 4, 5]
col_pins = [6, 7, 8, 9]
These lists define which Pico GPIO pins are connected to the keypad.
rows = [machine.Pin(pin, machine.Pin.OUT) for pin in row_pins]
cols = [machine.Pin(pin, machine.Pin.IN, machine.Pin.PULL_UP) for pin in col_pins]
The rows are outputs because the Pico drives them one at a time. The columns are inputs because the Pico reads them back to see whether a key is pressed.
The internal pull-up resistors keep the column pins high until a pressed key connects the active row to that column.
Keep the rows low by default
for row in rows:
    row.high()
This keeps every row inactive until the code scans it.
Scan the keypad
def read_key():
This function scans the keypad and returns the pressed key or keys.
for row_index, row in enumerate(rows):
    row.low()
Only one row is driven low at a time while the other rows stay high.
if col.value() == 0:
    return characters[row_index][col_index]
If one of the column inputs goes low while that row is active, the code knows exactly which button has been pressed.
row.high()
After checking that row, it is set high again and the code moves to the next row.
Avoid repeated prints
if key != last_key and key is not None:
    print("Pressed:", key)
Without this check, the same key would print over and over while you hold it down.
Example 2 - Simple Password Entry
This version stores key presses and checks the code when # is pressed.
import machine
import utime

characters = [
    ["1", "2", "3", "A"],
    ["4", "5", "6", "B"],
    ["7", "8", "9", "C"],
    ["*", "0", "#", "D"],
]

row_pins = [2, 3, 4, 5]
col_pins = [6, 7, 8, 9]

rows = [machine.Pin(pin, machine.Pin.OUT) for pin in row_pins]
cols = [machine.Pin(pin, machine.Pin.IN, machine.Pin.PULL_UP) for pin in col_pins]

for row in rows:
    row.high()

password = "1234"
entered = ""

def read_key():
    for row_index, row in enumerate(rows):
        row.low()

        for col_index, col in enumerate(cols):
            if col.value() == 0:
                row.high()
                return characters[row_index][col_index]

        row.high()

    return None

last_key = None

while True:
    key = read_key()

    if key != last_key and key is not None:
        print("Pressed:", key)

        if key == "*":
            entered = ""
            print("Cleared")
        elif key == "#":
            if entered == password:
                print("Access granted")
            else:
                print("Access denied")
            entered = ""
        else:
            entered += key
            print("Current:", entered)

    last_key = key
    utime.sleep_ms(100)
Common Problems
No key presses are detected
- check the row and column order on your keypad
- make sure the Pico and keypad share ground
- confirm the GPIO numbers in your code match the wiring
- make sure the column pins use
machine.Pin.PULL_UP
The wrong characters are printed
That usually means the keypad pin order is different from the characters layout or the row and column wires are connected in a different order.
A key keeps repeating
That can happen if you remove the last_key check. Keep a short delay and only print when the value changes.
Some keys work and others do not
- recheck the jumper wires
- make sure each row and column connection is seated properly
- test the keypad with a simpler sketch that prints every detected key